Blog https://tranduythanh.com/
Chào các bạn đọc
Các bài viết sắp tới sẽ được viết trên trang https://tranduythanh.com/
Tui đang sắp xếp thời gian để viết các bài về máy học, khai phá dữ liệu. Hi vọng sẽ tổng hợp được kiến thức, giúp các bạn hiểu được cơ chế hoạt động và áp dụng được vào công việc thực tế.
Hiện nay Tui đang bận một số công việc, Tui sẽ ráng sắp xếp trong thời gian tới để biên soạn.
Các Mô Hình Máy Học khai phá dữ liệu
Tui có build 3 mô hình máy học để khai phá dữ liệu, Tui đã xuất bản lên hệ thống Nuget của Microsoft, các bạn có thể tham chiếu tới sử dụng, có đầy đủ mã lệnh minh họa, các mô hình này gồm:
🥋Mô hình SApriori https://www.nuget.org/packages/SAprioriModel/, dùng để dự báo hành vi mua hàng của khách hàng theo mùa, theo thời gian. Mô hình cung cấp 2 tập dataset để test, small dataset khoảng 37 records, large dataset khoảng hơn 172.000 records. Mô hình sẽ trả về kết quả chi tiết của các luật kết hợp, cho phép xuất kết quả ra Excel. Có source code minh họa cách sử dụng. Việc áp dụng mô hình này vào phân tích hoạt động kinh doanh sẽ đem lại nhiều hiệu quả, từ các kết quả mà các luật kết hợp trả về, ta có thể lựa chọn các phương pháp tiếp cận khách hàng cũng như kế hoạch nhập hàng tốt hơn.
![]() Mô hình máy học hoàn chỉnh “ML.RealEstate” https://www.nuget.org/packages/ML.RealEstate/ để dự báo giá nhà, Mô hình này tui đã xuất bản lên hệ thống Nuget của Microsoft, các bạn có thể tham chiếu sử dụng để viết ra ứng dụng dự báo giá nhà cho riêng mình. Trong dự án minh họa này Tui mới chỉ thu thập 2353 giao dịch nhà ở riêng lẻ của TP.HCM, dự trù 2023 Tui sẽ cập nhật dataset cho mô hình nó học lên khoảng 100.000 giao dịch để có được mô hình chất lượng tốt hơn (hàng ngày Tui đang cố gắng thu thập khoảng 300 giao dịch)
Mô hình máy học hoàn chỉnh “ML.RealEstate” https://www.nuget.org/packages/ML.RealEstate/ để dự báo giá nhà, Mô hình này tui đã xuất bản lên hệ thống Nuget của Microsoft, các bạn có thể tham chiếu sử dụng để viết ra ứng dụng dự báo giá nhà cho riêng mình. Trong dự án minh họa này Tui mới chỉ thu thập 2353 giao dịch nhà ở riêng lẻ của TP.HCM, dự trù 2023 Tui sẽ cập nhật dataset cho mô hình nó học lên khoảng 100.000 giao dịch để có được mô hình chất lượng tốt hơn (hàng ngày Tui đang cố gắng thu thập khoảng 300 giao dịch)
![]() Trong thư viện này Tui có hướng dẫn chi tiết cách lập trình và có 1 dự án mẫu cách sử dụng “ML.RealEstate”, cũng như dataset. Các bạn quan tâm có thể sử dụng.
Trong thư viện này Tui có hướng dẫn chi tiết cách lập trình và có 1 dự án mẫu cách sử dụng “ML.RealEstate”, cũng như dataset. Các bạn quan tâm có thể sử dụng.
![]() Lưu ý cần đọc các bài về máy học mà Tui đã trình bày trên blog để nắm được cơ chế trước đã: https://duythanhcse.wordpress.com/machine-learning-ml-net/
Lưu ý cần đọc các bài về máy học mà Tui đã trình bày trên blog để nắm được cơ chế trước đã: https://duythanhcse.wordpress.com/machine-learning-ml-net/
🥰Mô hình máy học “ML.Emotion” https://www.nuget.org/packages/ML.Emotion/ để phân tích cảm xúc của khách hàng từ các feedbacks của họ về dịch vụ cũng như sản phẩm. Mô hình này Tui đưa ra 3 khung cảm xúc “Blame” – trách móc , “Neutral” – trung lập và “Compliment” – Khen ngợi. Tui có cung cấp phần mềm mẫu để các bạn biết cách sử dụng mô hình này. Việc nắm bắt được cảm xúc của khách hàng nó rất quan trọng trong việc cải thiện chất lượng dịch vụ và sản phẩm, từ đó nâng cao hiệu quả kinh doanh của mình.
Bài 2-Máy học Microsoft ML.NET – Mô hình hồi quy – Dự báo giá nhà – phần 1
Ở bài 1 Tui đã giới thiệu về nền tảng máy học Microsoft ML.NET, các bạn chưa đọc thì chú ý đọc để nắm được sơ lược về nền tảng máy học này trước khi làm bài Dự báo giá nhà bằng mô hình hồi quy. Tui sẽ hướng dẫn từ cơ bản tới nâng cao để các bạn có thể tự tay viết được phần mềm dự báo giá nhà nên Tui chia ra làm nhiều phần, mỗi phần sẽ giúp các bạn hiểu lý thuyết cơ bản, áp dụng lý thuyết để lựa chọn các tình huống cụ thể nhằm xây dựng được phần mềm theo mục đích riêng. Hi vọng qua mỗi phần thì nội công của các bạn sẽ thâm hậu lên, tuy nhiên đừng có chém gió quá vì các phần mềm này nó chỉ hữu ích thực sự khi chạy trong hệ thống minh bạch, nếu hệ thống không minh bạch thì nó chỉ nên là công cụ để tham khảo thôi, chứ xí xớn là Cò nó mổ cho má nhận không ra.
Mục đích của bài này sẽ giúp các bạn sẽ nắm được các kiến thức:
- Các mô hình hồi quy trong Microsoft ML.NET
- Các lớp huấn luyện được dùng trong bài toán hồi quy
- Xây dựng được phần mềm dự báo giá nhà đơn giản bằng mô hình hồi quy
- Chuẩn bị dữ liệu và mô hình hóa dữ liệu như thế nào?
- Chia bộ dữ liệu Train-Set và Test-Set ra sao
- Chọn giải thuật để train
- Train/build mô hình
- Đánh giá mô hình
- Lưu mô hình
- Tải mô hình
- Sử dụng mô hình
Các bạn lưu ý là chuỗi các bài học này Tui tập trung vào ứng dụng cách sử dụng các thư viện chứ không tập trung giải thích lý thuyết về máy học. Nên nếu bạn chưa có kiến thức cơ bản về máy học thì phải tự trang bị.
Trong máy học thì họ chia mô hình hồi quy ra làm 2 loại: Hồi quy tuyến tính và hồi quy Logistic. Microsoft cung cấp hàng loạt các giải thuật Trainning liên quan tới 2 mô hình hồi quy này:
Các Trainers hồi quy tuyến tính
- FastTreeRegressionTrainer
- FastTreeTweedieTrainer
- FastForestRegressionTrainer
- GamRegressionTrainer
- LbfgsPoissonRegressionTrainer
- LightGbmRegressionTrainer
- OlsTrainer
- OnlineGradientDescentTrainer
- SdcaRegressionTrainer
Các Trainers hồi quy Logistic:
- LbfgsLogisticRegressionBinaryTrainer
- SdcaLogisticRegressionBinaryTrainer
- SdcaNonCalibratedBinaryTrainer
- SymbolicSgdLogisticRegressionBinaryTrainer
Đây đa phần là các Extension method, và ta cũng có thể bổ sung các Trainers nếu muốn. Các lớp này được Microsoft cung cấp, và nó sẽ còn được cập nhật nhiều hơn nữa.
Các phần của bài dự báo giá nhà sẽ đi theo mô hình mà Tui vẽ dưới này, nó gồm 7 bước (Vui lòng trích dẫn nguồn khi dùng hình này). Tui sẽ minh họa 7 bước như trong bài 1 mà Tui đã mô tả.
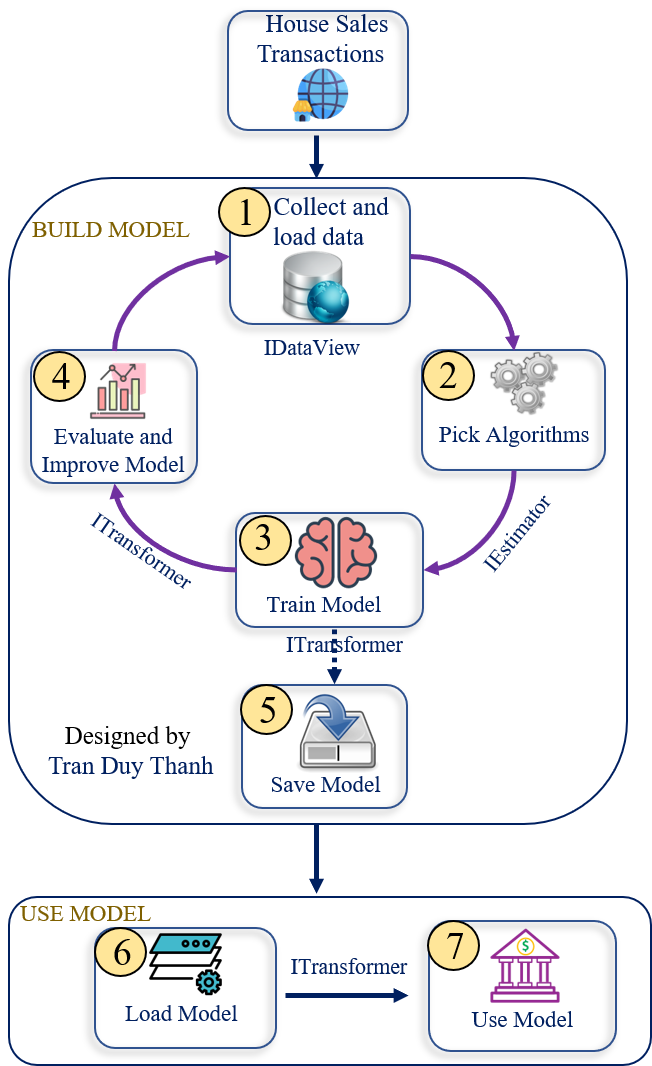
Tóm tắt 7 bước trên như sau:
Bước 1:
Collect dữ liệu và chạy tạo train – test set data
Tách dữ liệu thành 2 phần 20% cho test, 80% cho train
Bước 2:
Chọn giải thuật, rút trích đặc trưng cho tập dữ liệu
Giải thuật là lớp SdcaRegressionTrainer
Bước 3:
Tiến hành train mô hình, gọi phần Train Set (80%) để train
Bước 4:
Đánh giá mô hình, dùng độ qua R-Squared và RMSE (Root Mean Squared Error)
Nếu độ đo không thỏa yêu cầu thì quay lại bước collect dữ liệu, chọn tỉ lệ train và test phù hợp rồi build mô hình lại
Bước 5:
Lưu mô hình nếu như bước 4 thỏa yêu cầu
Bước 6:
Tải mô hình, khi sử dụng chỉ việc vào bước 6 và bước 7.
Bước 7:
Sử dụng mô hình bằng cách gọi hàm Predict để dự báo giá nhà.
Ta bắt đầu học cách sử dụng mô hình hồi quy tuyến tính, với giải thuật SdcaRegressionTrainer để làm phần 1 của dự báo giá nhà, đây là bài cơ bản để hiểu cơ chế trước, các bài sau sẽ nâng cấp dần lên.
Khởi động Visual Studio 2022, nếu chưa cài đặt thì đọc bài này.
Trong mục dự án tìm chọn Console App rồi nhấn Next
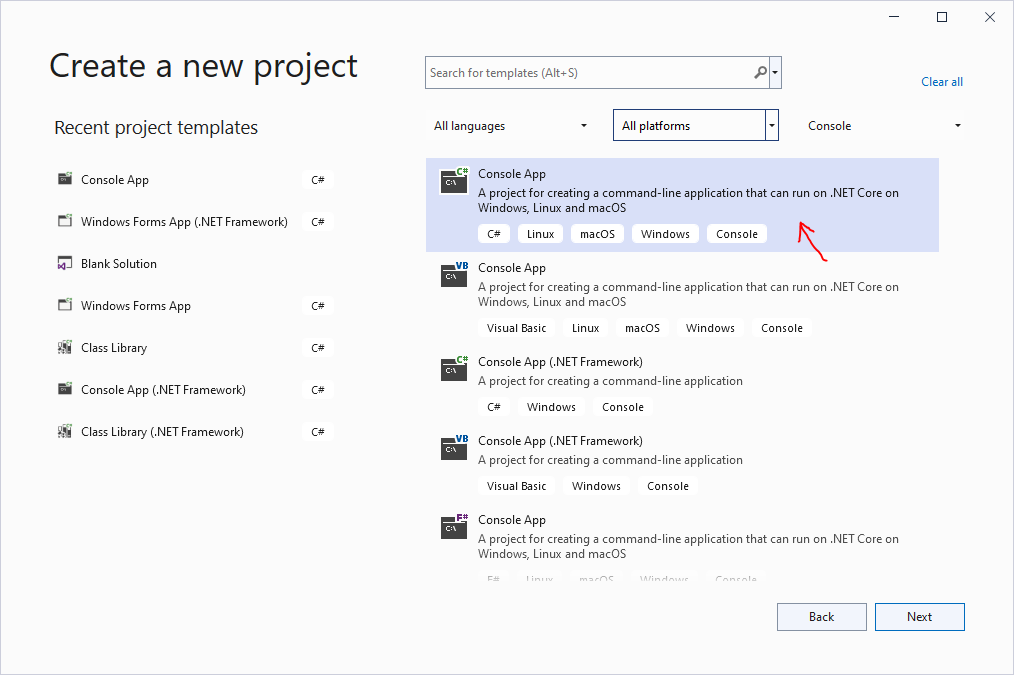
Sau khi nhấn Next:
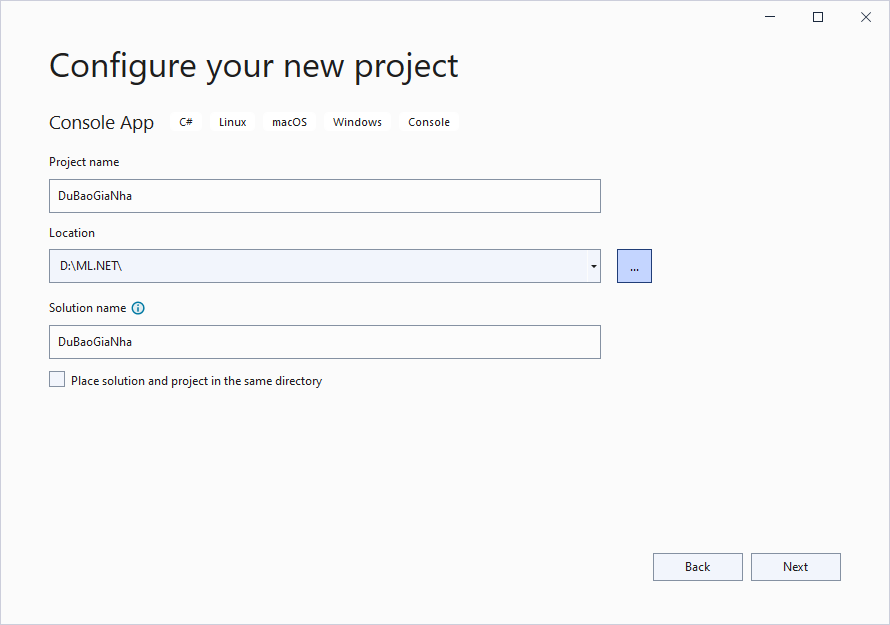
Đặt tên là “DuBaoGiaNha” rồi bấm Next

Chọn Framework .NET 6.0 (long-term support) rồi bấm Create. Dĩ nhiên khi nó ra version mới thì có thể là 7.0, 8.0….
Giao diện của dự án sẽ như hình dưới đây:
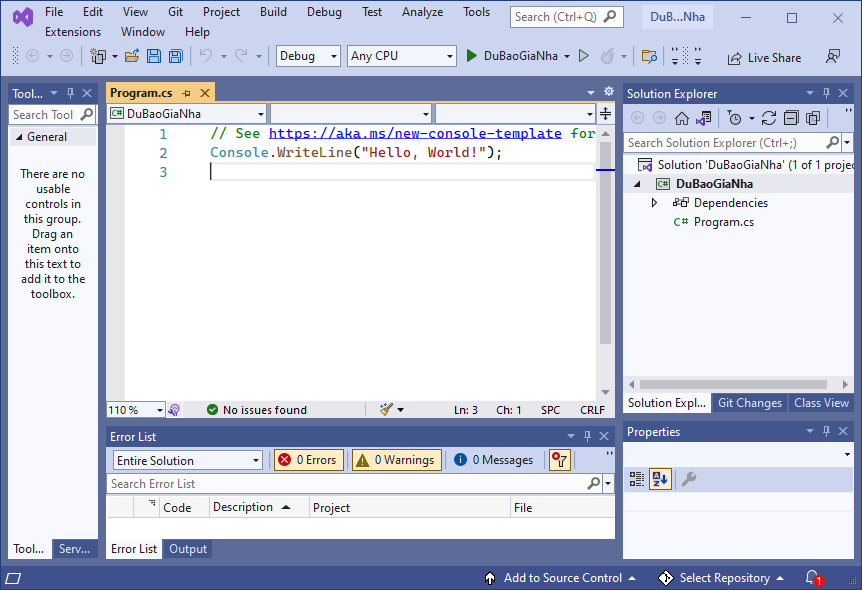
Bây giơ ta sẽ bổ sung thư viện máy học Microsoft.NET cho dự án bằng Nuget như sau:

Bấm chuột phải vào dự án chọn/ Manage Nuget Packages…
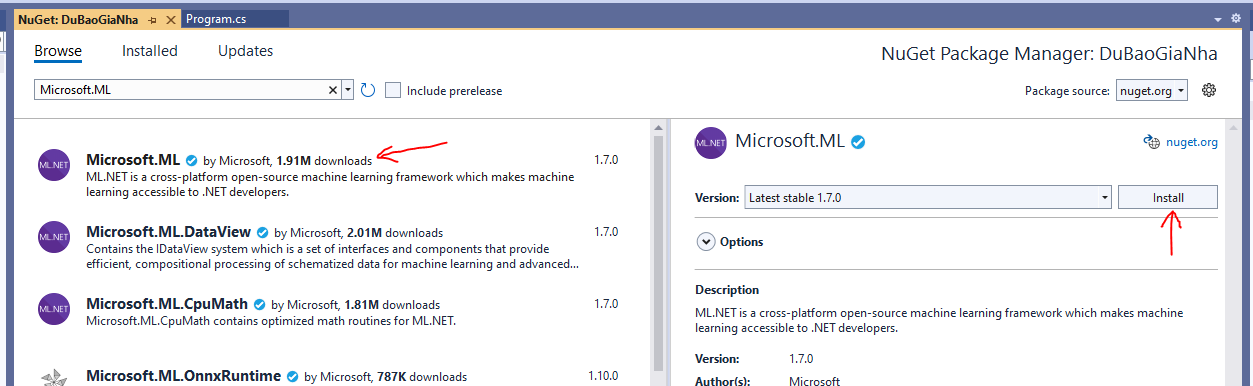
Mục Browser tìm “Microsoft.ML”, rồi bấm Install
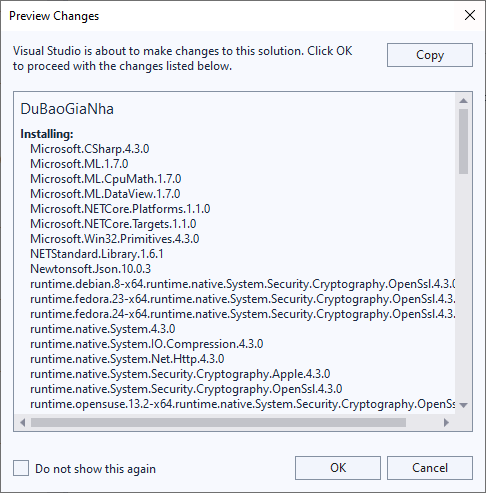
Nó hiển thị cửa sổ ở trên thì bấm OK.
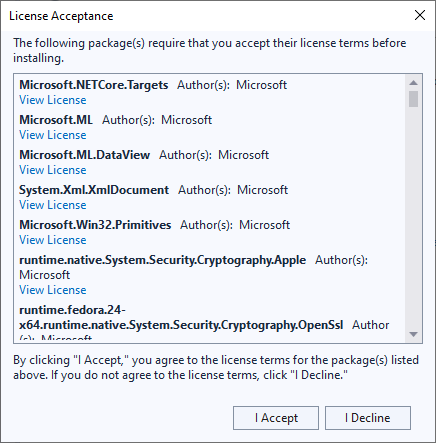
Sau đó màn hình License Acceptance cũng xuất hiện, ta nhấn “I Accept”

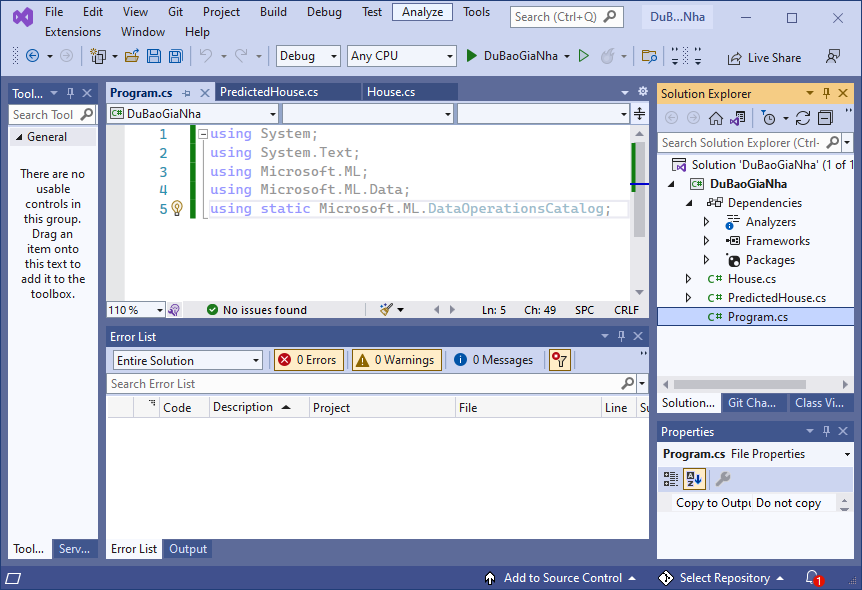
Nếu cài đặt thành công thì trong dự án mục Packages sẽ xuất hiện như hình trên.
Ta bắt đầu lập trình nhé.
Vì đây là phần 1, phần cơ bản để hiểu được cơ chế. Nên ta giả sử rằng ta có 1 tập các các nhà có các diện tích và giá của nó (tức là chỉ có 2 thuộc tính: Diện tích và Giá), bây giờ làm sao để chương trình nó dự báo được giá của một căn nhà mới khi biết được Diện tích? (Dĩ nhiên trong thực tế không có trường hợp này, vì giá 1 căn nhà nó lệ thuộc vào: Thành phố, quận, huyện, phường, đường, diện tích, mặt tiền, hẻm, đường lộ, số tầng, số phòng ngủ, phòng khách, bếp, nhà vệ sinh…. nhiều thông số khác…. và ở nước ta chắc là lệ thuộc vào Cò.).
Một lưu ý quan trọng trong máy học là “Garbage in Garbage out” tức là dữ liệu đầu vào là rác thì kết quả đầu ra cũng là rác, vì nó build mô hình sai. Như vậy khi thu thập dữ liệu ta phải luôn luôn có bước tiền xử lý. Ví dụ ta không thể cho máy nó học Giá của một căn nhà mà chủ nhà bị phá sản bị chủ nợ tới xiết bắt bán giá rẻ bèo, hay không thể cho nó học các dữ liệu là giao dịch giả được. Điều này là hiển nhiên thôi, chúng ta đi học cũng vậy, chúng ta phải học từ những điều đúng chứ?
Bây giờ ta tạo 1 lớp là House có 2 thuộc tính Diện tích và Giá Nhà như sau:

Bấm chuột phải vào dự án / chọn Add/ Chọn Class

Đặt tên Class là “House” rồi bấm Add, tiến hành viết lệnh như dưới đây cho lớp House
using System;
using System.Collections.Generic;
using System.Linq;
using System.Text;
using System.Threading.Tasks;

namespace DuBaoGiaNha
{
    internal class House
    {
        public float Size { get; set; }
        public float Price { get; set; }
    }
}
Tiếp tục lặp lại bước tạo lớp House, ta tạo 1 lớp mới tên là “PredictedHouse” như dưới đây
using System;
using System.Collections.Generic;
using System.Linq;
using System.Text;
using System.Threading.Tasks;

namespace DuBaoGiaNha
{
    internal class PredictedHouse:
    {

    }
}
Tiến hành bổ sung mã lệnh như bên dưới:
- thư viện Microsoft.ML.Data;
- thuộc tính [ColumnName(“Score”)], đó là kết quả trả về quả Predict do giải thuật ta lựa chọn trong trường hợp hồi quy tuyến tính này. Và phải viết như vậy, nó sẽ tự động Mapping kết quả trong “Score” cho thuộc tính Price
- Lưu ý dữ liệu các thuộc tính ta khai báo là float hết nhé, thuộc tính Price ta có thể đổi tên bất kỳ
using Microsoft.ML.Data;
using System;
using System.Collections.Generic;
using System.Linq;
using System.Text;
using System.Threading.Tasks;

namespace DuBaoGiaNha
{
    internal class PredictedHouse:House
    {
        [ColumnName("Score")]
        public float Price { get; set; }
    }
}
Như vậy ta có cấu trúc lớp như hình dưới đây, đồng thời vào “Program.cs” bổ sung 5 lệnh using namespace:
using System;
using System.Text;
using DuBaoGiaNha;
using Microsoft.ML;
using Microsoft.ML.Data;
using static Microsoft.ML.DataOperationsCatalog;
Trong Máy học Microsoft ML.NET tất cả đều bắt đầu bằng đối tượng MLContext, nên ta khai báo:
using System;
using System.Text;
using DuBaoGiaNha;
using Microsoft.ML;
using Microsoft.ML.Data;
using static Microsoft.ML.DataOperationsCatalog;
//xuất dấu Tiếng Việt
Console.OutputEncoding = Encoding.UTF8;
//khai báo đối tượng MLContext
MLContext mlContext = new MLContext();
Ta tiến hành 7 bước như sau:
Ngay bên dưới dòng lệnh 10 (dòng khởi tạo đối tượng MLContext), bổ sung các lệnh cho bước 1:
//Bước 1. Chuẩn bị dữ liệu và chạy tạo train - test set data
House[] houseData = {
               new House() { Size = 1.1F, Price = 1.2F },
               new House() { Size = 1.9F, Price = 2.3F },
               new House() { Size = 2.8F, Price = 3.0F },
               new House() { Size = 3.4F, Price = 3.7F },
               new House() { Size = 4.4F, Price = 7.7F },
               new House() { Size = 3.2F, Price = 3.2F },
               new House() { Size = 3.4F, Price = 3.8F },
               new House() { Size = 5.6F, Price = 8.1F },
               new House() { Size = 1.2F, Price = 1.4F },
               new House() { Size = 4.0F, Price = 6.5F },
               new House() { Size = 3.8F, Price = 5.9F }};
//load dữ liệu vài IDataView
IDataView alldata = mlContext.Data.LoadFromEnumerable(houseData);
//tách dữ liệu thành 2 phần 20% cho test, 80% cho train
TrainTestData splitDataView = mlContext.Data.TrainTestSplit(alldata, testFraction: 0.2);
Ở bước 1, Tui tạo khoảng 11 dữ liệu đầu vào, xem đó là lịch sử giao dịch
Hàm LoadFromEnumerable sẽ giúp chuyển dữ liệu đối tượng House thành IDataView, đây là interface quan trọng của Microsoft Machine Learning, nó giúp chuyển các dữ liệu đầu vào thành định dạng của ML.NET
Khi có dữ liệu rồi ta cần tách làm 2 nguồn, 1 nguồn để train mô hình, 1 nguồn để test mô hình.
Hàm TrainTestSplit sẽ giúp tách dữ liệu thành 2 nguồn theo tỉ lệnh testFraction, ở trên Tui để là 0.2 có nghĩa là lấy 20% cho test, 80% cho train. Nó sẽ trả về đối tượng TrainTestData, đối tượng này sẽ tự lưu phần Train-Set và Test-Set. (các bạn cứ tưởng tượng, Giảng Viên đưa 100 đề thi cho các bạn, bạn lấy ra 80 đề để ôn thi, sau đó bạn kiểm tra xem mình ôn bài có tốt không bằng cách lấy 20 đề kia làm luôn coi như nó là đề thật. Sau khi tới ngày thi thực tế thì Giảng Viên mới đưa 1 đề thật, nếu ôn luyện tốt thì đề thi thật sẽ được điểm cao),
Tiếp tục bổ sung lệnh cho bước 2 ở cuối:
// 2. Chọn giải thuật, rút trích đặc trưng cho tập dữ liệu
var pipeline = mlContext.Transforms.Concatenate("Features", new[] { "Size" })
    .Append(mlContext.Regression.Trainers.Sdca(labelColumnName: "Price", maximumNumberOfIterations: 100));
Ở bước 2 này ta cần rút trích đặc trưng cho dữ liệu, trong trường hợp này Căn nhà chỉ có đầu vào là Size (diện tích), nếu nó có nhiều thì cứ thêm vào các thuộc tính khác như là số tầng, phòng ngủ…. còn “Features” là keyword, phải viết y chang vậy.
Ở bước 2 chọn giải thuật train là Sdca (SdcaRegressionTrainer), labelColumnName được hiểu là cột mà mình cần dự báo, ở đây là cột Price (thuộc tính Price)
Nó sẽ trả về pipline (IEstimator)
Sau đó ta bổ sung lệnh cho bước 3:
// 3. Tiến hành train mô hình, gọi phần Train Set
var model = pipeline.Fit(splitDataView.TrainSet);
Ta gọi hàm Fit , truyền vào là tập dữ liệu huấn luyện , nó được lưu trong đối tượng splitDataView ở bước 1, Ta lấy phần dữ liệu huấn luyện thôi nha splitDataView.TrainSet
Kết quả của Fit nó sẽ trả về 1 model có kiểu ITransformer.
Tiếp tục bổ sung lệnh của bước 4 để đánh giá chất lượng của mô hình
//4. train mô hình xong thì phải đánh giá nó
RegressionMetrics metrics = mlContext.Regression.Evaluate(splitDataView.TestSet,
    labelColumnName: "Size", scoreColumnName: "Price");
//thông số này càng nhỏ càng tốt
Console.WriteLine("Root Mean Squared Error : " + metrics.RootMeanSquaredError);
//thông số này càng tịnh tiến tới 100% càng tốt
//trong kinh tế lượng họ cho rằng >=50% là ổn, nhưng không có nghĩa <50% là dở
//ví dụ như chứng khoán nó sẽ nhảy búa xua
Console.WriteLine("RSquared: " + metrics.RSquared);
Ở bước 4 Ta dùng 2 độ đo, R-Squared và Root Mean Squared Error
Sau khi dựa vào các độ đo này thì ta sẽ quyết định mô hình tốt hay không, nếu không tốt thì quay lại bước dữ liệu, kiểm tra xem dữ liệu có sạch sẽ và chuẩn mực không, rồi thử các trường hợp chia dữ liệu để chạy lại mô hình.
Sau khi bước 4 hoàn tất thì tiến hành viết lậnh cho bước 5 nhằm lưu mô hình này xuống ổ cứng, lưu lại để lần sau chỉ đọc ra sử dụng thôi, chứ không phải tốn thời gian với chi phí để build lại mô hình .
//5.giả sử mô hình ngon rồi thì lưu mô hình lại
mlContext.Model.Save(model, splitDataView.TrainSet.Schema, "housemodel.zip");
Như vậy mặc định nó sẽ lưu vào nơi thực thi của dự án.
Hàm Save có 3 đối số, đối số 1 là mô hình và ta muốn lưu, đối số 2 là cấu trúc của TrainSet (Schema), đối số 3 là tên mô hình được lưu xuống file, mặc định để .zip
Tiếp tục bổ sung lệnh cho bước 6:
//6. Load mô hình lên để sài
//dĩ nhiên là bước 6,7 này nó nằm riêng chỗ khác, 1->5 lưu xong thì dẹp nó đi
//khi dùng chỉ quan tâm bước 6, và 7 thôi. Nhưng vì Tui hướng dẫn để 1 lèo 1->7 cho bạn hiểu
DataViewSchema modelSchema;
// Load trained model
var modelDaLuu = mlContext.Model.Load("housemodel.zip", out modelSchema);
hàm Load sẽ có 2 đối số: Đối số 1 là tên file của mô hình mà ta lưu ở bước 5, đối số 2 là Schema là kết quả trả về loại cấu trúc của TrainSet mà ta lưu ở bước 5.
Sau khi load được mô hình thì ta tiến hành sử dụng như trong bước 7:
//7. Gọi predict để dùng mô hình xem dự báo
var input = new House() { Size = 2.5F };
var output = mlContext.Model.CreatePredictionEngine<House, PredictedHouse>(modelDaLuu).Predict(input);

Console.WriteLine("Nhà diện tích " + input.Size + " được dự đoán có giá =" + output.Price);
Ở bước 7 ta gọi CreatePredictionEngine với House là Input, PredictedHouse là output.
Truyền mồ hình vào rồi Gọi hàm Predict nó sẽ trả về một đối tượng PredictedHouse
Như vậy tới đây Tui đã trình bày xong 7 bước của bài máy học dùng Hồi quy tuyến tính để dự báo giá nhà.
Dưới đây là coding đây đủ:
using System;
using System.Text;
using DuBaoGiaNha;
using Microsoft.ML;
using Microsoft.ML.Data;
using static Microsoft.ML.DataOperationsCatalog;
//xuất dấu Tiếng Việt
Console.OutputEncoding = Encoding.UTF8;
//khai báo đối tượng MLContext
MLContext mlContext = new MLContext();
//Bước 1. Chuẩn bị dữ liệu và chạy tạo train - test set data
House[] houseData = {
               new House() { Size = 1.1F, Price = 1.2F },
               new House() { Size = 1.9F, Price = 2.3F },
               new House() { Size = 2.8F, Price = 3.0F },
               new House() { Size = 3.4F, Price = 3.7F },
               new House() { Size = 4.4F, Price = 7.7F },
               new House() { Size = 3.2F, Price = 3.2F },
               new House() { Size = 3.4F, Price = 3.8F },
               new House() { Size = 5.6F, Price = 8.1F },
               new House() { Size = 1.2F, Price = 1.4F },
               new House() { Size = 4.0F, Price = 6.5F },
               new House() { Size = 3.8F, Price = 5.9F }};
//load dữ liệu vài IDataView
IDataView alldata = mlContext.Data.LoadFromEnumerable(houseData);
//tách dữ liệu thành 2 phần 20% cho test, 80% cho train
TrainTestData splitDataView = mlContext.Data.TrainTestSplit(alldata, testFraction: 0.2);

// 2. Chọn giải thuật, rút trích đặc trưng cho tập dữ liệu
var pipeline = mlContext.Transforms.Concatenate("Features", new[] { "Size" })
    .Append(mlContext.Regression.Trainers.Sdca(labelColumnName: "Price", maximumNumberOfIterations: 100));

// 3. Tiến hành train mô hình, gọi phần Train Set
var model = pipeline.Fit(splitDataView.TrainSet);

//4. train mô hình xong thì phải đánh giá nó
RegressionMetrics metrics = mlContext.Regression.Evaluate(splitDataView.TestSet,
    labelColumnName: "Size", scoreColumnName: "Price");
//thông số này càng nhỏ càng tốt
Console.WriteLine("Root Mean Squared Error : " + metrics.RootMeanSquaredError);
//thông số này càng tịnh tiến tới 100% càng tốt
//trong kinh tế lượng họ cho rằng >=50% là ổn, nhưng không có nghĩa <50% là dở
//ví dụ như chứng khoán nó sẽ nhảy búa xua
Console.WriteLine("RSquared: " + metrics.RSquared);

//5.giả sử mô hình ngon rồi thì lưu mô hình lại
mlContext.Model.Save(model, splitDataView.TrainSet.Schema, "housemodel.zip");

//6. Load mô hình lên để sài
//dĩ nhiên là bước 6,7 này nó nằm riêng chỗ khác, 1->5 lưu xong thì dẹp nó đi
//khi dùng chỉ quan tâm bước 6, và 7 thôi. Nhưng vì Tui hướng dẫn để 1 lèo 1->7 cho bạn hiểu
DataViewSchema modelSchema;
// Load trained model
var modelDaLuu = mlContext.Model.Load("housemodel.zip", out modelSchema);

//7. Gọi predict để dùng mô hình xem dự báo
var input = new House() { Size = 2.5F };
var output = mlContext.Model.CreatePredictionEngine<House, PredictedHouse>(modelDaLuu).Predict(input);

Console.WriteLine("Nhà diện tích " + input.Size + " được dự đoán có giá =" + output.Price);
Chạy phần mềm (nhấn F5) ta có kết quả:
Root Mean Squared Error : 0.2828426113221826
RSquared: -6.999914170176103
Nhà diện tích 2.5 được dự đoán có giá =3.3304372
Bạn thử các dữ liệu khác, thay đổi tỉ lệ của Train-set, test-set để đánh giá lại chất lượng lại mô hình cũng thử Predict để xem giá của các căn nhà có thông số khác.
Như vậy các bạn đã hiểu được đầy đủ cách lập trình một bài dùng máy học với mô hình hồi quy tuyến tính để dự báo giá của một căn nhà. Ráng làm lại để hiểu thêm cách gọi cũng như cách sử dụng các thông số.
Bài sau Tui sẽ tiếp tục bài dự báo giá nhà, nhưng làm trên giao diện tương tác để các bạn dễ sử dụng hơn, với lại khi đưa cho khách hàng sử dụng thì phải có giao diện tương tác chứ đúng không?
thứ tự các bài tiếp theo gồm:
- Dự báo giá nhà dùng giao diện
- Dự báo giá nhà dùng giao diện + nạp dữ liệu từ text file
- Dự báo giá nhà dùng giao diện + nạp dữ liệu từ Json file
- Dự báo giá nhà dùng giao diện + nạp dữ liệu từ Excel
- Dự báo giá nhà dùng giao diện + nạp dữ liệu từ SQL Server
- Dự báo giá nhà với quy trình tổng hợp
Chúc các bạn thành công.
Mã nguồn của chương trình có thể tải tại đây:
https://www.mediafire.com/file/waqsthuxc97g6go/DuBaoGiaNha.rar/file
Nếu cảm thấy hữu ích thì hãy Ủng hộ Tui 1 ly cafe sữa đá lề đường
STK: 0101146302
Chủ TK: Trần Duy Thanh
Ngân Hàng: Đông Á, chi nhánh Gò Vấp
Bài 1-Giới thiệu nền tảng máy học ML.NET của Microsoft
Mục đích của bài viết này sẽ giúp các bạn nắm được các nội dung chính sau:
- ML.NET là gì?
- ML.NET hỗ trợ các bài toán nào liên quan tới Máy Học?
- Cơ chế hoạt động của ML.NET như thế nào?
- Kiến trúc lớp của ML.NET gồm những gì?
- Có những cách nào để lập trình được với ML.NET?
ML.NET là gì?
ML.NET là thư viện máy học Mã nguồn mở và chạy cross-platform(Windows, Linux, macOS) của Microsoft. Ta có thể lập trình được thư viện này trên các nền tảng như Desktop, Web, hay build các Service. Nó được đánh giá là mạnh mẽ có thể làm được những gì một số thư viện khác làm được (chẳng hạn như scikit-learn viết bằng Python) và làm được những thứ mà thư viện khác không làm được. Với việc sở hữu các nền tảng công nghệ mạnh mẽ nhất, khách hàng sẵn có trải rộng khắp thế giới nên ML.NET được kỳ vọng rất lớn sẽ tạo ra được cơn sốt về công nghệ liên quan tới máy học viết bằng C#/F# và tạo ra thị trường lao động ở phân khúc này là rất khả thi.
Theo thông tin từ hãng thì ML.NET bắt đầu khởi động từ 05/2018 và hiện nay bản chạy ổn định là 1.7.0 (tính tới 02/2022), và Microsoft cùng cộng đồng đang tiếp tục bổ sung tính năng cũng như cải tiến hiệu suất của các giải thuật.
Linh hồn của ML.NET là một mô hình học máy (machine learning model). Mô hình này chỉ định các bước cần thiết để chuyển đổi dữ liệu đầu vào của ta thành các kết quả dự đoán của mô hình, nó tùy vào giải thuật mà chúng ta lựa chọn. Với ML.NET, Ta có thể tùy chỉnh mô hình bằng cách lựa chọn các thuật toán machine learning của ML.NET (dĩ nhiên nó phải lệ thuộc vào bài toán ta muốn làm là gì để chọn giải thuật cho phù hợp) hoặc ta cũng có thể import các mô hình của TensorFlow hay ONNX đã được đào tạo trước để sử dụng. Ngoài ra ML.NET cũng cung cấp hàm cho ta lưu mô hình để tái sử dụng cũng như chia sẻ model cho cộng đồng.
Về cơ bản thì 1 bài toán Machine learning nó sẽ hoạt động như hình dưới đây (hình nguồn Microsoft):
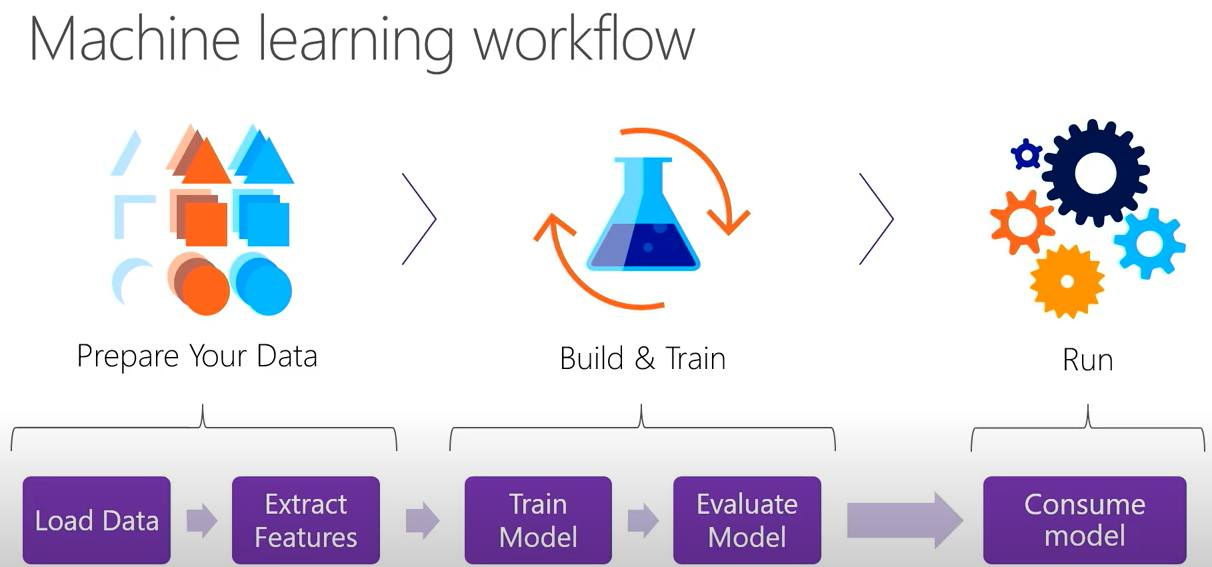
Đại khái tui tóm tắt các bước trong 1 bài toán Machine learning như sau (dĩ nhiên tùy vào kỹ thuật, kinh nghiệm của mỗi người mà ta tiến hành các bước cho riêng mình, ở đây Tui nói tổng quan):
- Bước 1 : Chuẩn bị dữ liệu, bước này cần chuẩn hóa dữ liệu do thường ban đầu các dữ liệu nó bị “ô nhiễm” tức là nó chứa các dữ liệu không đúng, dữ liệu chứa rác không đáp ứng được nhu cầu. Ví dụ như nếu dữ liệu text thì có các ký tự viết tắt, ký tự lạ, biểu tượng… Dữ liệu hình thì có các hình mờ không thể nhận dạng, dữ liệu Video thì có Video bị lỗi.
- Bước 2: Rút trích đặt trưng, cứ hiểu là bước vector hóa dữ liệu, các dữ liệu thường được mã hóa về các ma trận dạng số, bước này giờ đã dễ dàng hơn, ta chỉ cần nạp cấu trúc đối tượng và truyền các mảng thuộc tính tương ứng, ML.NET sẽ làm giúp ta điều này. Ở bước này đôi khi sẽ được làm đồng thời với việc chia dữ liệu ra làm 2 phần: Train set và Test set. Và nó tùy thuộc vào tỉ lệ lấy dữ liệu thì mô hình chạy có thể cho ra chất lượng khác nhau. Các bạn tưởng tượng có 100 đề thi thì 100 đề này là dữ liệu, nếu lấy 80 đề thi ra để luyện tập (nó gọi là Train Set), sau khi luyện tập xong ta lấy 20 đề kia ra để làm xem được hay không (20 đề đó gọi là Test set). Trong máy học có thêm khái niệm về Over-fit, nếu bạn lấy 100 đề đó ra luyện tập, sau đó lại lấy 1 đề trong 100 đề đó ra để làm bài test, thì lúc này đa phần bạn làm điểm cao nhưng mà điểm cao trong tự sướng (Over fit vì bạn tưởng nhầm là mình đã được train giỏi, nhưng là do bạn đã làm trước đó rồi, dẫn tới khi đi thi thực tế ra 1 đề lạ hoắc có thể bạn sẽ bị rớt)
- Bước 3: là tiến hành Build/Train mô hình: Tùy vào bài toán phân lớp, gom cụm… thì ta sẽ dùng các giải thuật khác nhau để build mô hình. Ví dụ như có 1 dữ liệu Comment của khách hàng, hỏi xem comment này là tích cực hay tiêu cực thì nó thuộc bài toán phân lớp, như vậy ta sẽ dùng các giải thuật phân lớp. Hay nếu có một tập dữ liệu các căn nhà và giá của nó, giờ muốn dự báo xem 1 căn nhà bất kỳ có giá bao nhiêu thì nó lại thuộc bài toán hồi quy. Bước 3 sẽ chọn đúng giải thuật để build mô hình cho đúng
- Bước 4: Đánh giá mô hình, mọi mô hình được build xong cần được đánh giá nó xem chất lượng của nó tới đâu (không có mô hình đúng hay sai chỉ có mô hình chất lượng hay không), và chất lượng hay không nó lệ thuộc vào các thang đo, ví dụ như trong các bài hồi quy thì nó các thang đo R-Squared, MSE, RMSE, MAE, và hầu như các giải thật cũng có Loss Function. R-Squared càng cao (tịnh tiến tới 100%) thì mô hình càng tốt, (dĩ nhiên với các bài về chứng khoán thì chưa chắc do nó nhảy múa, thông thường R-Squared >=50% là ổn, nhưng không có nghĩa là <50% là tệ), còn MSE, RMSE, MAE, Loss function thì thấp sẽ càng tốt. Việc quyết định chọn mô hình nào là tùy thuộc vào kinh nghiệm của người build mô hình và có tham khảo các độ đo này. Và lưu ý là ứng với mỗi loại giải thuật máy học thì độ đo sử dụng sẽ khác nhau, Tui chỉ ví dụ về giải thuật hồi quy để các bạn hiểu sơ lược vậy
- Bước 5: Sử dụng mô hình, ở bước này thường là sau khi bước 4 đánh giá xong, thì ta sẽ lưu mô hình xuống ổ cứng và có thể chia sẻ lên cloud, lưu lại để lần sau chỉ lấy ra sài thôi, không phải tốn công chạy lại (tiết kiệm thời gian và chi phí), khi khi lưu xong muốn sài thì load mô hình lên để sài. Còn sài như thế nào nó tùy thuộc vào bài toán của mình để gọi hàm Predict cho phù hợp.
ML.NET hỗ trợ các bài toán nào liên quan tới Máy Học?
- Classification: Ví dụ các bài toán về phân loại cảm xúc khách hàng tích cực hay tiêu cực từ các feedback của họ
- Clustering : Ví dụ các bài toán về gom cụm khách hàng, giả sử có N khách hàng ta cần phải gom thành k cụm, các cụm này chứa các đặc trưng khác nhau của khách hàng.
- Regression/Predict continuous values: Ví dụ các bài toán về hồi quy như dự đoán giá nhà, giá taxi …. từ một tập dữ liệu giao dịch trong quá khứ, hãy dự đoán giá của nó là gì khi có một số dự kiện mới.
- Anomaly Detection: Các bài toán về phát hiện bất thường, chẳng hạn như Phát hiện các giao dịch gian lận trong ngân hàng
- Recommendations: Các bài toán về khuyến nghị, ví dụ như làm sao quảng cáo được sản phẩm tới đúng khách hàng có nhu cầu, làm sao khi vào tiki thì nó gợi ý được các cuốn sách mà người này quan tâm.
- Time series/sequential data: các bài toán như dự báo thời tiết hay doanh số bán sản phẩm
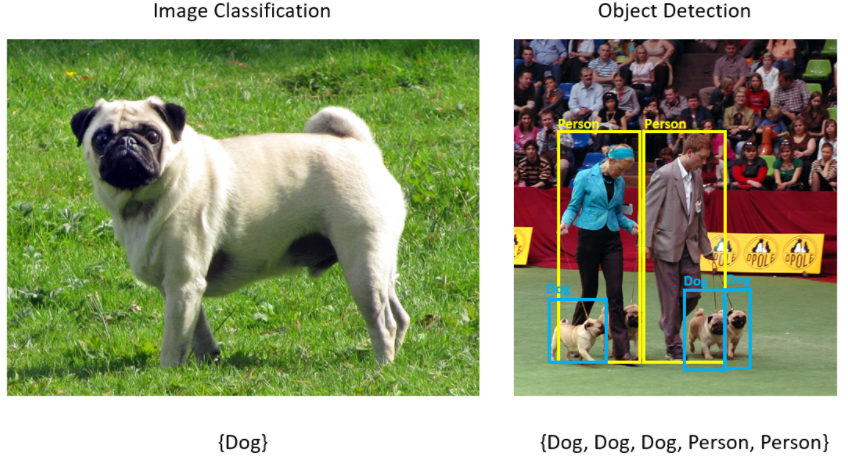
- Image classification: các bài toán về phân loại hình ảnh
- Object detection: Các bài toán về Phát hiện đối tượng
Dưới đây là hình minh họa sự khác biệt giữa Image classification và Object detection (hình nguồn Microsoft)
Cơ chế hoạt động của ML.NET như thế nào?
Ở trên Tui đã nói các bước hoạt động chung của một phần mềm liên quan máy học rồi, còn với ML.NET, khi sử dụng các thư viện của Microsoft thì cơ chế hoạt động như thế nào? về cơ bản là nó đúng với các bước cơ bản chung, Tui có vẽ lại workflow mà Microsoft cung cấp (hình gốc Tui thấy mờ và không đẹp nên Tui đã vẽ lại cho rõ và đẹp hơn).
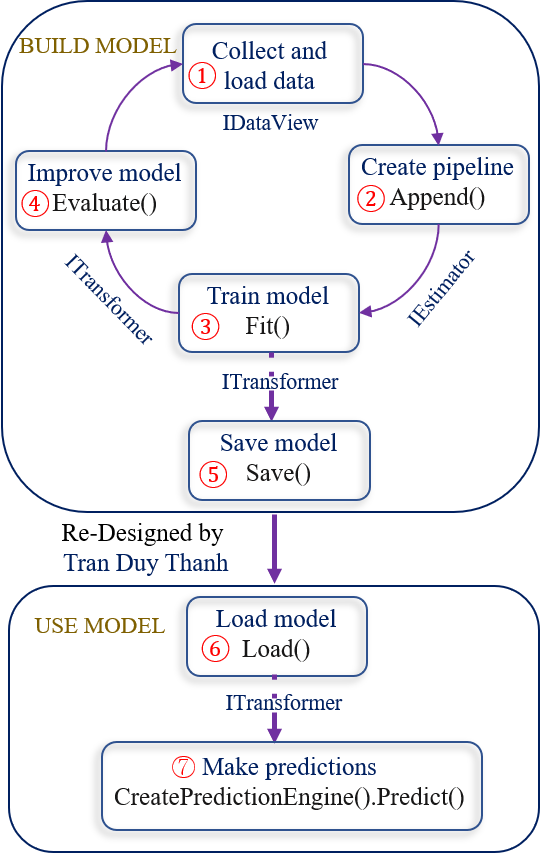
Ở hình trên như các bạn thấy thì sẽ có 7 bước hoàn chỉnh trong quá trình sử dụng thư viện máy học ML.NET của Microsoft. Tui tóm tắt lại như dưới đây(các coding chi tiết Tui sẽ trình bày ở các bài sắp tới):
- Bước 1: là bước chuẩn bị dữ liệu, ở bước này tùy vào bài toán mà ta thu thập dữ liệu khác nhau, dữ liệu sau khi thu thập phải được làm sạch/ chuẩn hóa. Vì nguyên tắc vàng các bạn phải nhớ “garbage in garbage out“, dữ liệu có thể được lưu dạng text, csv, sql server…. ứng với mỗi loại file ML.NET sẽ cung cấp các thư viện phù hợp để ta có thể tải dữ liệu đồng thời tự động mô hình hóa dữ liệu này thành mô hình hướng đối tượng. ở bước 1 thường sẽ làm công đoạn tải dữ liệu xong thì ta làm luôn công đoạn chia dữ liệu ban đầu thành 2 phần: Train set để huấn luyện mô hình (dùng cho bước 3), Test set để đánh giá mô hình (dùng cho bước 4). các dữ liệu được lưu vào IDataView object
- Bước 2: Tùy vào mục đích bài toán máy học mà ta dùng các giải thuật khác nhau, có thể dùng Binary classification, Multiclass classification, Regression…. (giải thuật nào là do mục đích nên khnog thể liệt kê hết, khi nào gặp thì tìm hiểu từng trường hợc cụ thể cho nó đỡ rắc rối). Bước này đại khái là chỉ định một quy trình hoạt động để trích xuất các đặc trưng và áp dụng thuật toán học máy cho phù hợp. Đối tượng tạo ra ở bước này là IEstimator
- Bước 3: Tiến hành train mô hình bằng cách gọi phương thức Fit() của IEstimator. kết quả của phương thức Fit() sẽ trả về một mô hình có kiểu ITransformer. Dữ liệu train là lấy Train set ở bước 1.
- Bước 4: sau khi train mô hình xong thì chưa có sài ngay (thường là vậy), vì thường các bài toán máy học nó sẽ có kết quả dự đoán sai khác với thực tế, vấn đề là sự sai khác này có được chấp nhận hay không? có được tiếp tục sử dụng và tiếp tục cải tiến mô hình nữa hay không. Do đó khi train mô hình xong thì ta cần đánh giá mô hình này chất lượng ra sao. Ta sẽ lấy Test set ở bước 1 để đánh giá. Hàm đánh này tên là Evaluate() nó nằm trong các lớp giải thuật mà ta sử dụng để train mô hình, train mô hình dùng giải thuật nào thì khi đánh giá cũng dùng giải thuật đó. Ví dụ khi train mà ta dùng MulticlassClassification để train, thì khi đánh giá cũng dùng MulticlassClassification để đánh giá. Kết quả của hàmg Evaluate() sẽ trả về một object XYZMetrics. Với XYZ là giải thuật mà ta dùng để đánh giá, ví dụ dùng MulticlassClassification để đánh giá thì nó trả về MulticlassClassificationMetrics, dùng Regression để đánh giá thì nó lại trả về kết quả là RegressionMetrics… Nên sau khi gọi hàm đánh giá xong thì dựa vào các đối tượngkết quả trả về này mà ta quyết định xem có dùng mô hình này được hay không (trong máy học không có mô hình sai chỉ có mô hình phù hợp hay không). Ví dụ như mô hình đó dự đoán giá bán căn nhà là 1 tỉ, nhưng thực tế là 5 tỉ mới đúng giá, thì ráng mà chịu ai biểu không xem chất lượng mô hình có hợp lý hay không, với lại bán 1 tỉ cũng được mà chỉ là ít tiền thôi (nhưng là kỹ sư phần mềm cùng với am hiểu về cuộc sống thì chúng ta cũng điên điên có giới hạn thôi, nhường người khác điên với). Nếu bước 4 đánh giá mô hình mà không thấy nó ổn thì quay lại bước 1.
- Bước 5: Lưu mô hình, sau khi đã đánh giá mô hình chất lượng ở bước 4 rồi thì lưu lại để lần sau chỉ tải mô hình ra sài thôi, không phải chuẩn bị lại dữ liệu và train lại (vì các bước này rất tốt chi phí). File mô hình được lưu mặc định có đuôi .zip . ta gọi phương thức Save() để lưu
- Bước 6: Load mô hình đã được lưu ở bước 5. Ví dụ hôm qua lưu xong tắt máy, hôm nay mở máy lên thì chỉ cần tải lại mô hình đã chạy thôi, hoặc nhiệm vụ của ta là build model và đánh giá mô model cho chất lượng, rồi gửi model tới team khác sử dụng, thì muốn gửi đi được phải lưu được mô hình xuống ổ cứng đã chứ. Ta gọi hàm Load() để tải mô hình. Sau khi tải nó sẽ mô hình hóa ngược lại đối tượng ITransformer
- Bước 7: là gọi hàm CreatePredictionEngine().Predict() để sử dụng mô hình nhằm tìm ra kết quả dự báo của chương trình. Truyền đối tượng ITransformer ở bước 6 vào sài thôi.
Vậy bạn nắm quy trình 7 bước trước nha. sau khi lưu rồi thì lúc sử dụng ta chỉ cần làm 2 bước đó là bước 6 và bước 7. Rất tiện lợi
Ví dụ code (hiển nhiên bạn xem để nắm cơ chế các bước Tui trình bày ở trên thôi, chứ giờ chưa cần hiểu code, Tui sẽ trình bày cách code chi tiết ở ài sau):
using System;
using System.Text;
using Microsoft.ML;
using Microsoft.ML.Data;
using static Microsoft.ML.DataOperationsCatalog;

class Program
{
    public class HouseData
    {
        public float Size { get; set; }
        public float Price { get; set; }
    }

    public class Prediction
    {
        [ColumnName("Score")]
        public float Price { get; set; }
    }

    static void Main(string[] args)
    {
        Console.OutputEncoding= Encoding.UTF8;
        MLContext mlContext = new MLContext();

        //Bước 1. Chuẩn bị dữ liệu và chạy tạo train - test set data
        HouseData[] houseData = {
               new HouseData() { Size = 1.1F, Price = 1.2F },
               new HouseData() { Size = 1.9F, Price = 2.3F },
               new HouseData() { Size = 2.8F, Price = 3.0F },
               new HouseData() { Size = 3.4F, Price = 3.7F },
               new HouseData() { Size = 4.4F, Price = 7.7F },
               new HouseData() { Size = 3.2F, Price = 3.2F },
               new HouseData() { Size = 3.4F, Price = 3.8F },
               new HouseData() { Size = 5.6F, Price = 8.1F },
               new HouseData() { Size = 1.2F, Price = 1.4F },
               new HouseData() { Size = 4.0F, Price = 6.5F },
               new HouseData() { Size = 3.8F, Price = 5.9F }};
        //load dữ liệu vài IDataView
        IDataView alldata = mlContext.Data.LoadFromEnumerable(houseData);
        //tách dữ liệu thành 2 phần 20% cho test, 80% cho train
        TrainTestData splitDataView = mlContext.Data.TrainTestSplit(alldata, testFraction: 0.2);

        // 2. Chọn giải thuật, rút trích đặc trưng cho tập dữ liệu
        var pipeline = mlContext.Transforms.Concatenate("Features", new[] { "Size" })
            .Append(mlContext.Regression.Trainers.Sdca(labelColumnName: "Price", maximumNumberOfIterations: 100));

        // 3. Tiến hành train mô hình, gọi phần Train Set
        var model = pipeline.Fit(splitDataView.TrainSet);

        //4. train mô hình xong thì phải đánh giá nó
        RegressionMetrics metrics = mlContext.Regression.Evaluate(splitDataView.TestSet,
            labelColumnName: "Size", scoreColumnName: "Price");
        //thông số này càng nhỏ càng tốt
        Console.WriteLine("Root Mean Squared Error : " + metrics.RootMeanSquaredError);
        //thông số này càng tịnh tiến tới 100% càng tốt
        //trong kinh tế lượng họ cho rằng >=50% là ổn, nhưng không có nghĩa <50% là dở, nó có thể là số âm vô cùng
        //ví dụ như chứng khoán nó sẽ nhảy búa xua
        Console.WriteLine("RSquared: " + metrics.RSquared);

        //5.giả sử mô hình ngon rồi thì lưu mô hình lại
        mlContext.Model.Save(model, splitDataView.TrainSet.Schema, "housemodel.zip");

        //6. Load mô hình lên để sài
        //dĩ nhiên là bước 6,7 này nó nằm riêng chỗ khác, 1->5 lưu xong thì dẹp nó đi
        //khi dùng chỉ quan tâm bước 6, và 7 thôi. Nhưng vì Tui hướng dẫn để 1 lèo 1->7 cho bạn hiểu
        DataViewSchema modelSchema;
        // Load trained model
        var modelDaLuu = mlContext.Model.Load("housemodel.zip", out modelSchema);

        //7. Gọi predict để dùng mô hình xem dự báo
        var input = new HouseData() { Size = 2.5F };
        var output = mlContext.Model.CreatePredictionEngine<HouseData, Prediction>(modelDaLuu).Predict(input);

        Console.WriteLine("Nhà diện tích "+ input.Size +" được dự đoán có giá ="+ output.Price);
    }
}
Kết quả chạy ta được:
Root Mean Squared Error : 0.2828426113221826
RSquared: -6.999914170176103
Nhà diện tích 2.5 được dự đoán có giá =3.3892932
Kiến trúc lớp của ML.NET gồm những gì?
Để sử dụng ML.NET ta sẽ bắt đầu với đối tượng MLContext. Đối tượng này chứa các hàm/đối tượng để tải, lưu dữ liệu, chuyển đổi dữ liệu , trình huấn luyện và các thành phần vận hành mô hình. Mỗi đối tượng sẽ có các phương thức để tạo các loại thành phần khác nhau như:
| Chức năng | Lớp sử dụng |
| Data loading and saving | DataOperationsCatalog |
| Data preparation | TransformsCatalog |
| Binary classification | BinaryClassificationCatalog |
| Multiclass classification | MulticlassClassificationCatalog |
| Anomaly detection | AnomalyDetectionCatalog |
| Clustering | ClusteringCatalog |
| Forecasting | ForecastingCatalog |
| Ranking | RankingCatalog |
| Regression | RegressionCatalog |
| Recommendation | RecommendationCatalog |
| TimeSeries | TimeSeriesCatalog |
| Model usage | ModelOperationsCatalog |
Như vậy Ta lưu ý ứng với loại chức năng khác nhau thì ta dùng các lớp cho phù hợp, dĩ nhiên cũng không quan trọng lắm chỗ này, đừng ráng nhớ nhiều làm gì mệt óc, khi nào gặp tường hợp nào thì ta cắm đầu vào trường hợp đó mà tìm hiểu thôi. Tui do đi dạy cùng với đi làm nên phải ráng biết càng nhiều càng tốt.
Có những cách nào để lập trình được với ML.NET?
Hiện ta có khoảng 3 cách để lập trình với ML.NET, chúng gồm (hình nguồn Microsoft):
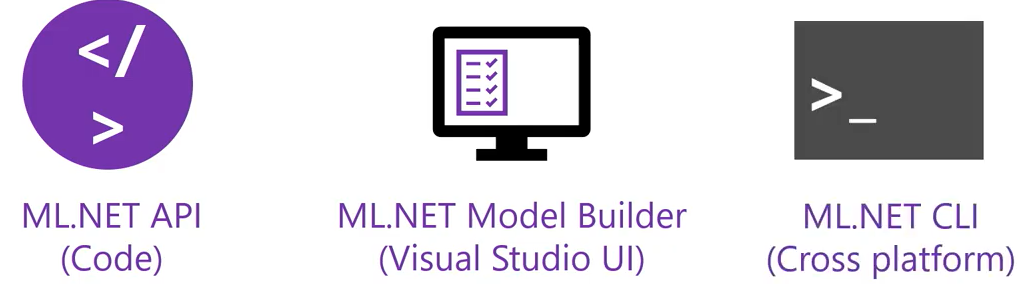
Như vậy ta có thể dùng ML.NET API (code), ML.NET Model Builder (dùng Visual Studio UI, xem bài), và ML.NET CLI (Cho cross platform)
Trong các bài hướng dẫn tui sẽ dùng củ yếu cách số 1 ML.NET API (code)
Chúc các bạn thành công.
Nếu cảm thấy hữu ích thì hãy Ủng hộ Tui 1 ly cafe sữa đá lề đường
STK: 0101146302
Chủ TK: Trần Duy Thanh
Ngân Hàng: Đông Á, chi nhánh Gò Vấp
Phân tích cảm xúc khách hàng bằng máy học ML.NET Model Builder
Như đã chém gió trong bài cài đặt Visual Studio 2022, ML.NET Model Builder là một công cụ lập trình Máy Học đang được hãng Microsoft và cộng đồng phát triển vô cùng mạnh mẽ, nó là mã nguồn mở và chạy đa nền tảng.
Trong bài này, Tui sẽ hướng dẫn các bạn chi tiết cách dùng ML.NET Model Builder để tạo một dự án phân tích cảm xúc khách hàng.
Tui tóm tắt lại 6 bước cơ bản cho một bài Machine learning dưới đây để các bạn có được mindset trước:
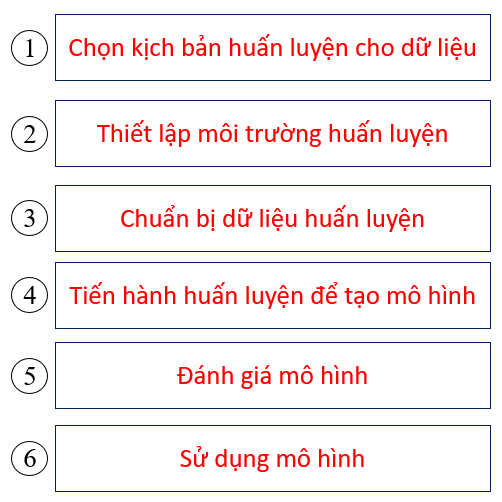
Ở Bước 1 “Chọn kịch bản huấn luyện cho dữ liệu”, tức là tùy vào mục đích mình dùng máy học để xử lý bài toán nào thì mình chọn kịch bản cho phù hợp, ví dụ: Data classification, Value prediction, Image classification, Recommendation …..Microsoft có sẵn các kịch bản này cho mình, chọn cho đúng theo nhu cầu.
Ở Bước 2, “Thiết lập môi trường huấn luyện” Ta có thể cấu hình máy Local cùi bắp vừa chạy vừa khóc ra tiếng miên hoặc sử dụng các cloud như Azure của Microsoft, Google Tensorflow…. trong bài này thì ta dùng local.
ở Bước 3, “Chuẩn bị dữ liệu huấn luyện”, là các dữ liệu có cấu trúc, được gán nhãn, nó có thể là text file, csv, SQL Server. Nó tùy thuộc vào kịch bản dữ liệu ở bước 1 mà cấu trúc dữ liệu ở bước 3 này nó sẽ khác nhau.
ở Bước 4, “Tiến hành huấn luyện để tạo mô hình”, bước này máy học sẽ tiến hành chạy xịt khói để huấn luyện dữ liệu, kết quả của quá trình này thường cho ra 4 giá trị output dưới đây:
Best accuracy: Thông số này cho thấy độ chính xác của mô hình tốt nhất mà mô hình tìm thấy. Nếu giá trị này cao có nghĩa là mô hình được dự đoán chính xác hơn trên dữ liệu thử nghiệm.
Best model: Thông số này cho ta biết thuật toán nào hoạt động tốt nhất trong quá trình chạy của Trình tạo mô hình.
Training time: Phần này cho ta biết tổng thời gian đã dành để đào tạo.
Models explored (total): Phần này cho ta biết tổng số mô hình được Model chạy trong khoảng thời gian nhất định.
Ở Bước 5 “Đánh giá mô hình”, thường thì khi huấn luyện xong ta được 1 mô hình có độ chính xác bằng bao nhiêu đó. Và ta cần thử một số dữ liệu đầu vào để đánh giá xem nó hiệu quả như thế nào. Kiểu như xem xét mô hình này có ổn để sử dụng hay không đó mà.
Cuối cùng là Bước 6, “Sử dụng mô hình”, nếu bước 5 OK thì ta sử dụng thôi. Tùy vào các hãng mà cách dùng khác nhau.
Ta bắt đầu nhé.
Lưu ý bài này là của Microsoft đã minh họa, Tui trình bày chi tiết lại hơn cho các bạn dễ hiểu và thao tác được thôi. Chứ Tui cũng kiểu gà mờ không có kiến thức nhiều lắm về máy học đâu, kiểu dạng như ở nhà trọ, đi dép Lào, chạy xe đạp và ngồi uống trà đá mà bày đặt bàn chuyện Taliban nên quản lý đất nước của họ như thế nào (hê hê, đọc cười cho vui để học cho dễ).
Mục đích Bài này là “Khi có 1 nhận xét của khách hàng về sản phẩm nào đó, hỏi nhận xét đó là tích cực hay tiêu cực?“. Ta thường nói cho nó hoa dollar “Phân tích cảm xúc”. Bài này hay, vì nó áp dụng vào kinh doanh nhằm cải thiện chất lượng dịch vụ.
Bây giờ ta tạo 1 dự án Windows App, đặt tên “CamXucApp”, chọn chính xác như dưới đây nha :

Chọn Windows Forms App như ở trên, rồi bấm nút “Next”:
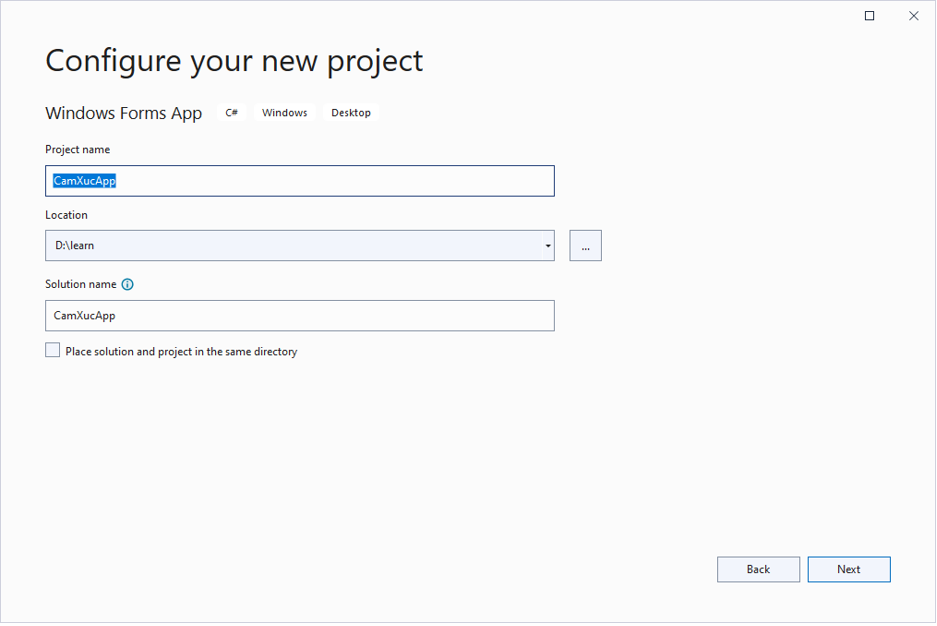
Đặt tên dự án là “CamXucApp” rồi bấm Next.

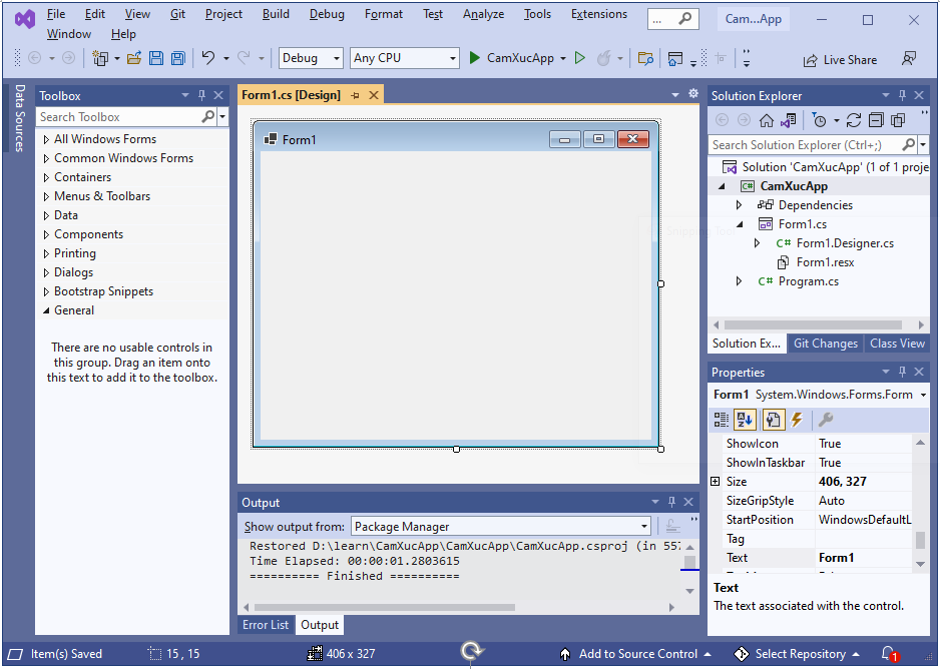
Chọn “.NET 6.0 (Long-term support)” rồi bấm Create.
Sau khi bấm Create, ta có được cấu trúc hơi bị ngon như dưới đây:
Bước tiếp theo là thêm Machine Learning vào dự án bằng cách: Bấm chuột phải vào Dự án / chọn Add/ Chọn Machine Learning Model…
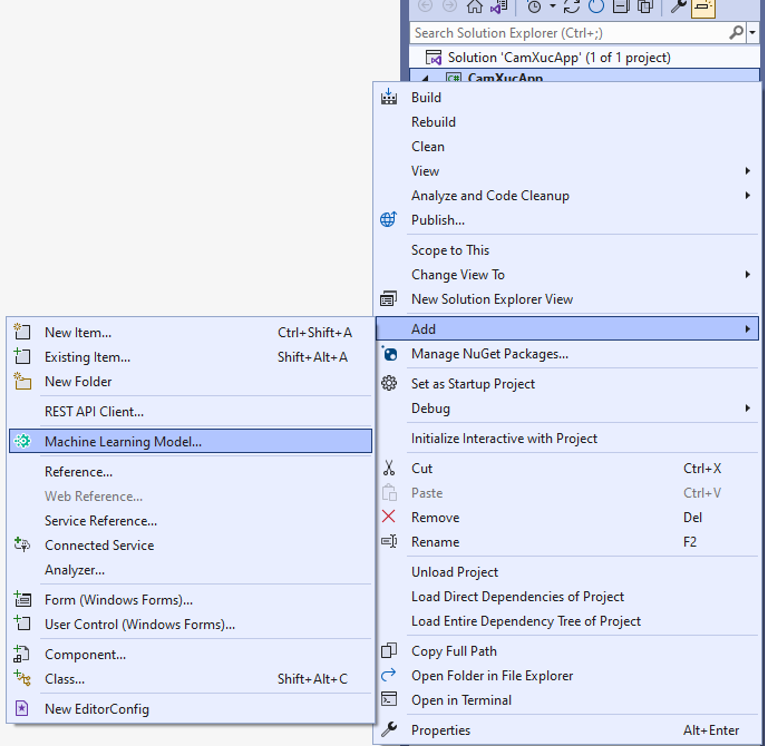
Màn hình Add New Item sẽ hiển thị ra như bên dưới, tìm tới “Machine Learning Model (ML.NET)”
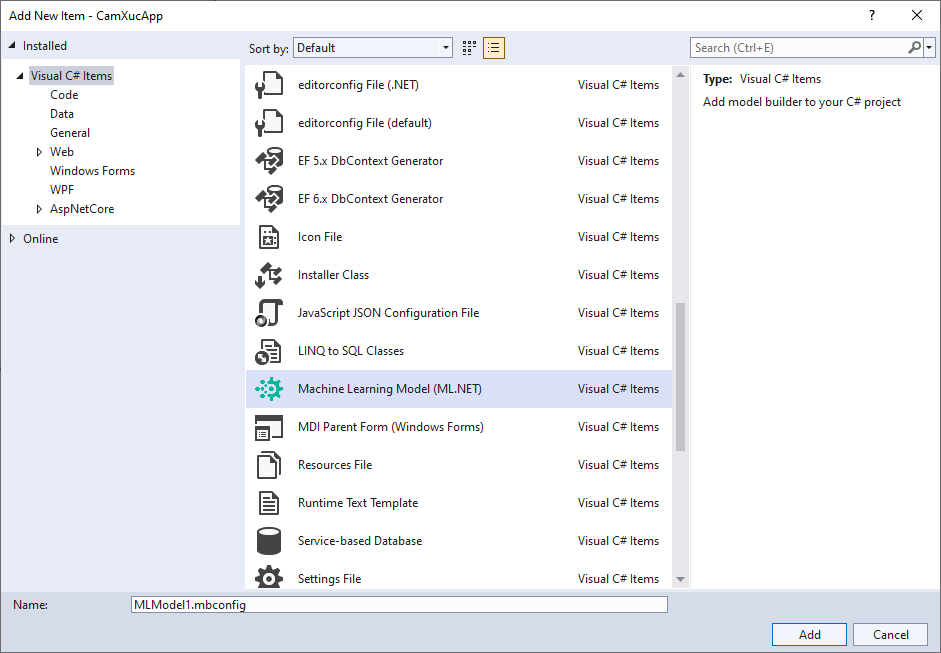
Mặc định tên nó là “MLModel1.mbconfig”, bây giờ bạn đổi tên qua “CamXucModel.mbconfig” như hình bên dưới:

Nhấn nút “Add” để tạo file mbconfig. File này chỉ đơn giản là một tệp JSON theo dõi trạng thái của giao diện người dùng.
Sau khi bấm “Add”, ta có giao diện như dưới đây:
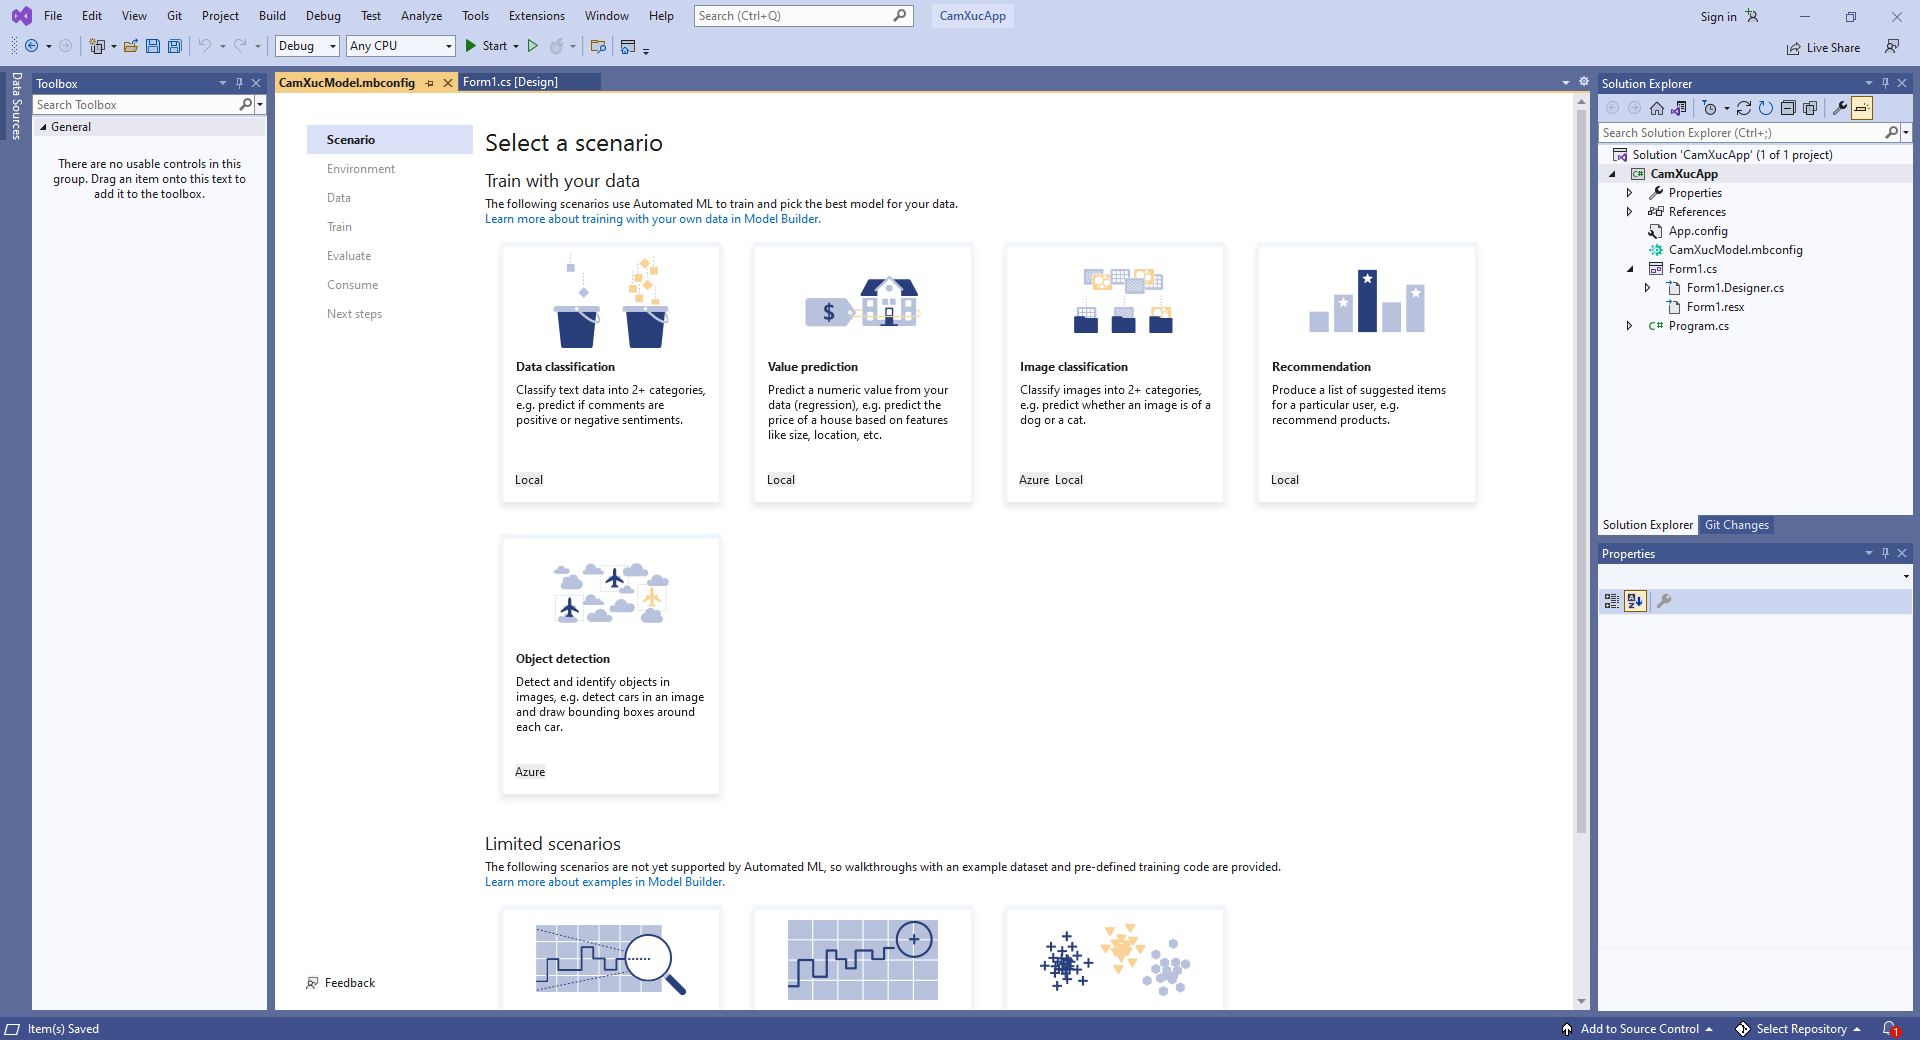

Để tạo Model thì trước tiên ta phải chọn Kịch bản.
Nó cung cấp 1 số loại kịch bản cho Data classification, Value prediction, Image classification, Recommendation…, Microsoft sẽ dùng Automated ML để train và tạo ra mô hình tốt nhất cho dữ liệu của bạn
Bài “Phân tích cảm xúc” nó cần biết là Tích cực hay tiêu cực, nên nó thuộc nhóm phân loại dữ liệu. Do đó ta chọn kịch bản cho Data classification.

Sau khi chọn Data classification. Thì ta cần chọn môi trường để train. Một số kịch bản Microsoft hỗ trợ train trên Azure và Local. Tuy nhiên với loại Data classification này thì hiện nay Microsoft mới hỗ trợ train phía Local, tương lai chắc là support cả bên Azure
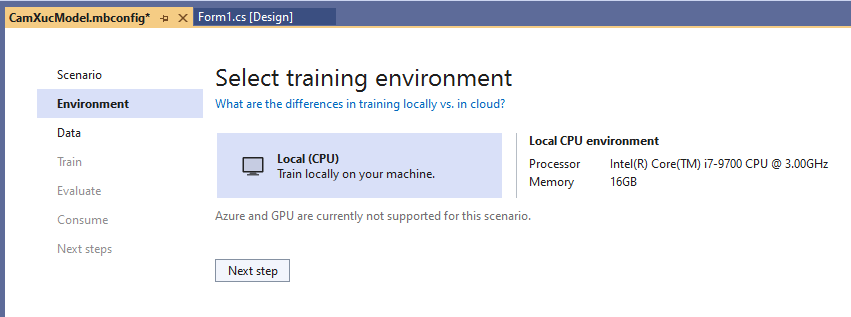
Thế thì ta chọn Local (CPU) sau đó nhấn nút “Next step” để qua mục data:

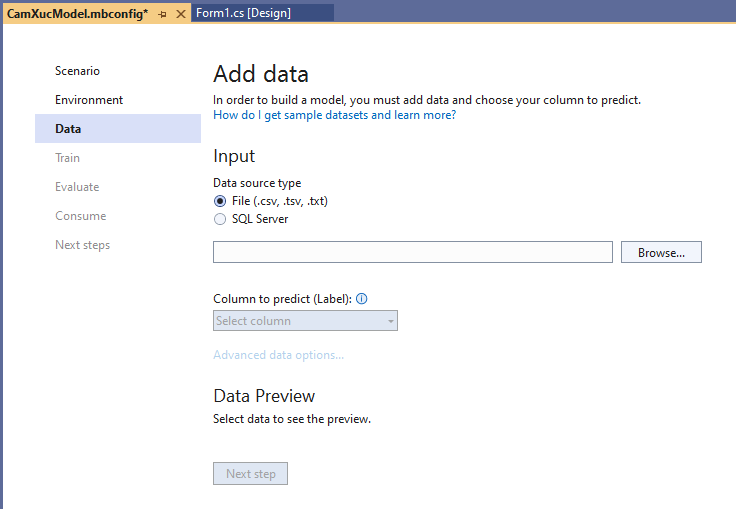
Ta sẽ sử dụng dữ liệu của UCI Machine Learning Repository, link tải ở đây.
Dữ liệu là file nén “sentiment labelled sentences.zip“, ta tải nó về và giải nén nó ra.
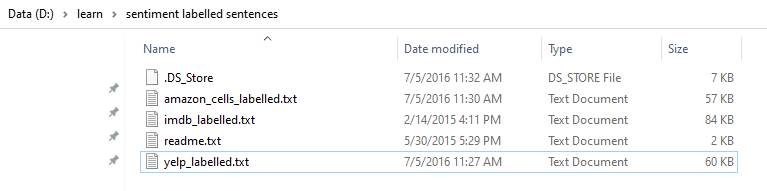
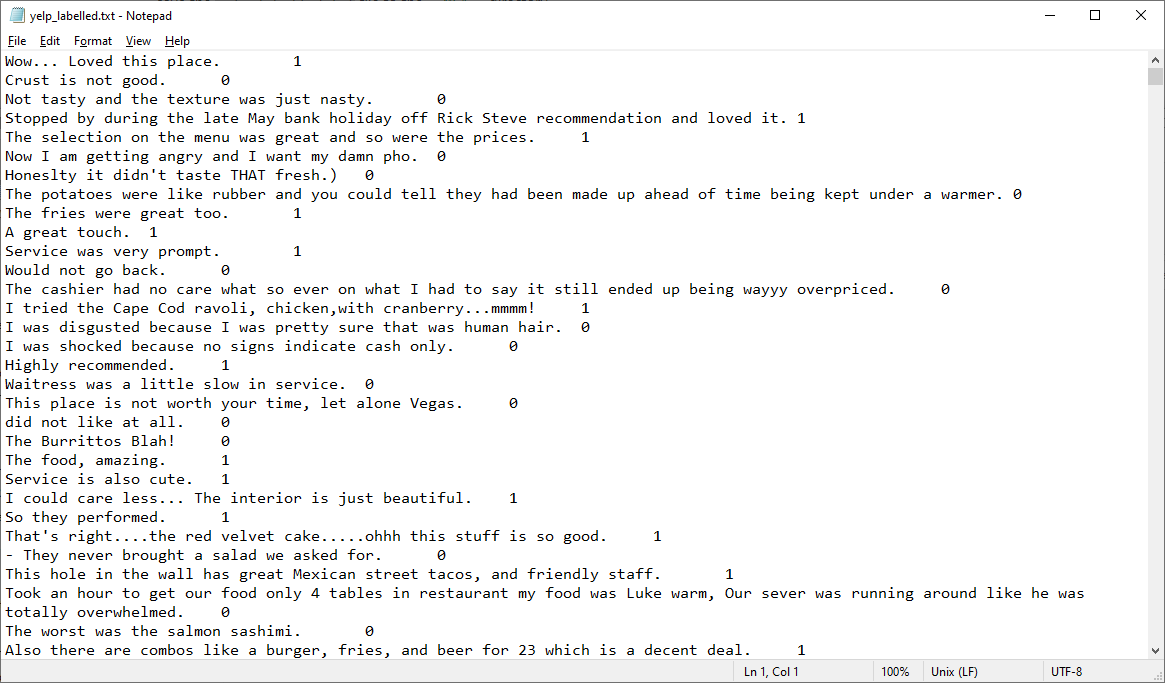
Ta để ý file “yelp_labelled.txt” là dữ liệu được gán nhãn, nó đánh giá về 1 nhà hàng. Cấu trúc của nó là text file, mỗi dòng có 2 phần: Phần comment là chuỗi, phần số đằng sau là gán nhãn nó tích cực (1), tiêu cực (0).
Tiếp theo ta cần đưa dữ liệu này vào mô hình để train. Ta có thể kết nói tới file hoặc là SQL Server. bài này là text file
Trong mục Browse bạn trỏ cái file “yelp_labelled.txt” đã giải nén :
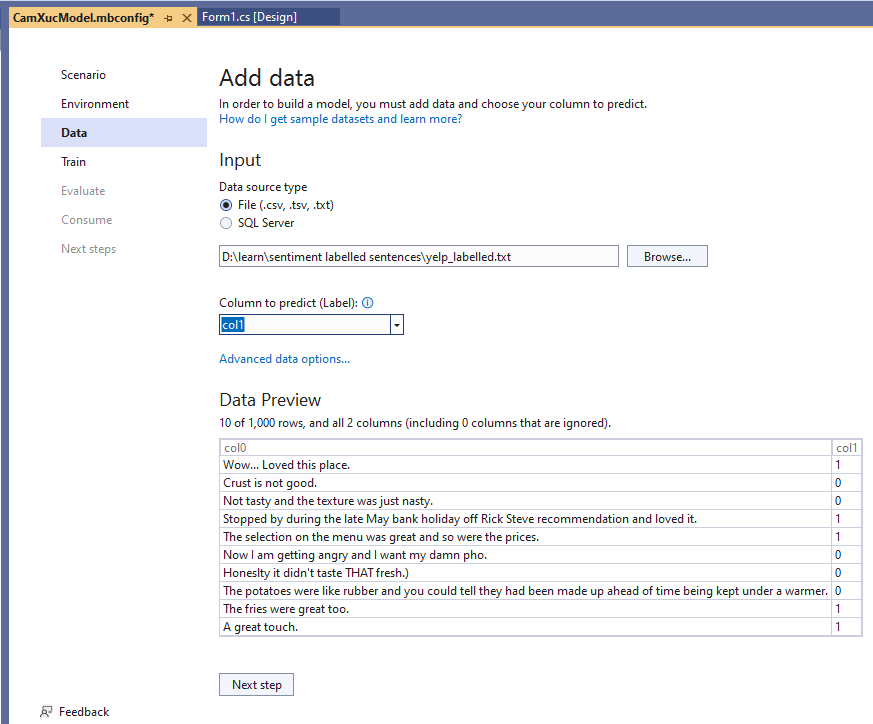
Mục “Column to predict” ->Chọn Col1 . Col1 là Label mà ta cần dự đoán. Ngoài ra ta có thể hiệu chỉnh các đặc trưng của Column bằng cách nhấn vào “Advanced data options..” nhưng ví dụ này đừng quan tâm
Mục Data preview cho ta thấy được dữ liệu trong file. Col0 là comment, col1 là label
Bây giờ nhấn “Next step” để qua bước Train.

Model Builder đánh giá nhiều mô hình với các thuật toán và cài đặt khác nhau dựa trên lượng thời gian đào tạo được đưa ra để xây dựng mô hình hoạt động tốt nhất.

Mục Time to train (second) là thời gian mà ta mong muốn nó train bao lâu, ta có thể đổi giá trị khác, ví dụ như 120 giây. Tuy nhiên với dữ liệu lớn thì Microsoft sẽ không quan tâm bạn nhập thế nào, nó tự động điều chỉnh thời gian phù hợp với dữ liệu để ra được mô hình tốt nhất.
Sau đó ta bấm “Start training“, bạn thấy nó sẽ đếm ngược, bạn chờ nhé….
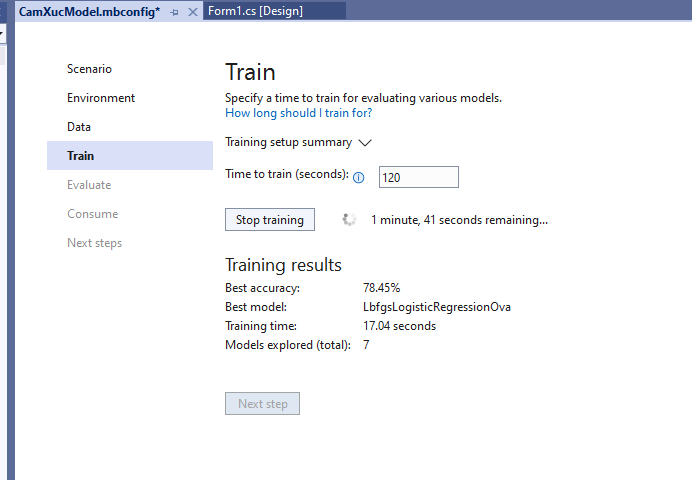
Đây là kết quả sau khi train gần xong :

Đây là kết quả sau khi train xong:
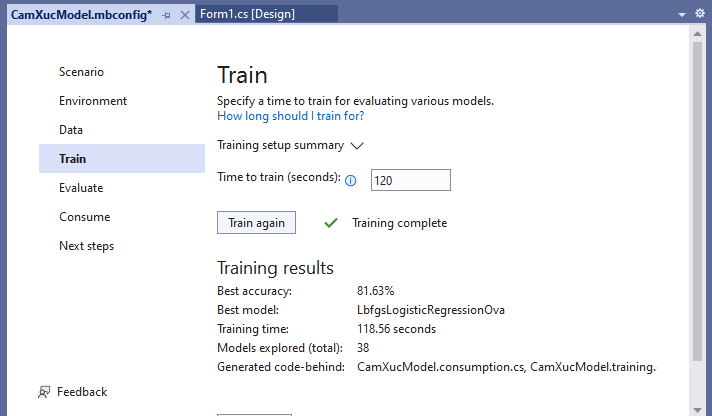
Best accuracy: Thông số này cho thấy độ chính xác của mô hình tốt nhất mà mô hình tìm thấy. Giá trị xác cao có nghĩa là mô hình được dự đoán chính xác hơn trên dữ liệu thử nghiệm. Ở trên nó là 81.63%, tương đối lắm, dĩ nhiên bạn có thể khác Tui
Best model: Thông số này cho ta biết thuật toán nào hoạt động tốt nhất trong quá trình chạy của Trình tạo mô hình.
Training time: Phần này cho ta biết tổng thời gian đã dành để đào tạo.
Models explored (total): Phần này cho ta biết tổng số mô hình được Model chạy trong khoảng thời gian nhất định.
Bạn thấy nó sẽ tạo ra 2 code – behinde: CamXucModel.consumption.cs và CamXucModel.training.cs. Đồng thời 1 file nén “CamXucModel.zip” cũng dược tao ra, đó là mô hình của chương trình.
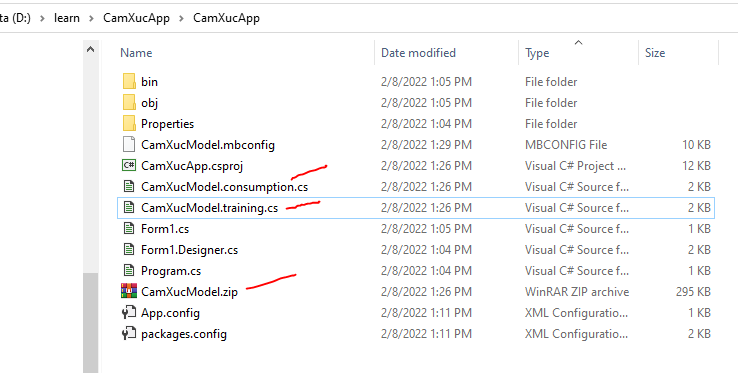
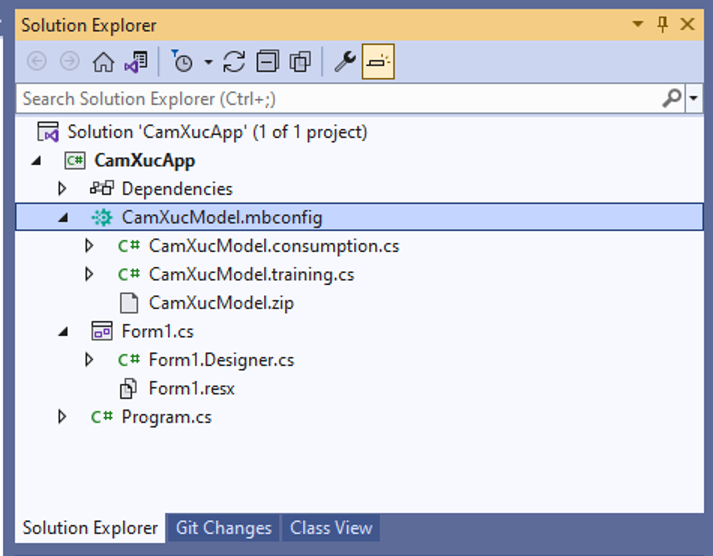
Các file này nó tự nằm ở đây trong dự án (ở CamXucModel.mbconfig bạn bấm vào hình tam giác đằng trước ra, bạn sẽ thấy 3 file này):
CamXucModel.consumption.cs: File này chứa các lớp đầu vào và đầu ra của mô hình và một phương thức Predict có thể được sử dụng để sử dụng mô hình.
CamXucModel.training.cs: File này chứa đường dẫn huấn luyện (biến đổi dữ liệu, thuật toán và các tham số thuật toán) được sử dụng để huấn luyện mô hình cuối cùng.
CamXucModel.zip: File này là mô hình ML.NET được đào tạo, là một file zip đã được serialized.

Bước tiếp theo ta sẽ đánh giá mô hình bằng cách vào “Evaluate” hay bấm nút Next step
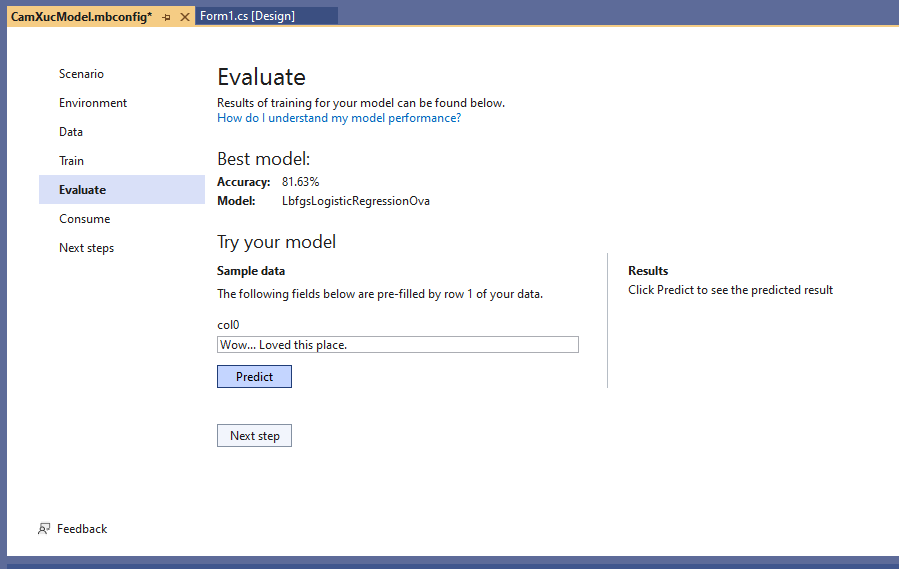
Thấy mục “Try your model”, sameple data có hiển ở col0 là “Wow… Loved this place.” Ta thử bấm nút “Predict” xem câu này là tích cực hay tiêu cực:
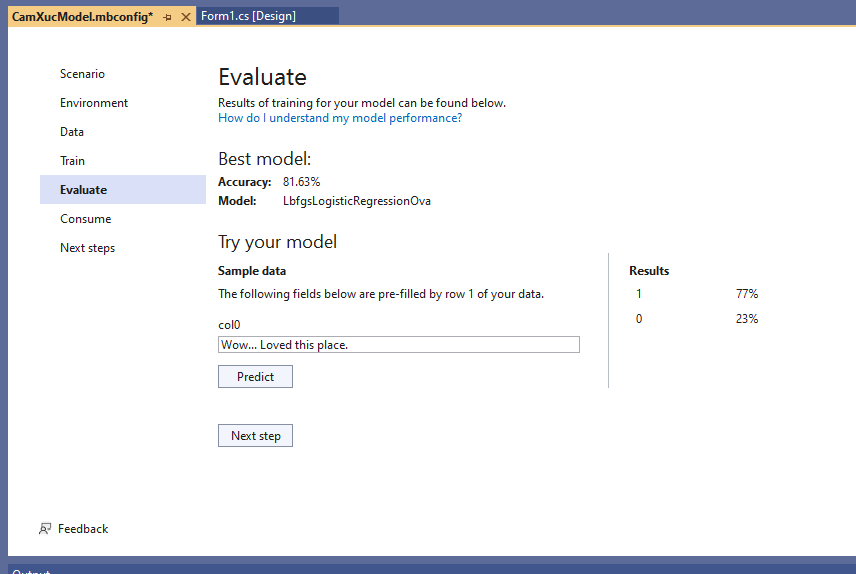
Kết quả 1 (tích cực 77%), 0 tiêu cực (23%) . Kết quả khá hợp lý
Bây giờ Tui thử đại 1 câu lạ hoắc “I love Mr Thanh”:
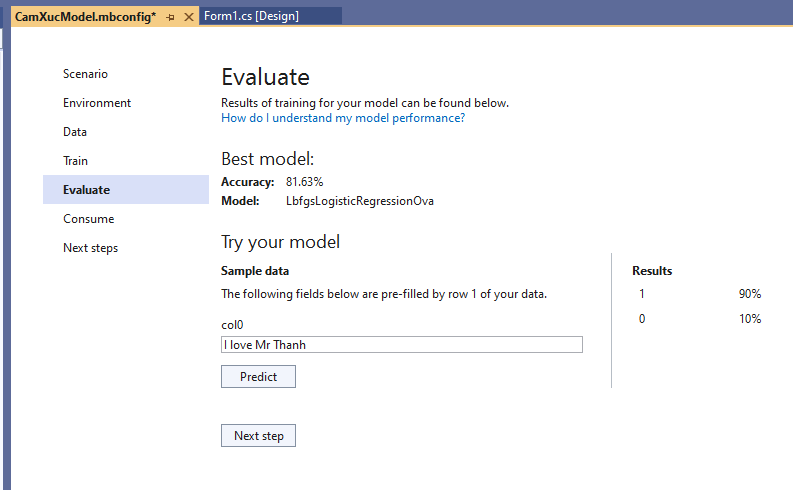
1 (Tích cực) chiếm 90%, 0 (tiêu cực) chiếm 10%. Cũng khá hợp lý.
Bây giờ Tui thử 1 câu lạ hoắc khác “I hate Mr Thanh”:
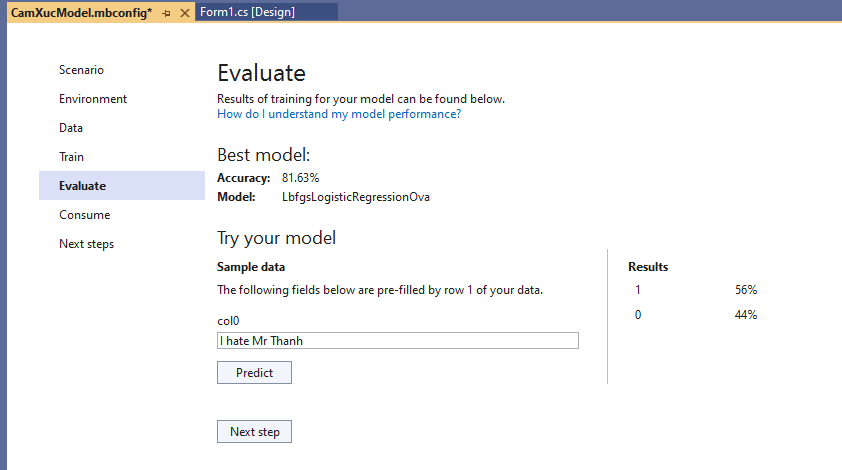
Mô hình cho ra kết quả, 1( tích cực) 56%, 0(tiêu cực) 44%. Chắc là cũng hơi chuối, nhưng kệ xác nó vì test chơi thôi, có chữ “Thanh” là tích cực rồi. Với thường ta dùng dữ liệu trong file kia để test.
Tiếp theo là “Consume”, bước sử dụng mô hình

Bấm Next Step, Microsoft hiển thị 1 số code cho ta test :
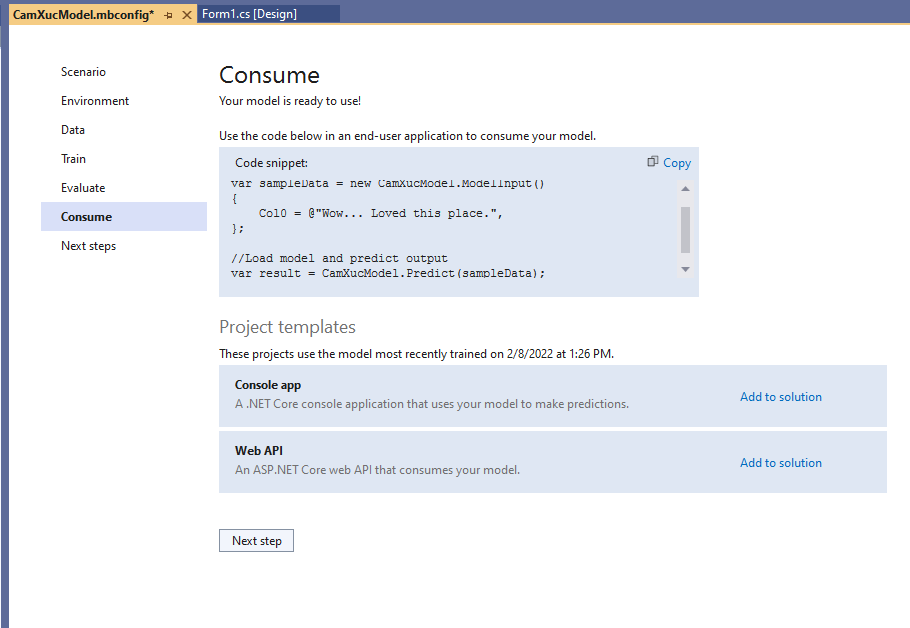
Bấm “Copy” để lấy code đưa vào dự án gọi.
//Load sample data
var sampleData = new CamXucModel.ModelInput()
{
    Col0 = @"Wow... Loved this place.",
};

//Load model and predict output
var result = CamXucModel.Predict(sampleData);
Ta thiết kế giao diện cho phần mềm này như sau:
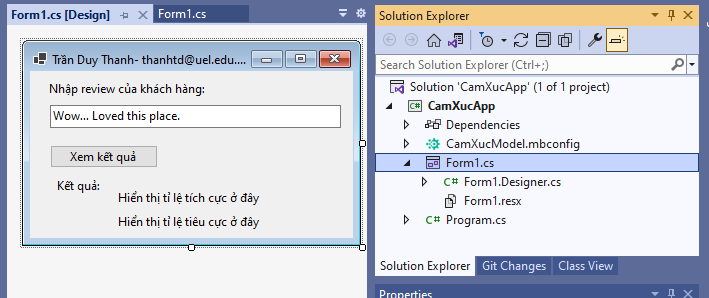
Bây giờ double click vào nút “Xem kết quả” để coding gọi mô hình máy học:
namespace CamXucApp
{
    public partial class Form1 : Form
    {
        public Form1()
        {
            InitializeComponent();
        }

        private void btnPredict_Click(object sender, EventArgs e)
        {
            //Load sample data
            var sampleData = new CamXucModel.ModelInput()
            {
                Col0 = txtReview.Text
            };

            //Load model and predict output
            var result = CamXucModel.Predict(sampleData);
            lblPositive.Text ="Tin này "+ Math.Round(result.Score[0]*100,2) + "% tích cực";
            lblNagative.Text = "Tin này " + Math.Round(result.Score[1] * 100, 2) + "% tiêu cực";

        }
    }
}
Chạy phần mềm lên để Test:
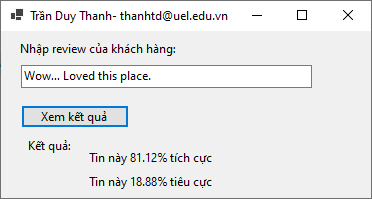
Trong ô nhập liệu bạn nhập các nhận xét sau đó bấm nút “Xem kết quả”, chương trình sẽ cho biết nhận xét này chiếm bao nhiêu % tích cực và bao nhiêu % tiêu cực. Giá trị này vô cùng hữu ích khi bạn làm bên dịch vụ, từ thông số này để biết cách mà cải thiện dịch vụ của mình cho tốt hơn. Bạn có thể kiểm tra cấu trúc dữ liệu của họ để tự tạo ra dữ liệu riêng cho mình.
Như vậy là tới đây Tui đã hướng dẫn xong chi tiết từng bước quá trình dùng máy học ML.NET Model Builder để Phân tích cảm xúc khách hàng. Tui nghĩ nó cũng là tương lai nên các bạn cũng dành thời gian nghiên cứu thêm các mô hình khác nâng cao hơn, để có thể sử dụng nhuần nhuyễn các thư viện máy học của Microsoft. các sản phẩm của họ rất là đỉnh cao.
Nếu chưa biết gì về lập trình C# thì bạn có thể đăng ký 3 khóa học dưới này, khá chi tiết và dễ hiểu:
1) C# cơ bản: https://unica.vn/toan-tap-ngon-ngu-lap-trinh-c?aff=11929
2) C# nâng cao: https://unica.vn/lap-trinh-winform-voi-c-10-ung-dung?aff=11929
3) Tăng tốc lập trình với LINQ: https://unica.vn/lap-trinh-linq-toan-tap?aff=11929
Source code bạn tải ở đây: https://www.mediafire.com/file/32lw325rjqtgbz2/CamXucApp.rar/file
Nếu cảm thấy hữu ích thì hãy Ủng hộ Tui 1 ly cafe sữa đá lề đường
STK: 0101146302
Chủ TK: Trần Duy Thanh
Ngân Hàng: Đông Á, chi nhánh Gò Vấp
Hướng dẫn tải, cài đặt và sử dụng Visual Studio 2022
Trong bản Visual Studio 2022 này chúng ta có thể lập trình Machine Learning với ML.NET Model Builder rất mạnh mẽ, đang được phát triển liên tục, giúp cho việc xây dựng các phần mềm liên quan tới Máy Học được “dễ dàng” hơn. ML.NET Model Builder là mã nguồn mở và chạy đa nền tảng, nói theo tiếng Anh cho nó sang mồm để bằng chị bằng em là “ML.NET Model Builder is An open source and cross-platform machine learning framework“
Để tải Visual 2022 ta vào link https://visualstudio.microsoft.com/downloads/
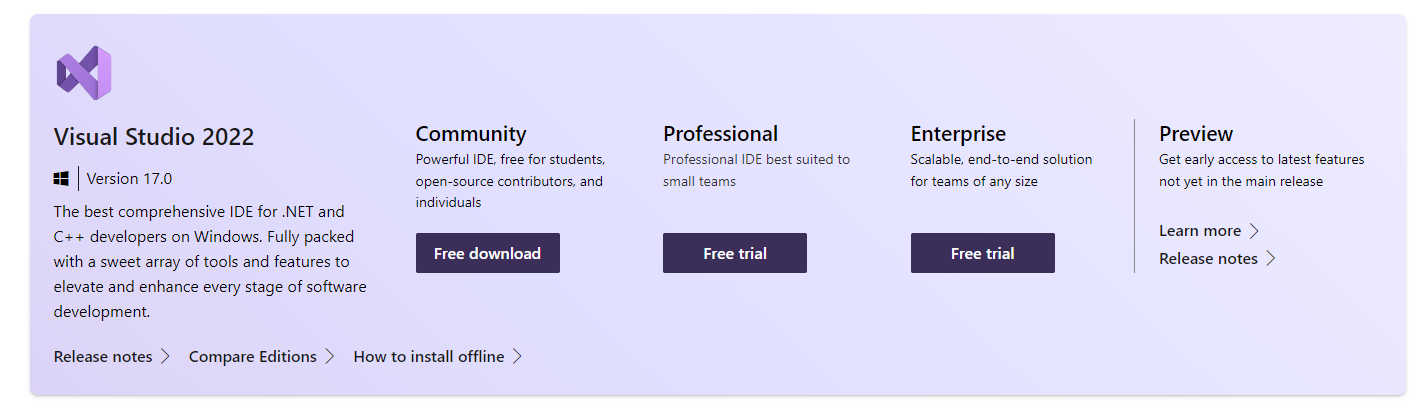
Vì chúng ta là dân thượng lưu, tiền nhiều nên chọn bản Community rất phù hợp, bản này cũng dư sức làm các phần mềm chạy nhanh té khói. Bấm vào “Free download”

Chọn nơi lưu trữ rồi bấ save.
Sau đó vào thư mục để cài đặt
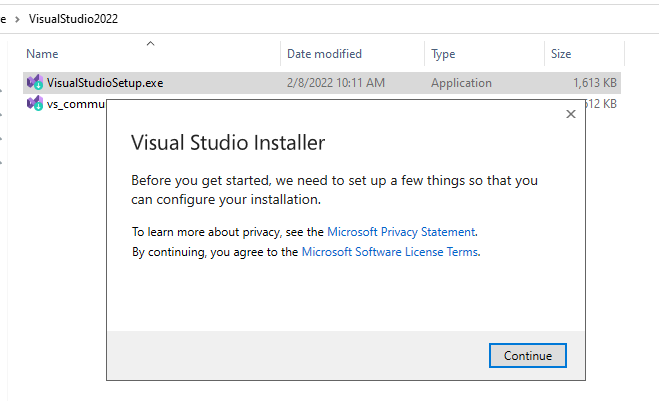
Bấm double click vào “VisualStudioSetup.exe”, nếu có cửa sổ bé nhỏ nào đó hiển thị lên thì bấm “Continue”, sau đó chờ nhé…
Sau khi nó tải xong thì ra màn hình lựa chọn dưới đây

Ở trên Tui chọn “.Net desktop development”, bên installation details để mặc định, để ý có “ML.NET Model Builder”
Lưu ý tùy vào nhu cầu code của bạn mà bạn có thể tick chọn nhiều mục khác nhau, tick càng nhiều thì càng tốn dung lượng (cực kỳ lớn), nên phải liệu cơm gắp mắm. Trong bài Cài đặt và sử dụng Visual Studio 2019 Tui có hướng dẫn chi tiết, bạn vào đây để xem vì nó y chang 2022 về mặt lựa chọn, Tui không muốn lặp lại hướng dẫn vì mất thời gian (nhớ bấm vào để xem kẻo lại thiếu thư viện).
OK, như vậy xem như đã lựa chọn xong, nhấn nút “Install” ở góc phải phía dưới màn hình để bắt đầu chờ nó tải và cài đặt (khá lâu tùy vào độ trâu của máy)
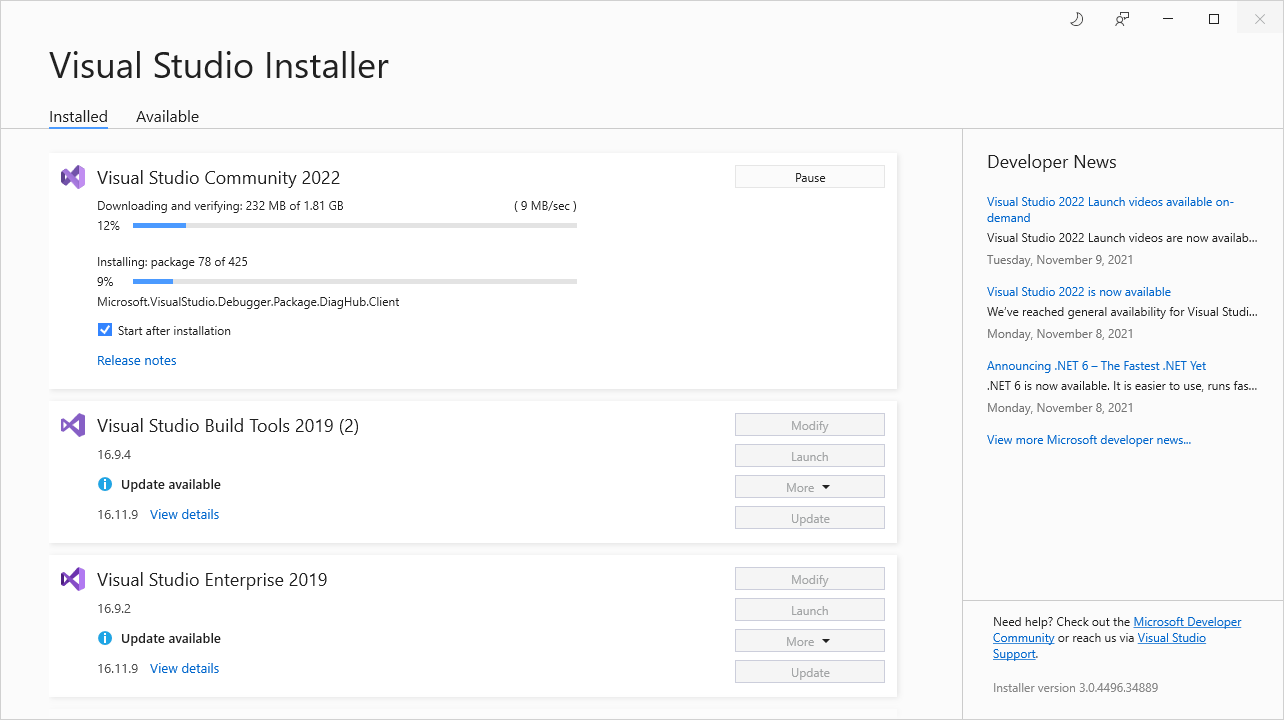
Bạn thấy ở trên đó, nó đang tải, tải xong thì nó sẽ cài… hãy chờ trong niềm hoan hỉ, chờ đợi trong hạnh phúc…..vui vẻ không quạ, mặt đã già sẵn rồi, đừng tạo thêm nếp nhăn vì sự quạ nữa

Chờ nó hoàn tất….
Khi nó ra được màn hình Welcome dưới đây là đã thành công
Sau đó màn hình cấu hình sẽ hiển thị ra như dưới đây:
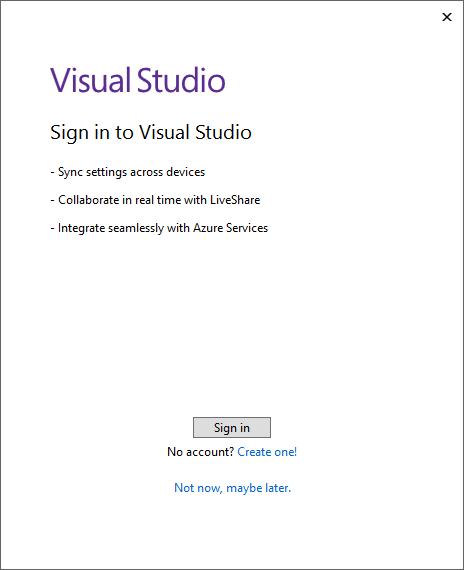
Nếu chưa có tài khoản thì cứ bấm “Not now, maybe later”… và quên nó luôn, còn có tài khoản thì ráng đăng nhập, để Microsoft họ còn theo dõi được mình code chuối tới mức nào.
Màn hình bên dưới sẽ hiển thị, trong mục Development Settings chọn Visual C# nha. Còn color theme tùy vào độ phân giải của đôi mắt bồ câu của bạn. Tui thì thích Blue
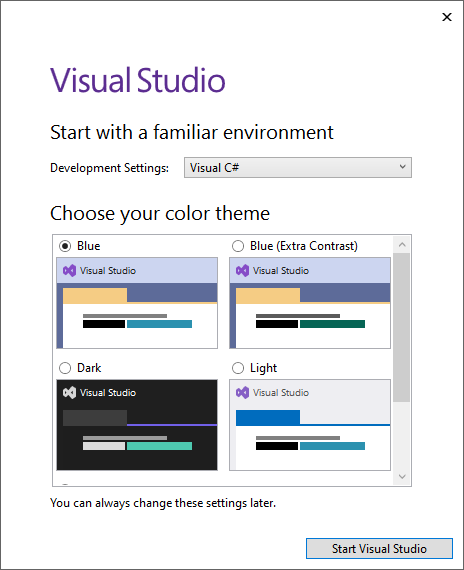
Sau đó bấm “Start Visual Studio” để bắt đầu
Màn hình Visual Studio 2022 sẽ hiển thị như bên dưới, lưu ý nếu trước đó bạn có Visual studio cũ thì các dự án trong mục Recents nó cũng được đưa qua 2022 nên bạn có thể mở luôn khá tiện lợi.
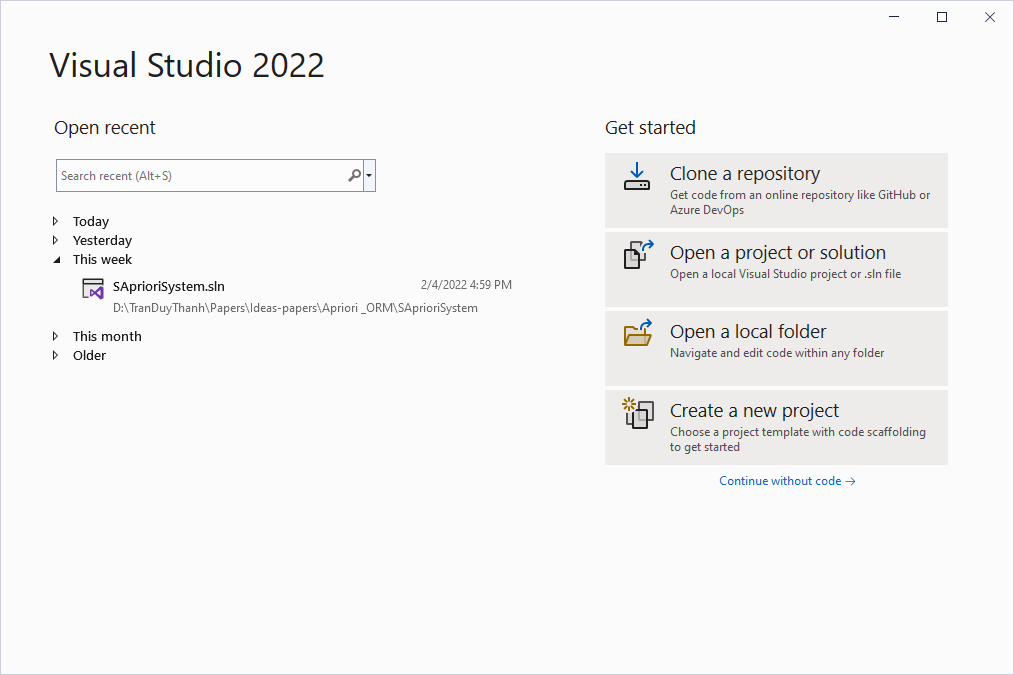
Bây giờ Ta thử tạo 1 Project hoành tráng trong Visual Studio 2022 xem sao nhé.
Dự án mang tên “HelloWorld” (xin Chào thế giới)
Để tạo dự án thì bấm vào “Create a new Project”, nó sẽ ra màn hình dưới đây:
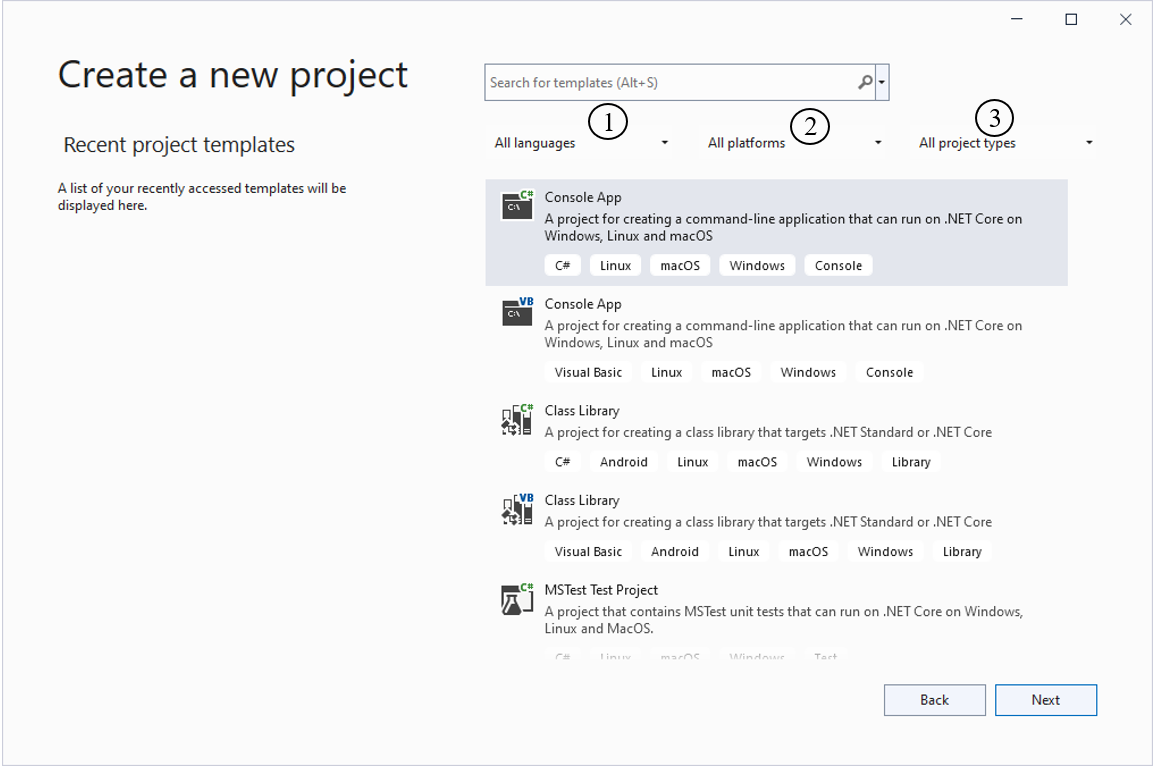
Tùy vào mục đích tạo dự án mà ta sẽ chọn mục 1, 2, 3 khác nhau
1 – Lựa chọn ngôn ngữ lập trình
2- Lựa chọn platforms
3- Lựa chọn Project type
Hình bên dưới là Tui chọn C# -> Windows->Desktop
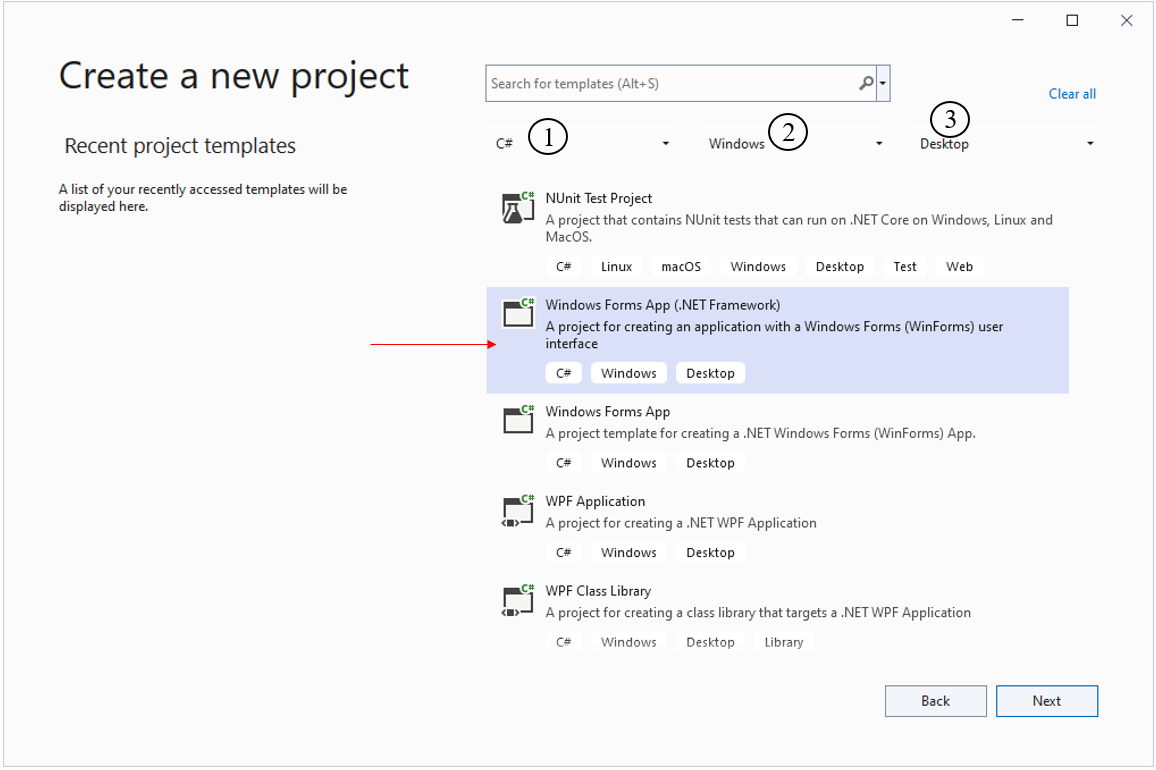
Sau đó Tui chọn “Windows Forms App (.NET Framework)” rồi bấm Next. Màn hình Configure your new Project xuất hiện như bên dưới:

Project name: đặt tên “HelloWorld“
Location: Chọn nơi lưu trữ dự án (không lưu ở C là được), tên thư mục cũng cố gắng đừng đặt Tiếng Việt có đấu, vì có dấu đôi khi lập trình liên quan commandline nó sai búa xua
Framework: Từ này chọn tối thiểu là 4.7.2 vì nó có thể làm việc tốt với Machine Learning, máy của Tui có 4.8 máy bạn cài vào cũng có nên có thể dùng 4.8
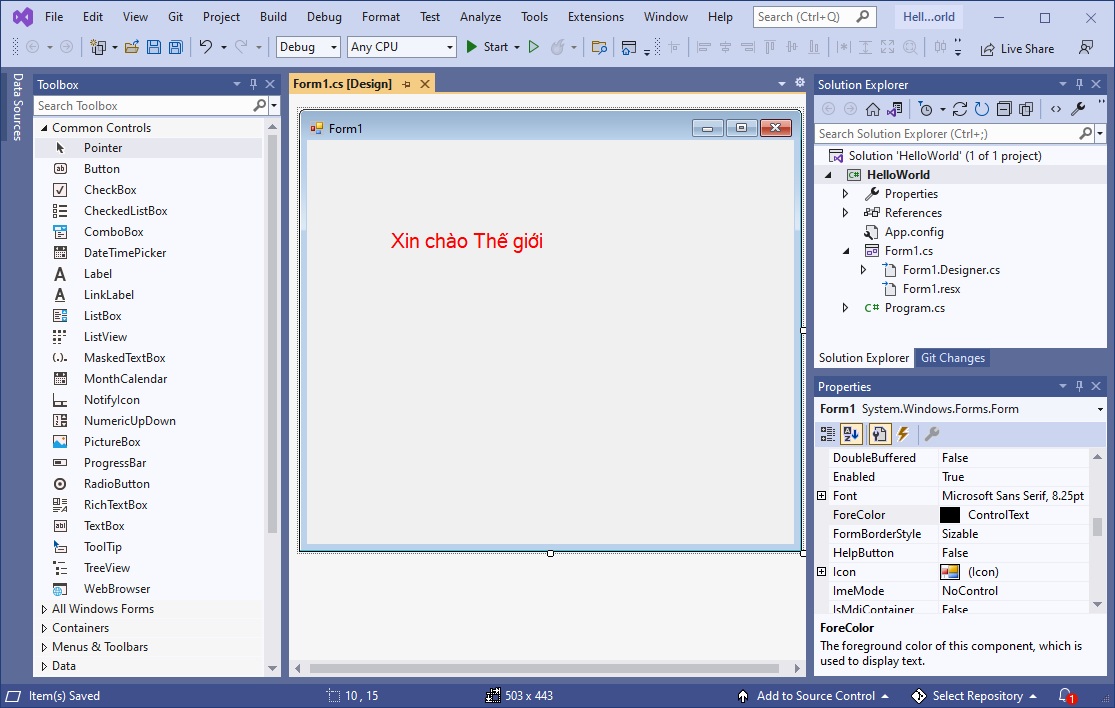
Sau đó bấm nút “Create” để tạo Project. Bạn xin chào thế giới như bên dưới, biểu tượng Icon cũng có khác chút đỉnh, túm lại chả có gì thay đổi lắm. học lập trình chỉ cần nắm tốt nền tảng thì khi gặp cái mới ta dễ xoay sở.
Trong các khóa về C# Tui có hướng dẫn chi tiết từ cơ bản tới nâng cao, các bạn chưa rành về lập trình có thể theo học thứ tự 3 khóa sau:
1) C# cơ bản: https://unica.vn/toan-tap-ngon-ngu-lap-trinh-c?aff=11929
2) C# nâng cao: https://unica.vn/lap-trinh-winform-voi-c-10-ung-dung?aff=11929
3) Tăng tốc lập trình với LINQ: https://unica.vn/lap-trinh-linq-toan-tap?aff=11929
Giờ chạy phần mềm lên (nhấn F5) hoặc bấm nút có chữ Start trên thanh công cụ

Chúc bạn thành công, tới đây bạn đã biết cách Tải, cài đặt, và sử dụng Visual Studio 2022 rồi
bài học tới Tui sẽ hướng dẫn bạn cách thức viết 1 phần mềm Machine learning bé tẹo trong Visual Studio 2022 với thư viện ML.NET như thế nào.
Bài 4: Tạo file bat để hỗ trợ đồng bộ Local và Remix IDE trong Ethereum Blockchain
Ở bài 3, Các bạn đã biết cách đồng bộ mã nguồn Local và Remix IDE trong Ethereum Blockchain. Tuy nhiên vì mã lệnh khá phức tạp và khó nhớ nên sẽ làm chúng ta mất thời gian khi mỗi lần lập trình muốn đồng bộ lại mất thời gian tìm kiếm lại các câu lệnh. Vì vậy bài này Tui hướng dẫn các bạn cách tạo file bat để khi đồng bộ bạn chỉ cần nhấp double click vào file bat là có thể thực hiện.
Các bước đơn giản như sau:
Ta đồng bộ dữ liệu trong thư mục: D:/SmartContract/HelloWorld
Bạn có thể đồng bộ D:/SmartContract nếu như trong D:/SmartContract có nhiều Project. Khi đồng bộ nó sẽ nạp toàn bộ project trong local lên Remix IDE và ngược lại
Bước 1: Tạo file bat
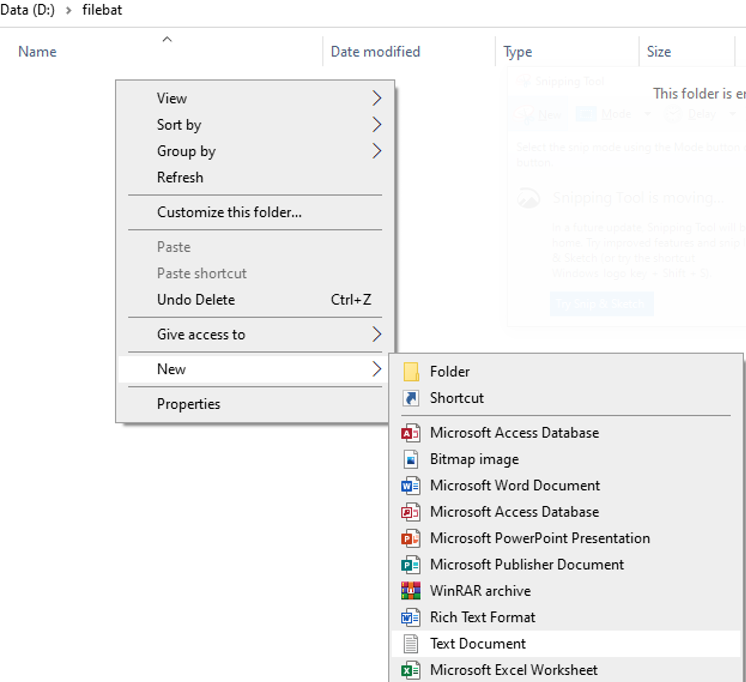
Ở bất kỳ nơi đâu trong máy tính bạn tạo file bat như sau: Bấm chuột phải/ chọn New / Chọn Text Document như hình bên dưới
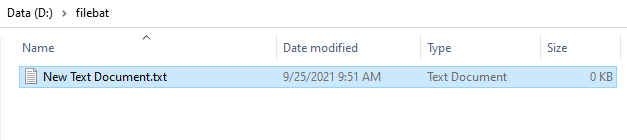
Lúc này file “New Text Document.txt” được tạo ra như dưới đây:
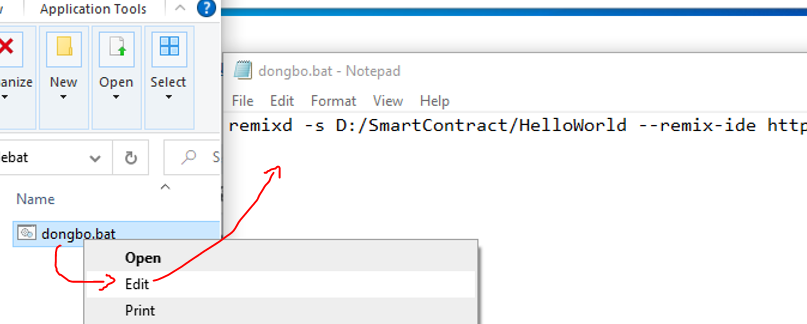
Ta mở file này lên và gõ lệnh:
remixd -s D:/SmartContract/HelloWorld --remix-ide https://remix.ethereum.org
Lệnh trên sẽ giúp đồng bộ vào project HelloWorld trong thư mục SmartContract
Nếu bạn muốn đồng bộ toàn bộ các Project trong D:/SmartContract thì gõ lệnh:
remixd -s D:/SmartContract --remix-ide https://remix.ethereum.org
Xem hình minh họa:

Sau khi gõ lệnh xong, bạn nhấn Ctrl+S để lưu file
Sau khi lưu file, bạn đóng file và ra ngoài đổi tên file: “New Text Document.txt” thành “dongbo.bat”, dĩ nhiên đặt tên gì cũng được miễn đuôi file là .bat
Bước 2: Tạo shortcut cho file dongbo.bat
Nếu bạn lưu dongbo.bat ngoài desktop thì không cần tạo shortcut, tuy nhiên lập trình viên ít ai lưu dữ liệu ngoài desktop, mà chúng ta thường lưu trong các thư mục ở ổ đĩa D.
Tạo shortcut ngoài desktop để giúp thao tác cho lẹ khỏi mất công đi tìm vì ta hàng ngày lập trình nó.
Bạn bấm chuột phải vào dongbo.bat/chọn send to / chọn Desktop (Create shortcut) như hình bên dưới
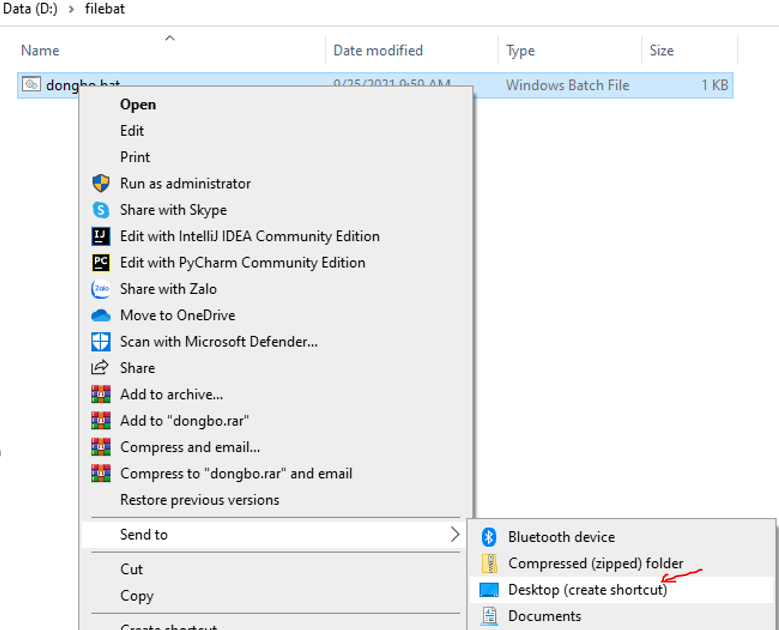
Như vậy shortcut sẽ được tạo cho dongbo.bat
Bước 3 – Test đồng bộ.
Bạn chạy shortcut ở ngoài desktop đã tạo ở bước 2 (hoặc chạy trực tiếp file bat ở nơi bạn đã tạo).
Chương trình sẽ tiến hành chạy dịch vụ đồng bộ và thông bao như dưới đây

Bây giờ bạn vào https://remix.ethereum.org/ và chọn kết nối localhost (như đã hướng dẫn ở bài số 3) Ta sẽ có kết quả như hình dưới đây:
Như vậy Tui đã hướng dẫn xong cách tạo file bat để mỗi lần lập trình bạn chỉ cần chạy file này là nó tự động tạo dịch vụ đồng bộ mà bạn không cần phải nhớ các lệnh phức tạp của nó
Nếu như bạn muốn đồng bộ qua thư mục khác thì tạo 1 filebat mới hoặc bạn sửa ngay chính file bat cũ bằng cách bấm Chuột phải vào file .bat rồi chọn edit sau đó tiến hành đổi thư mục khác nếu muốn.
Chúc các bạn thành công và tiết kiệm được thời gian khi làm thao tác đồng bộ.
Bài 3: Đồng bộ mã nguồn giữa máy Local và Remix IDE trong Ethereum Blockchain
Chúng Ta tiếp tục chuỗi các bài học về ngôn ngữ Solidity để lập trình Smart Contract trong Ethereum Blockchain, với công cụ lập trình Remix IDE được biên dịch và chạy trên máy ảo Ethereum (Ethereum Virtual Machine – EVM).
Trong 2 bài trước Tui đã hướng dẫn các Bạn cách sử dụng công cụ Remix IDE, cấu trúc của công cụ cũng như chức năng của chúng và đã thử nghiệm 1 bài HelloWorld để các bạn biết được cách coding cũng như biên dịch và deploy 1 smart contract trong công cụ này. Tuy nhiên ở 2 bài đó thì mã nguồn chỉ được lưu tạm trên trình duyệt nếu có cookie thì nó cũng lưu tạm thời thôi, tức là có thể mất toàn bộ mã nguồn.
Trong bài này Tui sẽ hướng dẫn các Bạn cách thức đồng bộ mã nguồn giữa máy Local và Remix IDE, tức là khi ta lập trình trên Ethereum Blockchain thì mọi thao tác thay đổi mã nguồn, hay cấu hình trong workspace sẽ được lưu về máy Local. Và các ngày hôm sau các Bạn có thể kết nối rồi phục hồi lại mã nguồn trong Local lên Ethereum Blockchain để tiếp tục coding.
Chúng ta làm các bước sau.
Bước 1: Cài đặt NPM(node package manager).
NMP là viết tắt của Node package manager là một công cụ tạo và quản lý các thư viện lập trình Javascript cho Node.js.
Trước khi cài NPM thì bạn kiểm tra xem máy tính mình đã từng có NPM, nếu chưa có thì cài đặt.
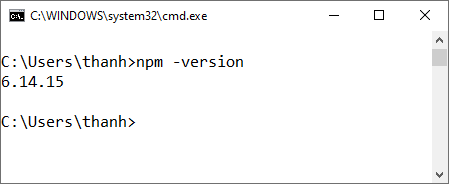
lệnh kiểm tra như sau:
npm -version
Xem hình Tui chụp dưới đây nếu ra được version như của Tui tức là máy tính của bạn đã có rồi (hoặc gõ 2 dấu trừ đằng trước version):
Nếu nó báo không nhận ra thì ta cần cài NodeJS, NMP được tích hợp sẵn khi bạn cài NodeJS
Chi tiết về cài đặt và lập trình NodeJS các bạn xem tại danh sách các bài Blog mà Tui đã viết trước đây:
Cụ thể bạn xem 2 bài trong danh sách NodeJS, gồm:
Sau khi cài đặt thành công NodeJS thì tốt nhất khởi động lại máy rồi mở lại command line để test NPM, nếu nó ra kết quả như của Tui là thành công. Còn vẫn chưa được thì có thể do nghiệp khá nặng, cần chọn lại ngày giờ và phiên bản cài đặt.
Bước 2: Cài đặt remixd daemon
Để hệ thống truy suất được tới local file từ Remix IDE-Ethereum Blockchain thì ta cần cài remixd daemon
Cách cài đặt như sau:
Trong commandline gõ lệnh:
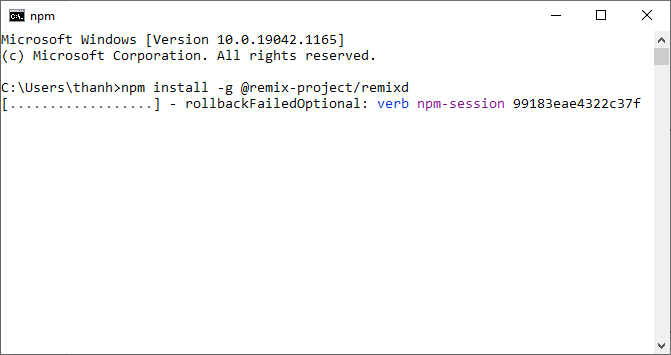
npm install -g @remix-project/remixd
Xem hình minh họa:
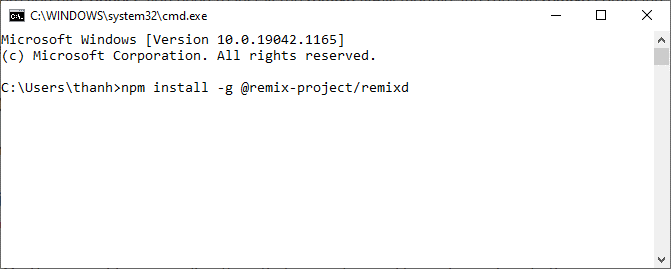
Gõ lệnh như trên rồi nhấn phím Enter:
Chờ remixd cài đặt….
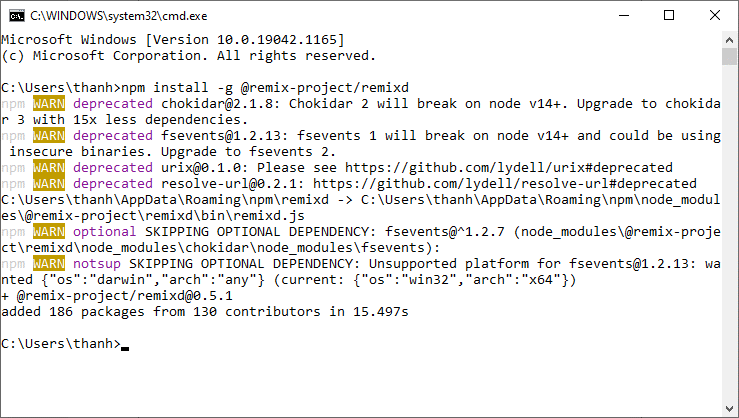
màn hình trên đã thông báo hoàn tất quá trình cài đặt, bây giờ ta kiểm tra version của nó để xác thực rằng remixd được cài thành công hay không.
viết lệnh như sau:
remixd --version
Xem hình minh họa:

Như vậy đã cài remixd thành công.
Bước 3: Chạy remixd daemon
Xem lại bài ví dụ Smart Contract ở bài số 2

Bạn thấy Workspaces là HelloWorld không? Workspaces này chỉ được lưu trên Ethereum Blockchain, ở máy Local chúng ta nó không hề biết Workspaces này.
Giả sử trong ổ D:/ bạn tạo thư mục tên là HelloWorld để đồng bộ (dĩ nhiên là tên gì cũng được). Trong bài này, Tui tạo thư mục cha tên là SmartContract rồi bên trong nó có thư mục HelloWorld (Còn bạn thích để kiểu gì cũng được, nhưng trong case này Tui muốn hướng dẫn thêm 1 số lệnh cơ bản trong command line như trỏ thư mục nên mới cố tình làm vậy để Bạn có thểm kiến thức):
D:/SmartContract/HelloWorld
Bạn viết các lệnh trong commandline để di chuyển tới thư mục SmartContract, xem minh họa:

Sau đó dùng lệnh tổng quát sau để chạy remixd daemon
remixd -s <absolute-path-to-the-shared-folder> --remix-ide https://remix.ethereum.org
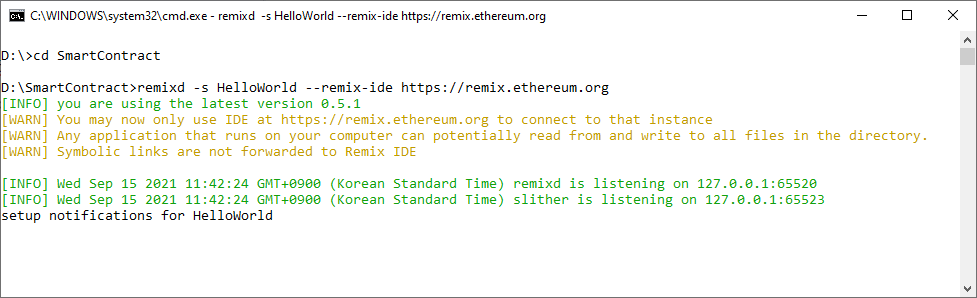
Như vậy trong trường hợp này thì Tui sẽ viết:
remixd -s HelloWorld --remix-ide https://remix.ethereum.org
Xem hình minh họa:

Nhấn enter và chờ cho chương trình chạy:
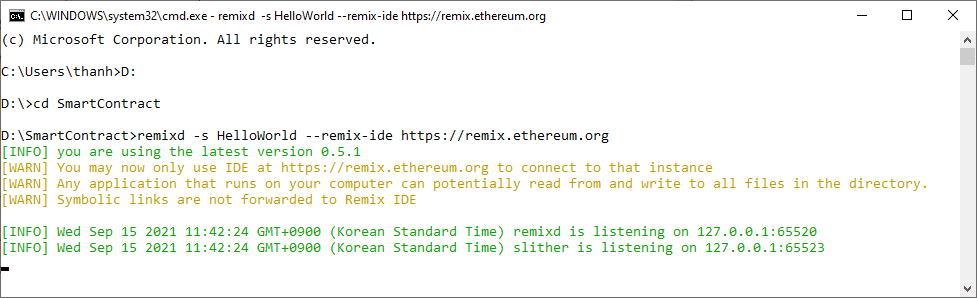
Như vậy đã chạy remixd daemon thành công.
Lưu ý nếu bạn tạo thư mục là ThanhHandsome thì phải đổi cái HelloWorld thành ThanhHandsome
Bước 4 – Kết nối local để đồng bộ mã nguồn.
Sau khi đã chạy remixd daemon thành công, từ Remix IDE Ethereum Blockchain ta làm như sau:
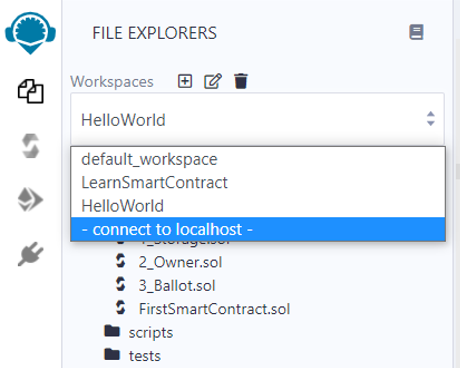
Từ mục Workspaces, Ta chọn -connect to localhost- như hình trên, màn hình sau sẽ xuất hiện:
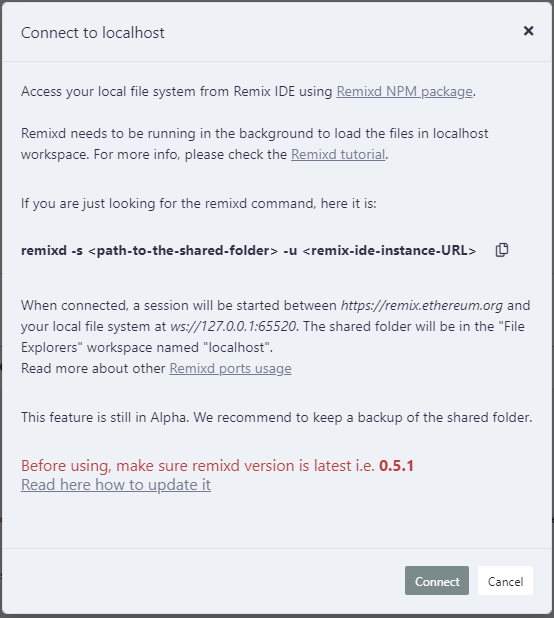
Ta bấm “Connect”, và chờ Remix IDE kết nối, dưới đây là màn hình kết nối thành công:

Lúc này Bạn cũng có thể quay lại commandline chỗ remixd daemon chạy thì cũng thấy nó thông báo “setup notifications for HelloWorld”:
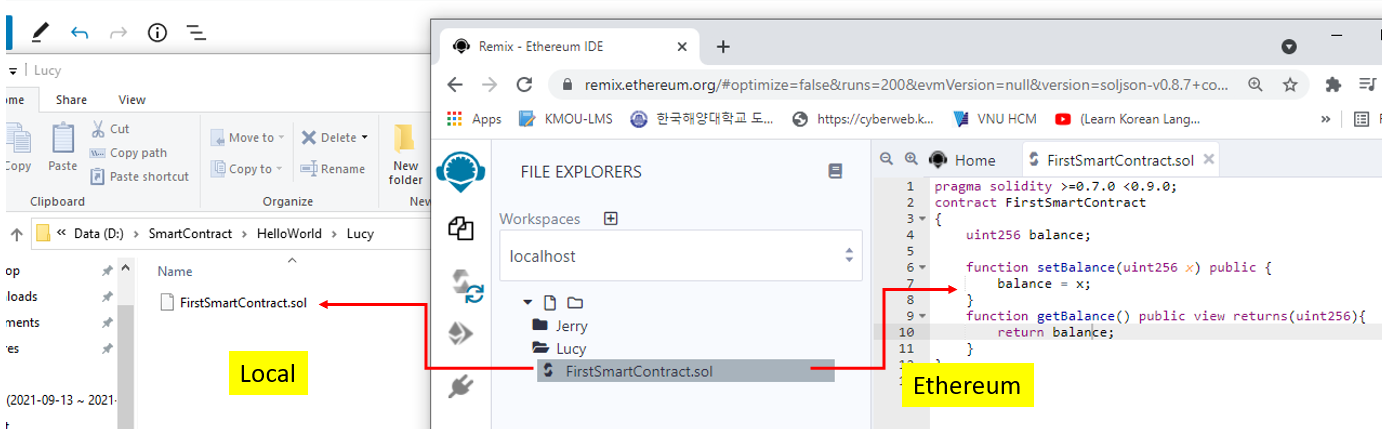
Tui chụp màn hình so sánh giữa Local và Ethereum để bạn xem:

Hiện tại Local vẫn trống trơn vì ta chưa code gì cả.
Bây giờ Tui thử tạo trên Remix Ethereum 1 thư mục “Lucy”:
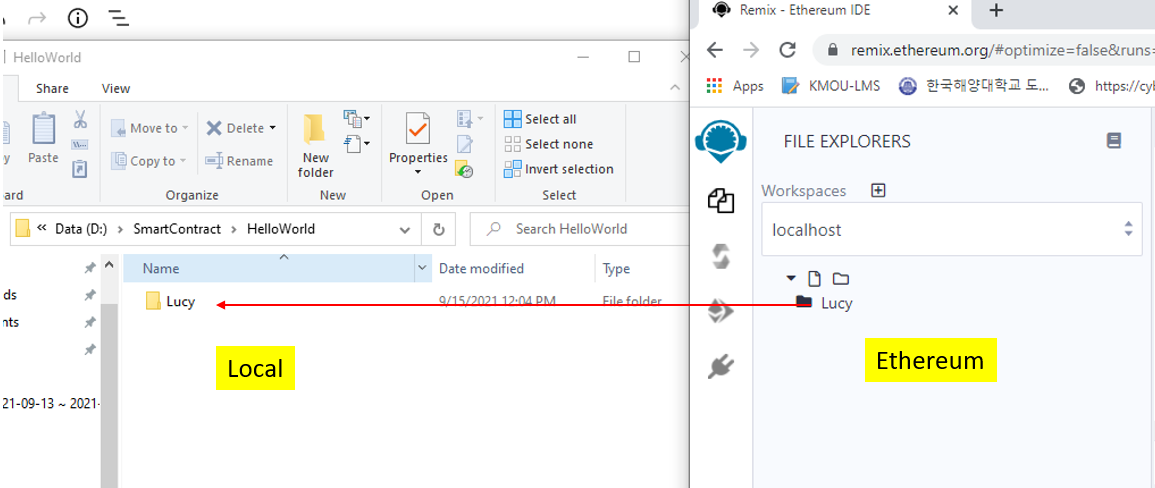
Bạn thấy đó, ngay lập tức thư mục Lucy ở Ethereum sẽ được đồng bộ về ngày máy local
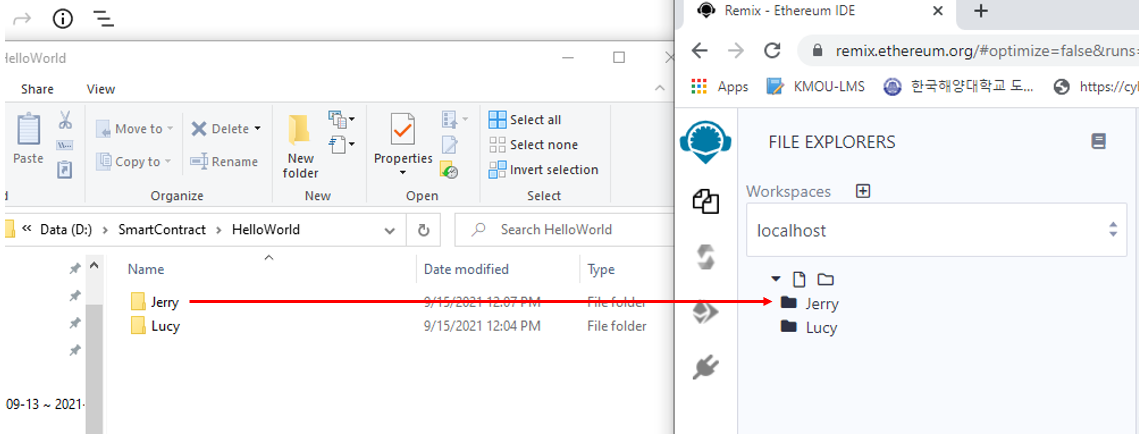
Và bây giờ trong máy Local, thêm 1 thư mục Jerry

Trường hợp này thì Ethereum chưa đồng bộ ngay (có thể sẽ dùng các lệnh hoặc version sau). Mà ta reload lại trang và kết nối lại localhost để xem nó tự đồng bộ (bạn reload page và làm lại bước kết nối là nó tự đồng bộ). xem hình:
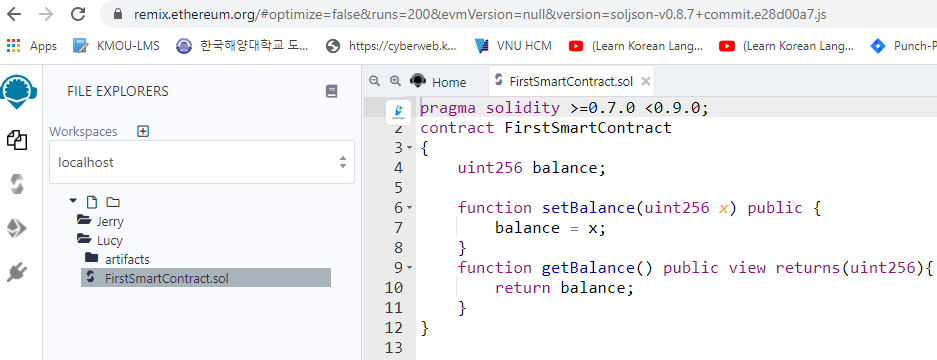
Tiếp theo ta thử viết 1 Solidity Smart Contract trong thư mục Lucy, đặt tên FirstSmartContract.sol:
Lúc này ở Local nó cũng tự động đồng bộ mã nguồn từ Ethereum về cho bạn.
Code FirstSmartContract.sol:
pragma solidity >=0.7.0 <0.9.0;
contract FirstSmartContract
{
    uint256 balance;

    function setBalance(uint256 x) public {
        balance = x;
    }
    function getBalance() public view returns(uint256){
        return balance;
    }
}
Bây giờ ta tiến hành biên dịch xem như thế nào:
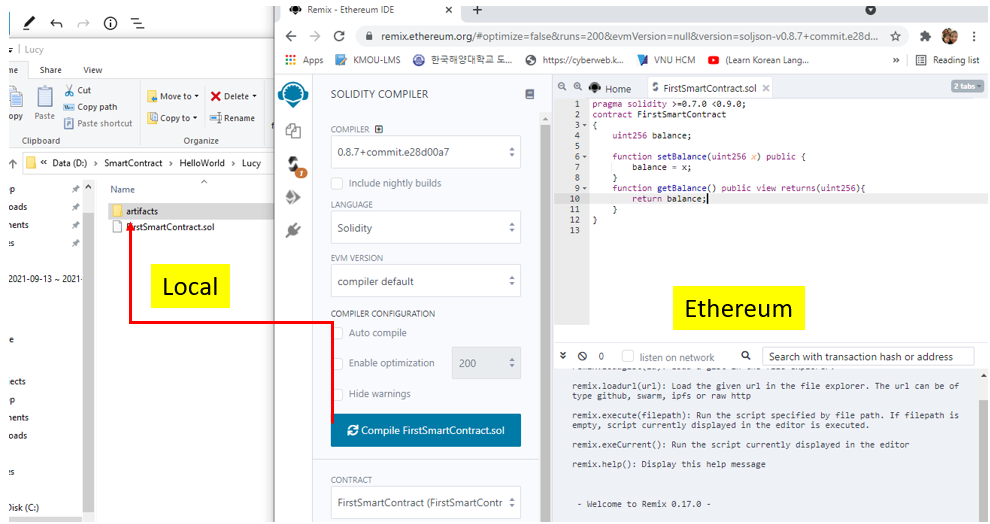
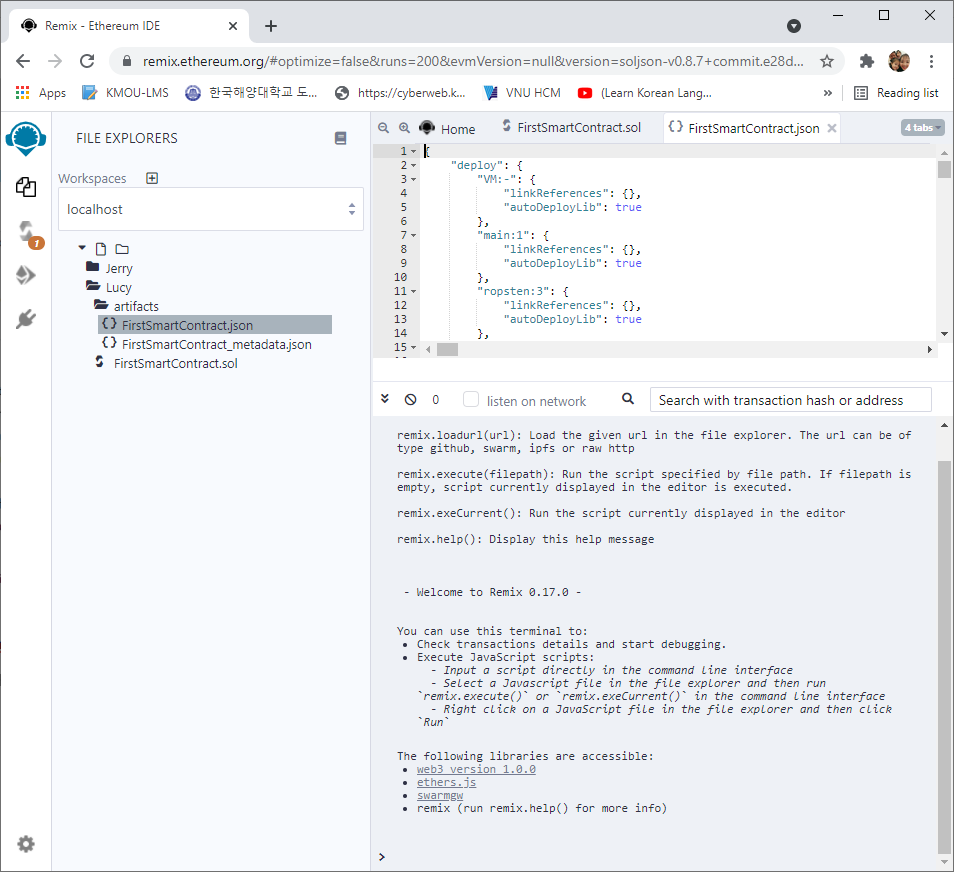
Trong local thư mục artifacts sẽ được tạo ra với 2 file json:
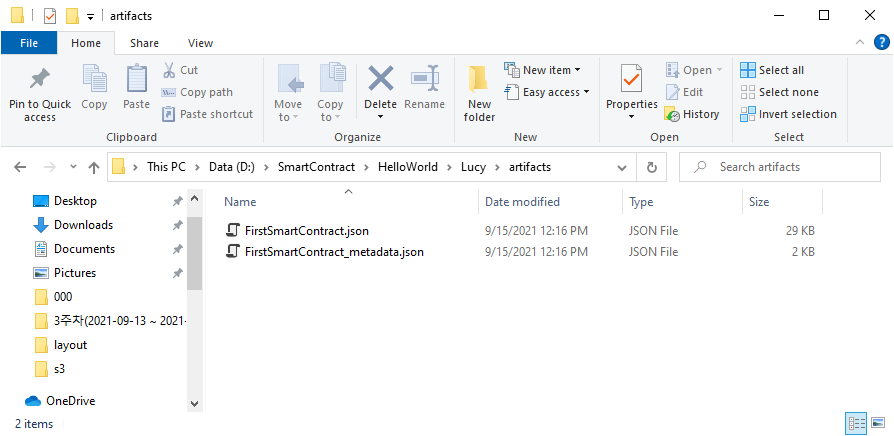
Và dĩ nhiên nó cũng đồng bộ từ Ethereum, ta xem lại cấu trúc thư mục:
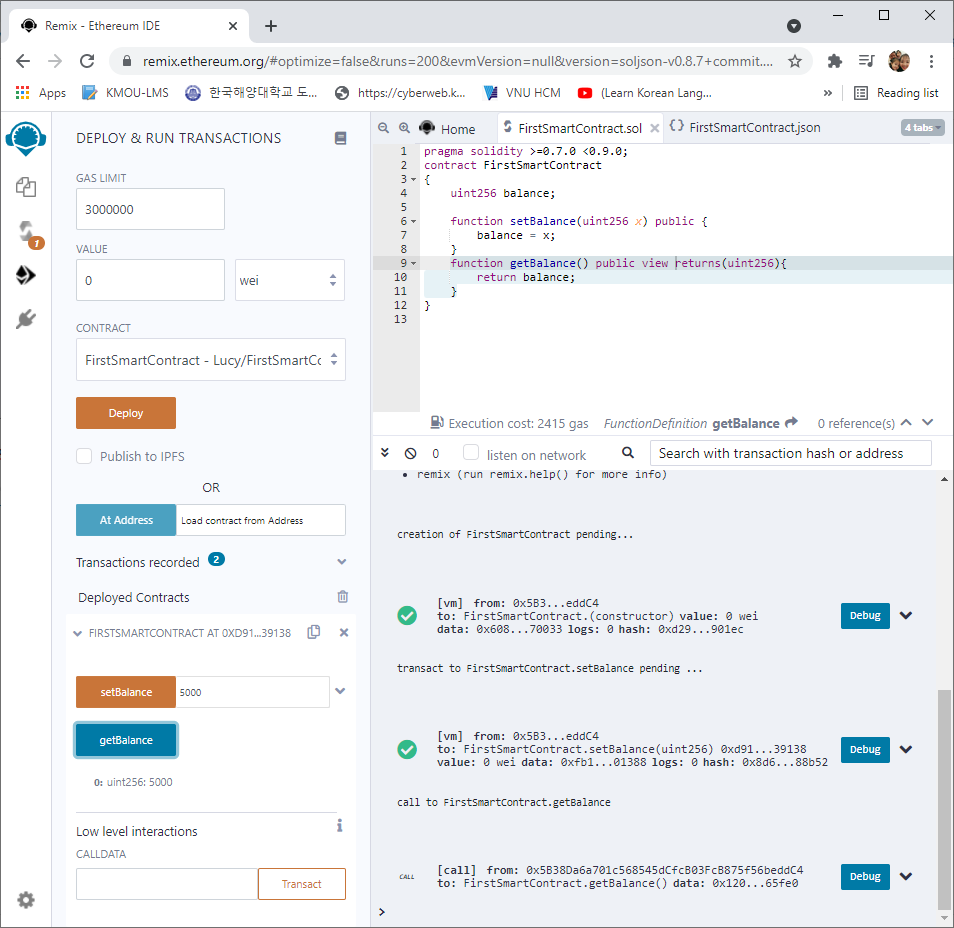
Bây giờ ta vào mục Deploy (nhớ click chọn vào file FirstSmartContract.sol trước nhé):
Các bước test như bài 2, các bạn tự thử nhé.
Như vậy tới đây Tui đã hướng dẫn xong cách thức đồng bộ dữ liệu Local-Remix IDE Ethereum Blockchain. Điều này là quan trọng vì ta cần bảo trì mã nguồn. Và có thể dùng các công cụ lập trình Solidity khác để lập trình sau đó đồng bộ code sau khi có internet.
Bài học sau Tui sẽ minh họa cách tạo 1 Coin và thử giao dịch chuyển tiền qua lại giữa các ví trong Ethereum Blockchain, sau đó sẽ đi sâu vào hướng dẫn ngôn ngữ lập trình Solidity, Bạn cần có kiến thức về Solidity thì mới có nền tảng mà lập trình Smart Contract. Vì nó dùng Solidity để lập trình. Không vội
Chúc các bạn thành công.
Bài 2: Tạo và chạy Smart Contract đầu tiên trong Ethereum Blockchain
Ở bài 1 các bạn đã biết cách sử dụng công cụ Remix IDE để lập trình Smart Contract trong Ethereum Blockchain. Trong bài này Tui sẽ hướng dẫn cách tạo 1 Smart Contract đầu tiên và biên dịch, deploy nó như thế nào.
Muốn thay đổi thế giới thì trước tiên Bạn phải xin chào thế giới, vì vậy ta tạo một workspace tên là “HelloWorld” như dưới đây: (Thực ra ta không thể đổi được thế giới này đâu, hồi còn trẻ trâu Tui cũng muốn đổi này đổi kia, nhưng từ khi cưới Vợ và đặc biệt lúc có Em Bé, Tui còn không có cơ hội đổi kênh Youtube huống chi đòi đổi thế giới, thay đổi được chính bản thân mình cho nó tốt lên là may lắm rồi).
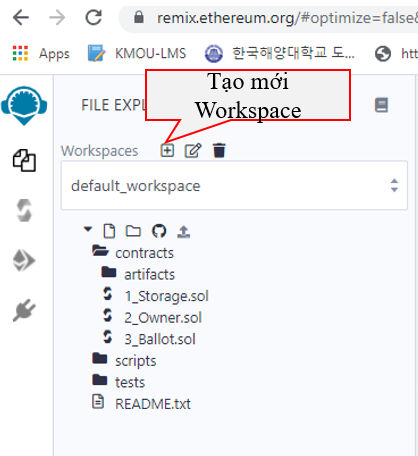
Ta đặt tên như hình dưới đây rồi bấm nút OK:
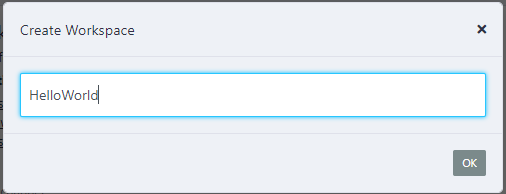
Sau khi bấm nút OK ta có kết quả:
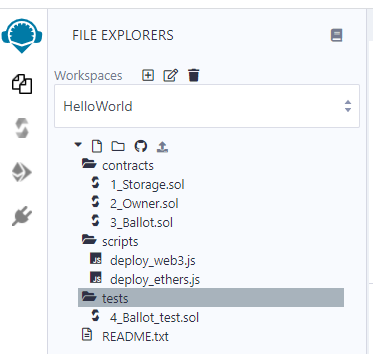
Mặc định Remix Ethereum IDE sẽ tạo cho bạn cấu trúc thư mục và các tập tin Contract mẫu như trên.
Bây giờ ta tạo 1 file .sol (Contract viết bằng ngôn ngữ lập trình Solidity).
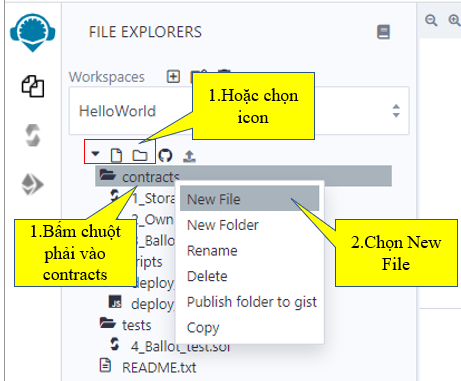
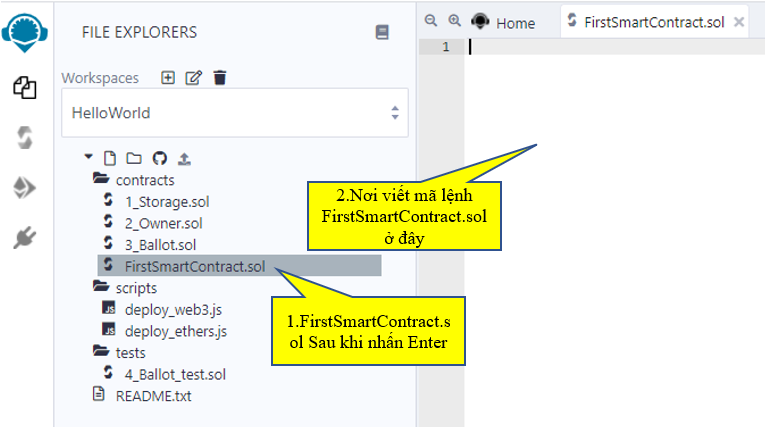
Đặt tên là FirstSmartContract nó tự ra đuôi FirstSmartContract.sol:

Kết quả sau khi nhấn phím Enter:
Bây giờ ta code như sau, cách code Solidity nó tương tự như java, python…. dĩ nhiên có những điểm khác vì nó chuyên biệt cho Smart Contract. Tui sẽ sắp xếp thời gian viết các blog hướng dẫn về Solidity ở các bài tiếp theo để phục vụ tốt cho việc viết các dự án liên quan tới Smart Contract.
Ở bài này thì cứ làm theo như Tui viết cho nó có cảm giác trước đã
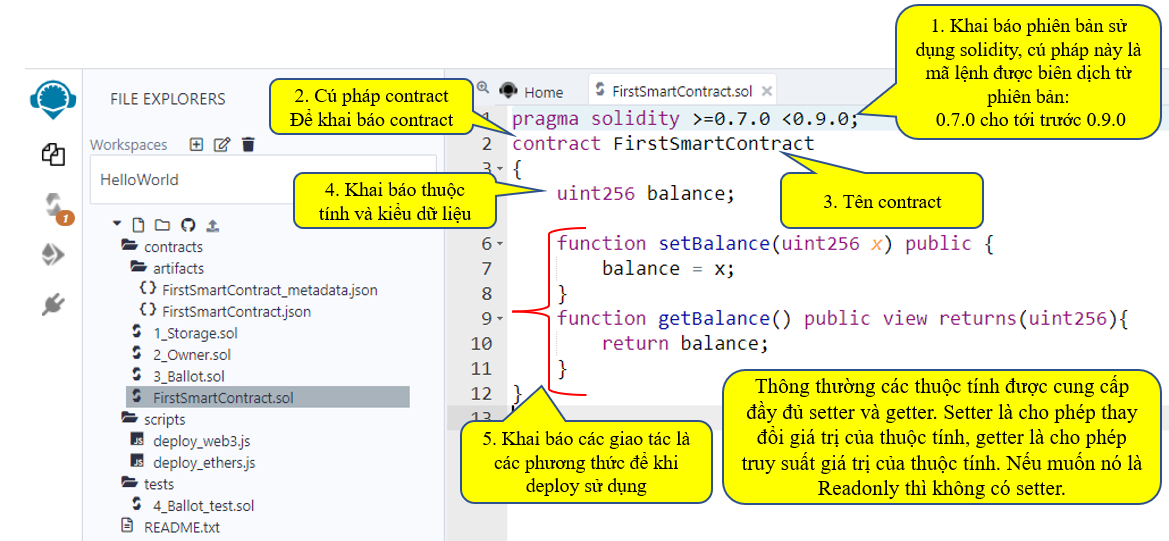
Mã lệnh Contract của FirstSmartContract ở trên gồm có thuộc tính balance và các phương thức setBalance để thay đổi giá trị của balance, phương thức getBalance để truy suất giá trị của balance.
Coding như sau:
pragma solidity >=0.7.0 <0.9.0;
contract FirstSmartContract
{
    uint256 balance;

    function setBalance(uint256 x) public {
        balance = x;
    }
    function getBalance() public view returns(uint256){
        return balance;
    }
}
Khi ta viết sai cú pháp thì chương trình sẽ tự động báo lỗi, lúc này ta sẽ không biết dịch được, ví dụ Tui cố tình sửa 1 xíu cho nó báo lỗi thì bạn sẽ thấy hình ảnh sau:
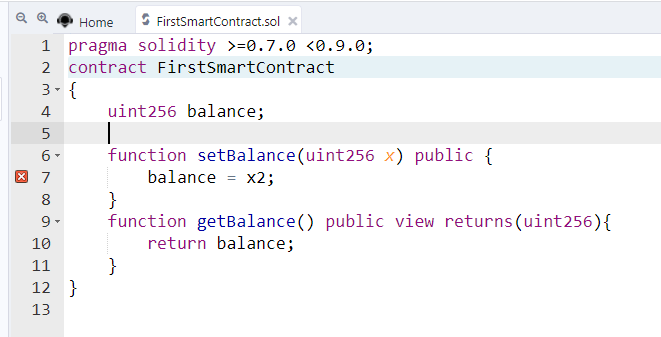
Ở trên không có biến x2 nhưng Tui vẫn khai báo, dãna tới nó bị lỗi có nút màu đỏ. lúc này không biên dịch được.
OK, giờ bạn sửa lại cho nó đúng để chúng ta vào bước biên dịch:
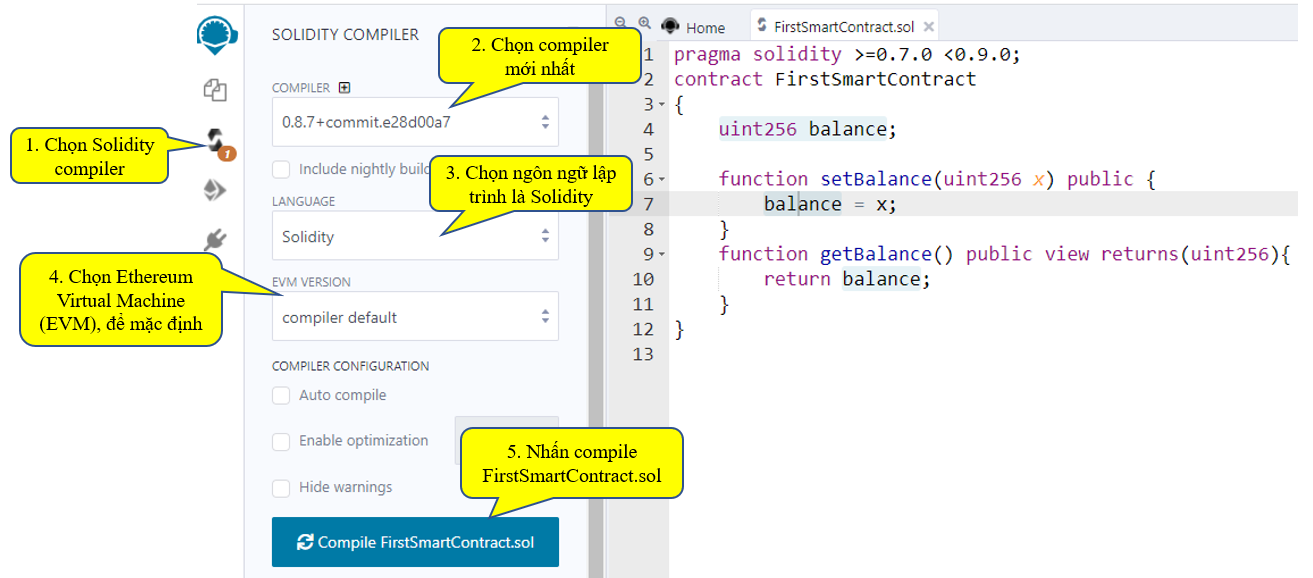
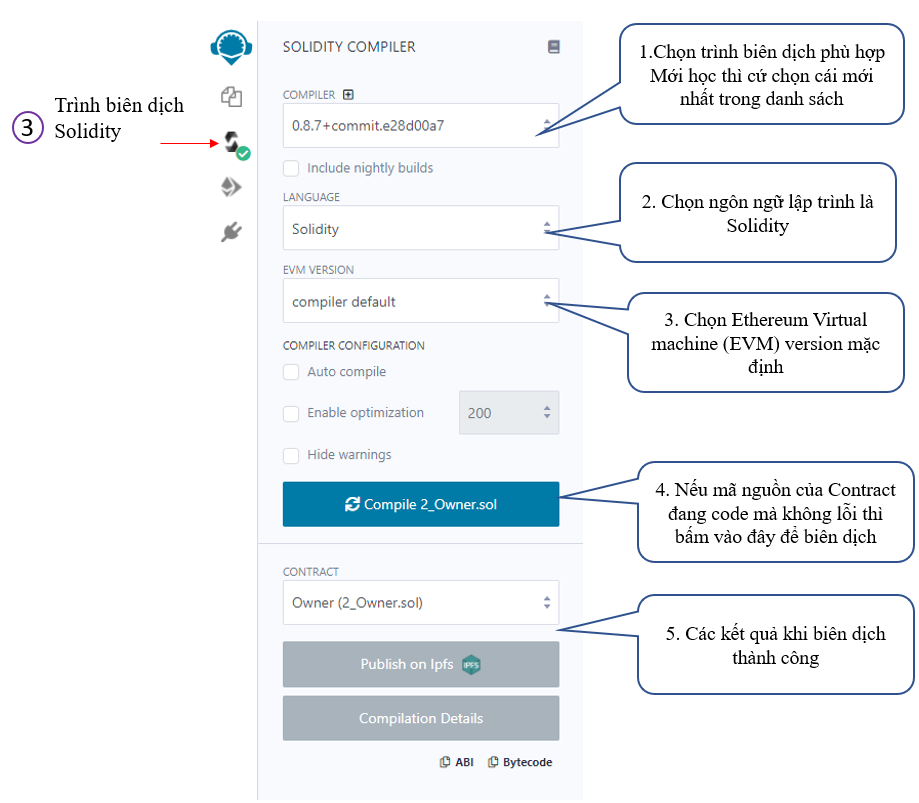
Theo hình trên, để biên dịch ta làm theo cá bước:
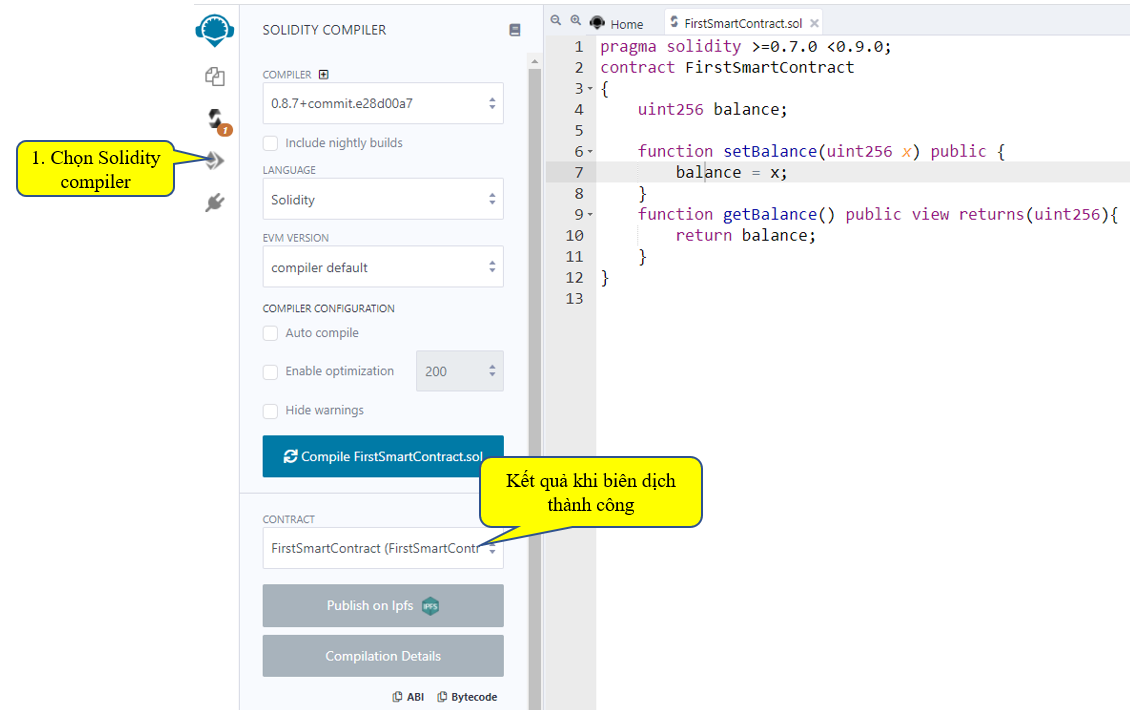
1. Chọn Solidity compiler
2. Chọn compiler mới nhất
3. Chọn ngôn ngữ lập trình là Solidity
4. Chọn Ethereum Virtual Machine (EVM), để mặc định
5. Nhấn compile FirstSmartContract.sol
Ta xem kế quả:
Sau khi biên dịch thành công, ta vào mục Deploy & Run transactions như hình dưới đây:
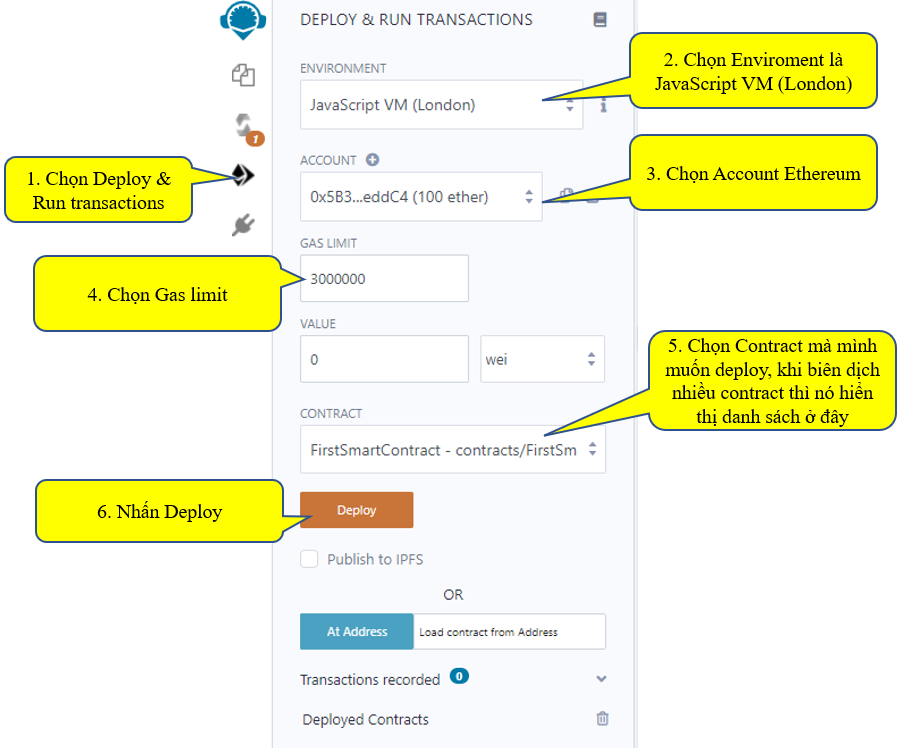
Như vậy các bạn cần làm các bước trong mục Deploy & run transactions như sau:
1. Chọn Deploy & Run transactions
2. Chọn Enviroment là JavaScript VM (London). ở đây có 1 danh sách tùy chọn
3. Chọn Account Ethereum, cũng có nhiều tùy chọn
4. Chọn Gas limit
5. Chọn Contract mà mình muốn deploy, khi biên dịch nhiều contract thì nó hiển thị danh sách ở đây
6. Nhấn Deploy
Sau khi nhấn Deploy ta xem kết quả:
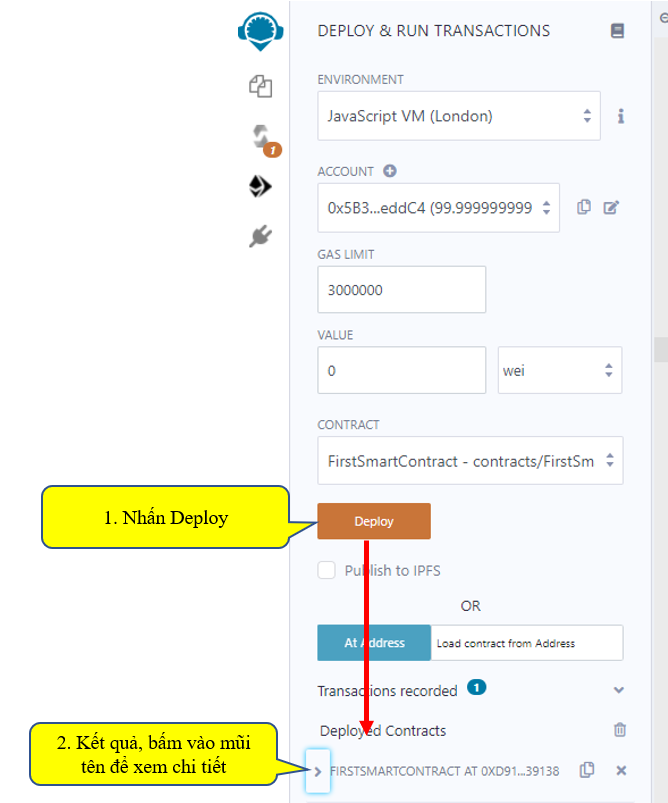
Khi nhấn vào mũi tên để xem chi tiết, ta có màn hình dưới đây, các phương thức (các giao tác) được hiển thị để cho ta tương tác:
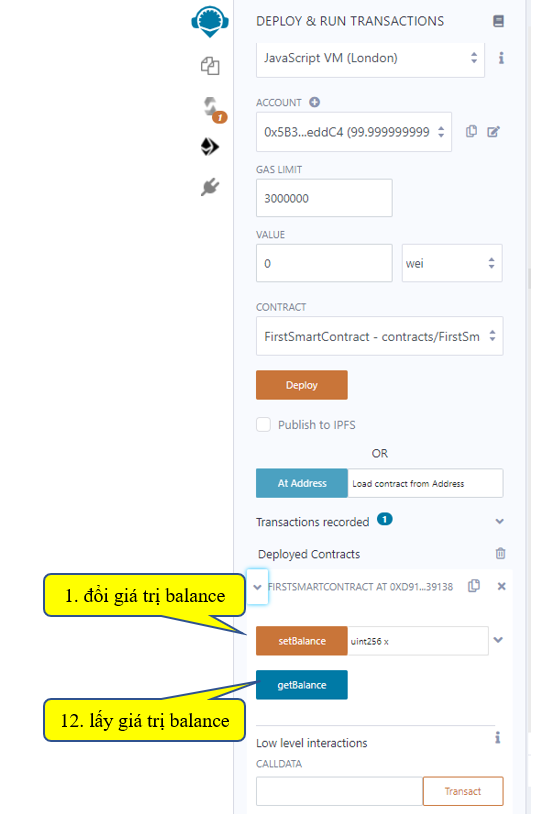
Ví dụ bây giờ ta setBalance là 500000000, chi tiết thao tác xem hình:

Bước 1: nhập giá trị cho giao tác setBalance
Bước 2: nhấn nút setBalance
Bước 3: chi tiết transaction thực hiện, ta có thể xem
Tiếp theo để kiểm tra giao tác setBalance có làm thay đổi giá trị của balance hay không, ta thử nghiệm giao tác getBalance:
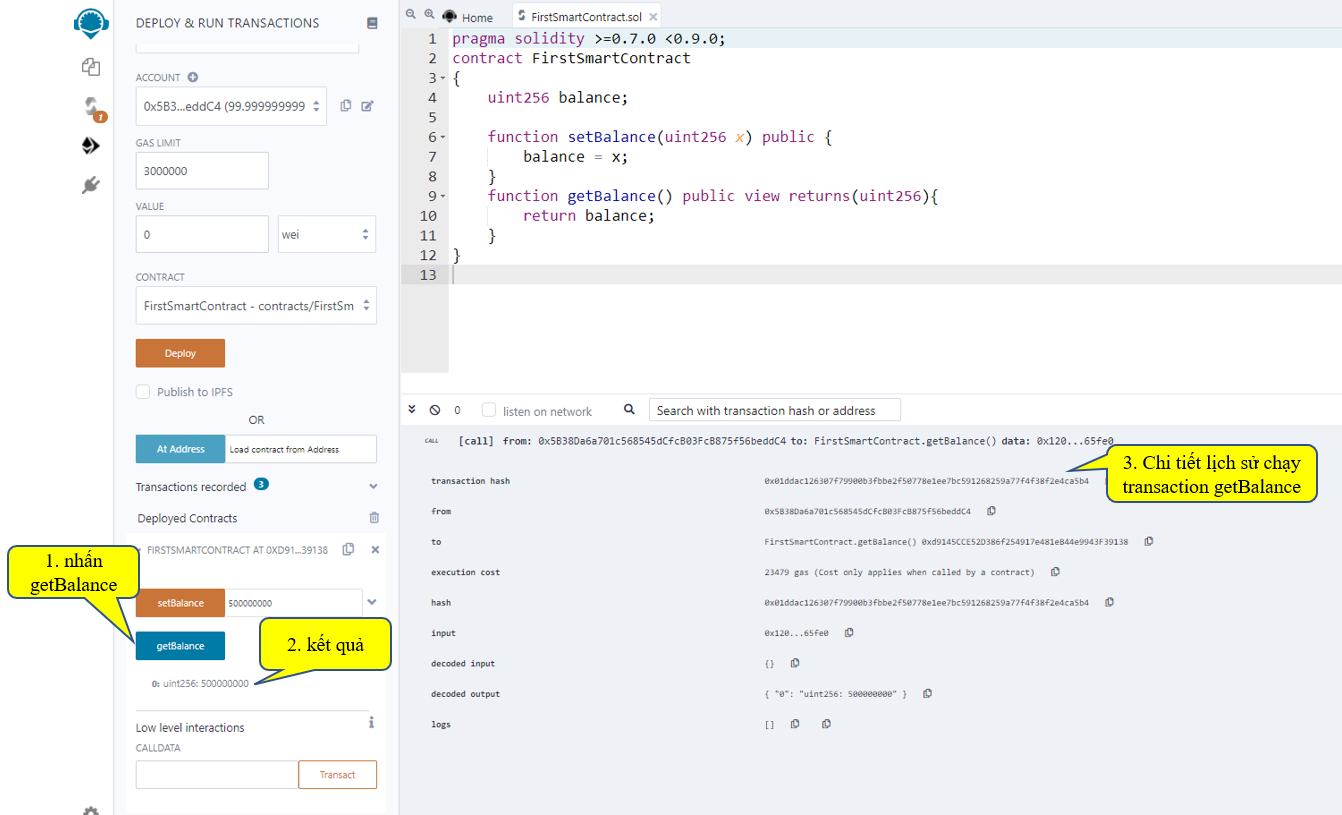
Như vậy là tới đây ta đã hoàn tất việc Code một Smart Contract cũng như cách biên dịch và deploy, run nó như thế nào.
Bài tiếp theo Tui sẽ hướng dẫn các bạn đồng bộ những gì mình lập trình trên Remix Ethereum IDE về máy local của mình để lưu trữu cũng như bảo trì code.
Code FirstSmartContract.so tải ở đây:
https://www.mediafire.com/file/b0vix0rrt44qygn/FirstSmartContract.sol/file
Chúc các bạn thành công
Bài 1: Sử dụng Remix IDE để lập trình Smart Contract trong Ethereum Blockchain
Ethereum tạo ra một số ngôn ngữ để hỗ trợ các dự án liên quan tới Blockchain. Trong đó có Solidity là ngôn ngữ được tạo ra với sứ mệnh chính là viết các dự án về Smart Contract. Ngoài ra hãng cũng phát triển IDE Remix rất nổi tiếng và tiện lợi trong quá trình lập trình cũng như biên dịch và test thử nghiệm các Contract (giới thiệu Smart Contract của Ethereum ở đây: https://docs.soliditylang.org/en/v0.8.7/introduction-to-smart-contracts.html)
Bài này Tui sẽ hướng dẫn các bạn cách sử dụng Remix IDE để lập trình và biên dịch các Contract mặc định online trên hệ thống https://remix.ethereum.org/. Ở bài sau Tui sẽ hướng dẫn các bạn cách tạo một Smart Contract hoàn toàn mới cũng như cách kết nối đồng bộ nó về máy Local.
Lần đầu truy cập vào https://remix.ethereum.org/ ta có giao diện mặc định như bên dưới đây cùng với 1 dự án Smart Contract mẫu(Mặc định màn hình đen thui vậy kệ nó, Tui sẽ hướng dẫn bạn chỉnh theme sau)
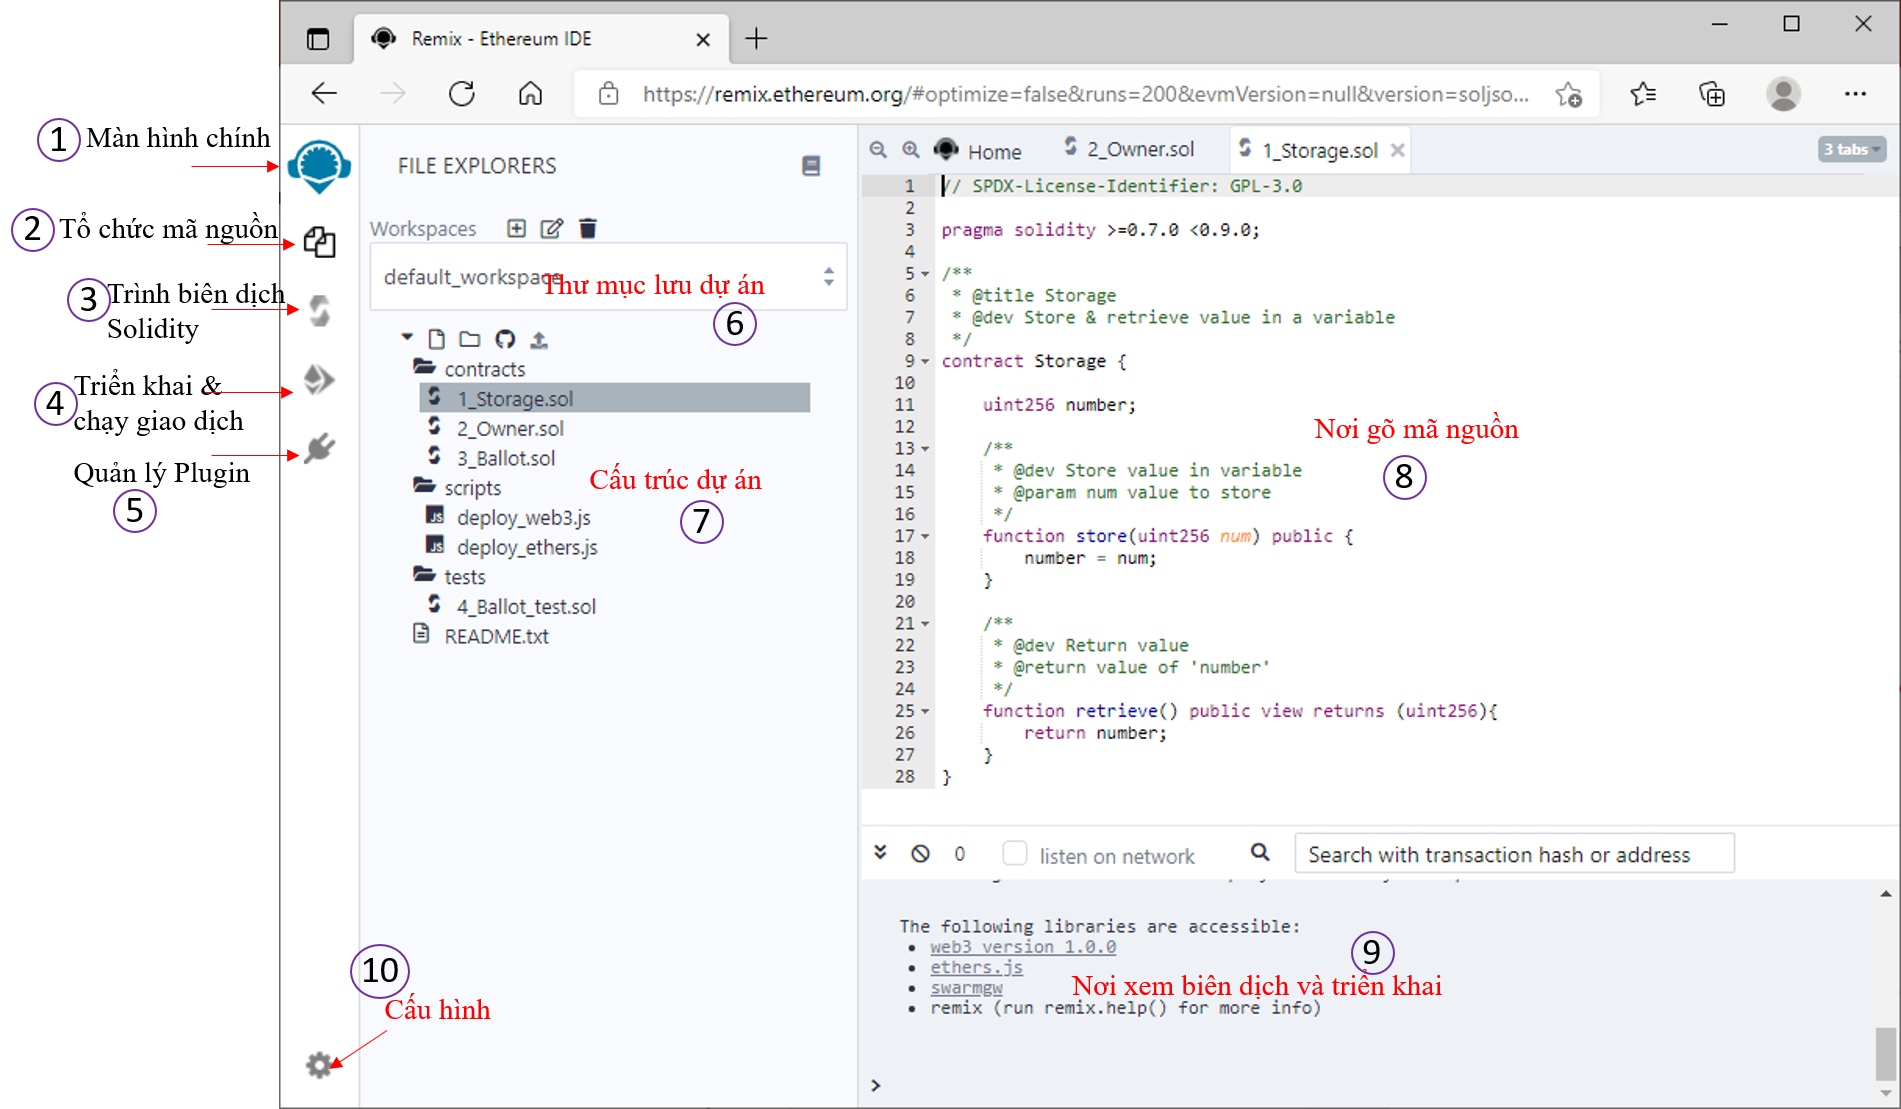
Giao diện của từng mục như sau:
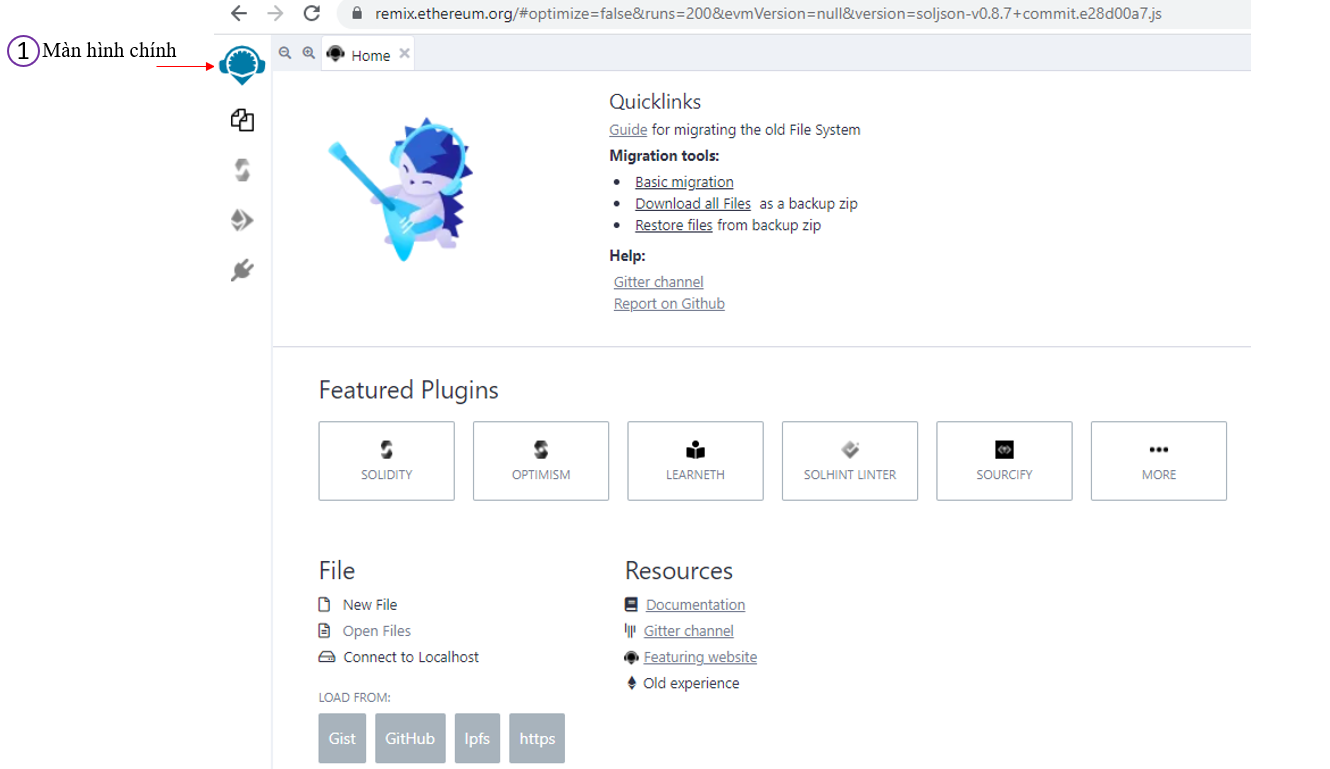
Mục 1 – Màn hình Home:
Khi bạn chọn mục màn hình home thì giao diện hiển thị như bên dưới, nó có thể chứ danh sách cấu trúc dự án, hoặc các hướng dẫn, các giới thiệu về plugins, hay các thao tác trên file, thư mục và các tài nguyên.
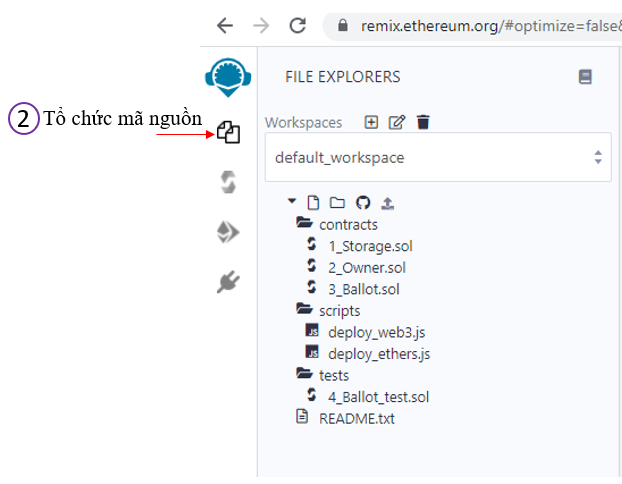
Mục 2 – Tổ chức mãn nguồn:
Khi nhấn vào mục này ta sẽ thấy cấu trúc thư mục như hình bên, ta bấm vào thư mục để xổ các tập tin mã nguồn ra. Muốn thao tác trên nó như: thêm, xóa, sửa tập tin thư mục thì bấm chuột phải vào nó sẽ xổ ra menu cho chọn. Các tập tin mã nguồn mặc định có phần mở rộng là .sol
Mục 3 – trình biên dịch Solidity
Thường khi ta coding xong 1 Contract nếu nó không báo lỗi thì vào đây biên dịch để sử dụng cho bước triển khai và chạy giao dịch.
Mục 4 – Triển khai và chạy giao dịch:
Sau khi mục 3 ta đã biên dịch thanh công thì qua mục 4 này để deploy nó, chi tiết như hình bên dưới

Chi tiết quá trình biên dịch trong mục 3 và chi tiết deploy trong mục 4 cũng được hiển thị trong mục 9.
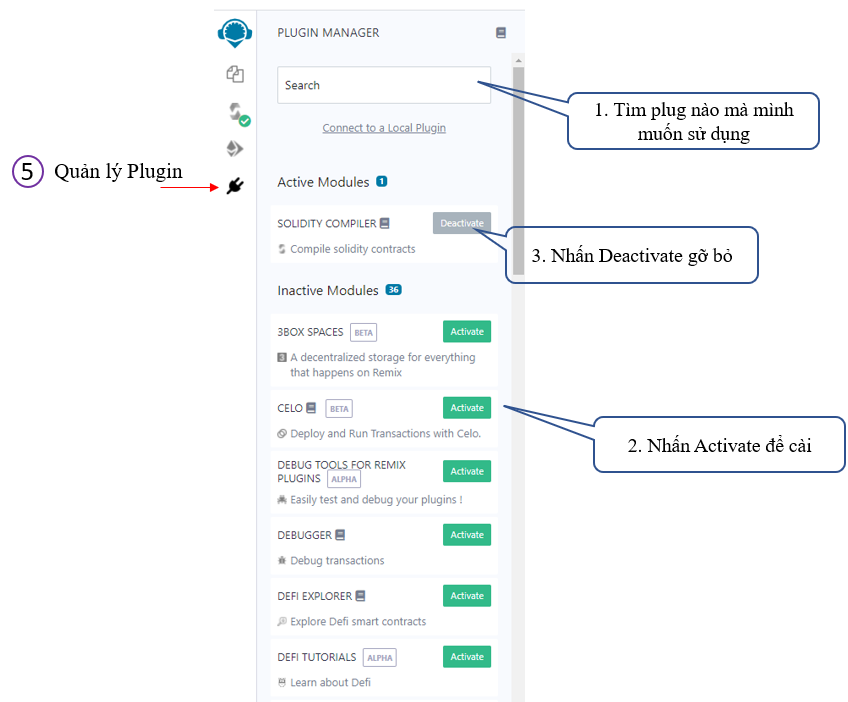
Mục 5- Quản lý Plugin
Trong quá trình triển khai phần mềm Smart Contract sẽ có những lúc ta phải dùng thêm các thư viện ngoài, ta cần vào đây để cài đặt như hình minh họa bên dưới.
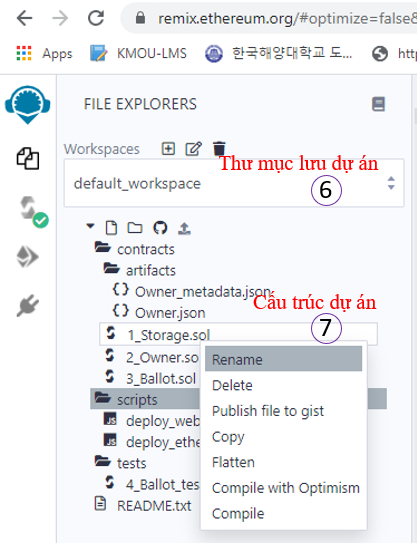
Mục 6-7 quản lý thư mục dự án và cấu trúc dự án
ở mục này ta có thể tạo các Workspaces mới, thêm , sửa, xóa tập tin và thư mục như hình bên dưới.
Tên tập tin nếu nó là Contract thì đuôi mặc định là .sol
Mục 8 – viết mã nguồn:
Ta nhấn vào từng tập tin .sol để lập trình contract như hình bên dưới.
Dĩ nhiên nó là 1 ngôn ngữ lập trình Solidity, bạn phải biết về nó. Tui sẽ tranh thủ ra khóa học hướng dẫn sau. Tạm thời bạn có thể học bản Tiếng Anh tại đây: https://docs.soliditylang.org/en/v0.8.7/index.html

Mục 9 như đã nói là nơi hiển thị chi tiết các tương tác khi biên dịch, deploy.
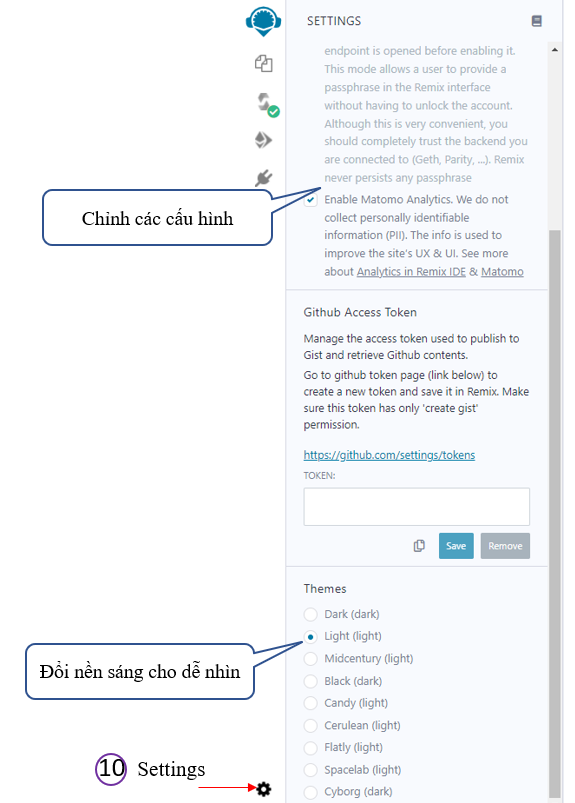
Mục 10 là settings để thay đổi các cấu hình cũng như giao diện
Như vậy tới đây Tui đã hướng dẫn xong cách sử dụng Remix – Ethereum IDE để lập trình các phần mềm về Smart Contract. Các bạn về cơ bản đã biết được ý nghĩa của từng thành phần.
Bài tiếp hteo Tui sẽ hướng dẫn các bạn cách tạo mới 1 Contract hoàn toàn cũng như biết cách biên dịch, deploy và thử nghiệm 1 số giao tác ngay trên hệ thống của Ethereum Blockchain.
Hẹn gặp ở bài thứ 2, đó là bài “Tạo First Smart Contract”.
Chúc các bạn thành công


