– Bài tập này Tôi sẽ hướng dẫn các bạn cách xử lý tập tin trong Android, bao gồm:
+ Internal Storage
+ External Storage
+ Saving Cache Files
– Các bạn chú ý là Android sử dụng cấu trúc tập tin giống như trong ứng dụng Java thuần túy.
– Tập tin trong Android có thể được lưu trữ trong Main Memory (thường là lưu trữ tập tin có dung lượng nhỏ) hoặc SD Card (thường là lưu trữ tập tin có dung lượng lớn).
– Các tập tin được lưu trữ cùng với các tài nguyên khác trong bộ nhớ trong (chẳng hạn như Icons, hình ảnh, nhạc,…) thì người ta gọi chung là Resource Files.
– Trên mạng có đầy rẫy website hướng dẫn về thao tác với tập tin trong Android, nhưng ở đây Tôi muốn trình bày theo cách của Tôi.
1) Internal Storage
– Ở đây có 2 trường hợp:
– Thứ nhất: đọc Resource File (Read only)
– Thứ nhì : đọc và ghi tập tin (Read & Write).
* Đọc Resource File:
– Bạn xem giao diện bên dưới: Tôi tạo 1 tập tin và nhập đại vào một số dữ liệu rồi kéo thả tập tin đó vào thư mục drawable. Nếu như ứng dụng của bạn không có thư mục này thì bạn tự tạo nó nhớ là viết y xì “drawable“, tên file cũng đừng để khoảng trắng, đừng để chữ số đằng trước.
 – Khi nhấn chọn “Read Data“, chương trình sẽ đọc nội dung từ myfile.txt và hiển thị lên EditText.
– Ở đây Tôi muốn hỏi các bạn là : “Tại sao các resource được đóng gói trong APK lại là Read Only?“. Tôi nghĩ câu trả lời đơn giản nhất đó là sử dụng tối ưu bộ nhớ. Vì điện thoại không giống như máy tính, bộ nhớ trong của nó không có bao la bát ngát như PC, mỗi phần mềm (.APK) được cài đặt vào thì nó sẽ không muốn “Co Giãn” dung lượng vì nó cần quản lý phần mềm để tối ưu nhất (sử dụng bộ nhớ ít nhất).
– Bạn xem cấu trúc XML của giao diện (activity_main.xml):
<LinearLayout xmlns:android="http://schemas.android.com/apk/res/android"
 xmlns:tools="http://schemas.android.com/tools"
 android:id="@+id/LinearLayout1"
 android:layout_width="match_parent"
 android:layout_height="match_parent"
 android:orientation="vertical"
 tools:context=".MainActivity" >

<Button
 android:id="@+id/btnreaddata"
 android:layout_width="match_parent"
 android:layout_height="wrap_content"
 android:text="Read Data" />

<EditText
 android:id="@+id/editdata"
 android:layout_width="match_parent"
 android:layout_height="0dip"
 android:layout_weight="2"
 android:ems="10"
 android:gravity="top|left"
 android:inputType="textMultiLine" >

<requestFocus />
 </EditText>
– Đây là source code để đọc Resource File:
– Bạn chỉ cần copy đoạn code này vào sự kiện của nút đọc là xong:
public void readData()
 {
 String data;
 InputStream in= getResources().openRawResource(R.drawable.myfile);
 InputStreamReader inreader=new InputStreamReader(in);
 BufferedReader bufreader=new BufferedReader(inreader);
 StringBuilder builder=new StringBuilder();
 if(in!=null)
 {
 try
{
 while((data=bufreader.readLine())!=null)
 {
 builder.append(data);
 builder.append("\n");
 }
 in.close();
 editdata.setText(builder.toString());
}
 catch(IOException ex){
 Log.e("ERROR", ex.getMessage());
 }
}
}
– Ở đây Tôi không cung cấp source nguồn, vì nó chỉ có 1 hàm xí xi đó. Các bạn chỉ cần thiết kế giao diện cho giống như XML Layout rồi copy code vào sự kiện của nút nhấn là xong.
– Cách đọc tập tin trong Android y chang như trong Java thuần túy, ở đây bạn chỉ để ý dòng lệnh số 4:
InputStream in= getResources().openRawResource(R.drawable.myfile);
Dòng lệnh này để đọc Resource File và trả về InputStream. Khi có InputStream rồi thì mọi xử lý sẽ giống như Java.
* Đọc và ghi tập tin:
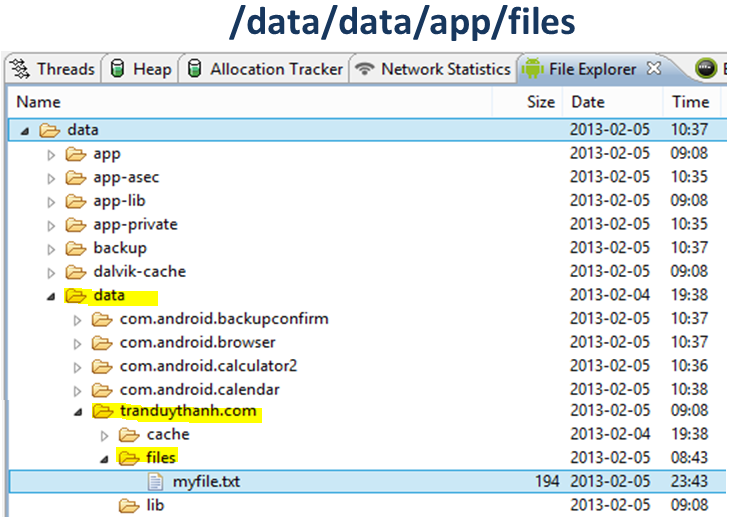
– Trường hợp này bạn kéo thả tập tin vào cấu trúc thư mục như hình bên dưới (dùng DDMS):
– Nhìn vào những vệt Tôi tô màu vàng, các bạn kéo thả vào đúng vị trí ứng dụng của bạn.
– XML Resource cho bài tập này:
<LinearLayout xmlns:android="http://schemas.android.com/apk/res/android"
 xmlns:tools="http://schemas.android.com/tools"
 android:id="@+id/LinearLayout1"
 android:layout_width="match_parent"
 android:layout_height="match_parent"
 android:orientation="vertical"
 tools:context=".MainActivity" >

<Button
 android:id="@+id/btnreaddata"
 android:layout_width="match_parent"
 android:layout_height="wrap_content"
 android:text="Read Data" />

<EditText
 android:id="@+id/editdata"
 android:layout_width="match_parent"
 android:layout_height="0dip"
 android:layout_weight="2"
 android:ems="10"
 android:gravity="top|left"
 android:inputType="textMultiLine" >

<requestFocus />
 </EditText>

<Button
 android:id="@+id/btnwritedata"
 android:layout_width="match_parent"
 android:layout_height="wrap_content"
 android:text="Write Data" />

</LinearLayout>
– XML resource trên sẽ tạo giao diện như hình bên dưới:

– Source Activity
package tranduythanh.com;
import java.io.BufferedReader;
import java.io.FileInputStream;
import java.io.FileNotFoundException;
import java.io.FileOutputStream;
import java.io.IOException;
import java.io.InputStream;
import java.io.InputStreamReader;
import java.io.OutputStreamWriter;

import android.os.Bundle;
import android.app.Activity;
import android.util.Log;
import android.view.Menu;
import android.view.View;
import android.view.View.OnClickListener;
import android.widget.Button;
import android.widget.EditText;

public class MainActivity extends Activity implements OnClickListener{

Button btnread,btnwrite;
 EditText editdata;
 @Override
 protected void onCreate(Bundle savedInstanceState) {
 super.onCreate(savedInstanceState);
 setContentView(R.layout.activity_main);
 btnread=(Button) findViewById(R.id.btnreaddata);
 btnwrite=(Button) findViewById(R.id.btnwritedata);
 editdata=(EditText) findViewById(R.id.editdata);
 btnread.setOnClickListener(this);
 btnwrite.setOnClickListener(this);
 }
 public void onClick(View v) {
 if(v.getId()==R.id.btnreaddata)
 {
 readData();
 }
 else if(v.getId()==R.id.btnwritedata)
 {
 writeData();
 }
 }
 /**
 * Hàm đọc tập tin trong Android
 * Dùng openFileInput trong Android để đọc
 * ra FileInputStream
 */
 public void readData()
 {
 try {
 FileInputStream in= openFileInput("myfile.txt");
 BufferedReader reader=new
 BufferedReader(new InputStreamReader(in));
 String data="";
 StringBuilder builder=new StringBuilder();
 while((data=reader.readLine())!=null)
 {
 builder.append(data);
 builder.append("\n");
 }
 in.close();
 editdata.setText(builder.toString());
 } catch (FileNotFoundException e) {
 e.printStackTrace();
 } catch (IOException e) {
 e.printStackTrace();
 }
 }
 /**
 * Hàm ghi tập tin trong Android
 * dùng openFileOutput để ghi
 * openFileOutput tạo ra FileOutputStream
 */
 public void writeData()
 {
 try {
 FileOutputStream out=
 openFileOutput("myfile.txt",0);
 OutputStreamWriter writer=
 new OutputStreamWriter(out);
 writer.write(editdata.getText().toString());
 writer.close();
 } catch (FileNotFoundException e) {
 e.printStackTrace();
 } catch (IOException e) {
 e.printStackTrace();
 }
 }
 /*
 * hàm này là đọc Resource File, Tôi gom chung vào đây
 */
 public void readData2()
 {
 String data;
 InputStream in= getResources()
 .openRawResource(R.drawable.myfile);
 InputStreamReader inreader=new InputStreamReader(in);
 BufferedReader bufreader=new BufferedReader(inreader);
 StringBuilder builder=new StringBuilder();
 if(in!=null)
 {
 try{
 while((data=bufreader.readLine())!=null)
 {
 builder.append(data);
 builder.append("\n");
 }
 in.close();
 editdata.setText(builder.toString());
 }
 catch(IOException ex){
 Log.e("ERROR", ex.getMessage());
 }
 }
 }

 @Override
 public boolean onCreateOptionsMenu(Menu menu) {
 // Inflate the menu; this adds items to the action bar if it is present.
 getMenuInflater().inflate(R.menu.activity_main, menu);
 return true;
 }
}
– Bạn nhìn vào dòng lệnh 52: FileInputStream in= openFileInput(“myfile.txt”);
Lệnh ở dòng này mở tập tin lên để đọc, nó trả về FileInputStream nên mọi thứ sẽ giống như Java thuần túy.
– Tiếp tục nhìn vào dòng lệnh 78: FileOutputStream out=openFileOutput(“myfile.txt”,0);
Lệnh ở dòng này mở tập tin lên để ghi. đối số thứ 2 Tôi để là số 0 (MODE_PRIVATE) là mặc định. Bạn có thể dùng MODE_APPEND, MODE_WORLD_READABLE, MODE_WORLD_WRITEABLE. Ý nghĩa của mỗi mode bạn có thể lên mạng tìm. Hoặc chỉ cần di chuyển chuột vào hàm trên là eclipse tự giải thích cho các bạn (nếu eclipse bạn đã cài Javadoc).
– Bạn tải source code mẫu phần này ở đây:
http://www.mediafire.com/download/toi0ht8ht0t5gd3/LearnFileInternalStorage.rar
2. External Storage:
– Phần này Tôi muốn hướng dẫn các bạn cách tương tác với tập tin được lữu trữ trên SD Card.
– Để thao tác được trên SD Card, bạn phải cấp quyền cho ứng dụng (uses – permission)
– Để vừa ghi vừa đọc trên SD Card thì ta phải sử dụng 2 permission bên dưới trong AndroidManifest:
<uses-permission android:name=”android.permission.WRITE_EXTERNAL_STORAGE” />
<uses-permission android:name=”android.permission.READ_EXTERNAL_STORAGE” />
– Để lấy được đường dẫn của SD Card ta dùng lệnh:
String sdcard=Environment.getExternalStorageDirectory().getAbsolutePath();
– Sau đó mọi thứ tương tác với tập tin thì y xì như Java thuần túy, ở đây Tôi dùng Scanner để đọc và OutputStreamWriter để ghi.
– Vì vậy giao diện Tôi làm y chang như Internal Storage:
– Bạn tạo Project và kéo thả tập tin vào SD card (dĩ nhiên khi tạo AVD thì bạn phải checked vào using SD card thì mới có). Bạn xem hình để biết cách kéo thả vào SD Card:
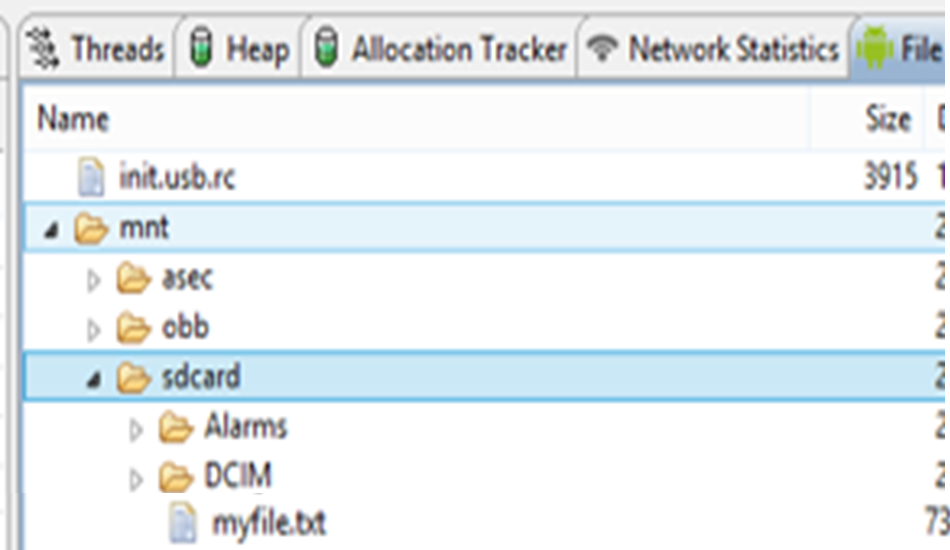
– Ở hình trên bạn vào DDMS, tới thư mục mnt/ chọn sdcard. Phải chọn cho đúng vì nó có nhiều thư mục cùng tên sdcard, nhưng bạn chọn sdcard ở trong thư mục mnt thôi. Sau đó kéo thả tập tin vào đây là xong.
– XML Resource y xì như phần internal Storage nên Tôi không đưa vào đây, bạn xem Source code Activity:
package tranduythanh.com;

import java.io.File;
import java.io.FileNotFoundException;
import java.io.FileOutputStream;
import java.io.IOException;
import java.io.OutputStreamWriter;
import java.util.Scanner;

import android.os.Bundle;
import android.os.Environment;
import android.app.Activity;
import android.view.Menu;
import android.view.View;
import android.view.View.OnClickListener;
import android.widget.Button;
import android.widget.EditText;

public class MainActivity extends Activity implements OnClickListener{

Button btnread,btnwrite;
 EditText editdata;
 @Override
 protected void onCreate(Bundle savedInstanceState) {
 super.onCreate(savedInstanceState);
 setContentView(R.layout.activity_main);
 btnread=(Button) findViewById(R.id.btnreaddata);
 btnwrite=(Button) findViewById(R.id.btnwritedata);
 editdata=(EditText) findViewById(R.id.editdata);
 btnread.setOnClickListener(this);
 btnwrite.setOnClickListener(this);
 }
 public void onClick(View v) {
 if(v.getId()==R.id.btnreaddata)
 {
 readData();
 }
 else if(v.getId()==R.id.btnwritedata)
 {
 writeData();
 }
 }
 /*
 * đọc từ SD Card
 * Environment.getExternalStorageDirectory().getAbsolutePath()
 * để lấy đường dẫn trên SD Card
 */
 public void readData()
 {
 String sdcard=Environment
 .getExternalStorageDirectory()
 .getAbsolutePath()+"/myfile.txt";
 try {
 Scanner scan=new Scanner(new File(sdcard));
 String data="";
 while(scan.hasNext())
 {
 data+=scan.nextLine()+"\n";
 }
 scan.close();
 editdata.setText(data+"");
 } catch (FileNotFoundException e) {
 e.printStackTrace();
 }
 }
 /**
 * ghi tập tin trên SD Card
 */
 public void writeData()
 {
 String sdcard=Environment
 .getExternalStorageDirectory()
 .getAbsolutePath()+"/myfile.txt";
 try {
 OutputStreamWriter writer=
 new OutputStreamWriter(
 new FileOutputStream(sdcard));
 writer.write(editdata.getText()+"");
 writer.close();
 } catch (FileNotFoundException e) {
 e.printStackTrace();
 } catch (IOException e) {
 e.printStackTrace();
 }
 }

 @Override
 public boolean onCreateOptionsMenu(Menu menu) {
 // Inflate the menu; this adds items to the action bar if it is present.
 getMenuInflater().inflate(R.menu.activity_main, menu);
 return true;
 }

}
– Vì có sử dụng Permission nên bạn xem AndroidManifest:
<?xml version="1.0" encoding="utf-8"?>
<manifest xmlns:android="http://schemas.android.com/apk/res/android"
 package="tranduythanh.com"
 android:versionCode="1"
 android:versionName="1.0" >

<uses-sdk
 android:minSdkVersion="14"
 android:targetSdkVersion="17" />

<uses-permission android:name="android.permission.WRITE_EXTERNAL_STORAGE" />
 <uses-permission android:name="android.permission.READ_EXTERNAL_STORAGE" />

<application
 android:allowBackup="true"
 android:icon="@drawable/ic_launcher"
 android:label="@string/app_name"
 android:theme="@style/AppTheme" >
 <activity
 android:name="tranduythanh.com.MainActivity"
 android:label="@string/app_name" >
 <intent-filter>
 <action android:name="android.intent.action.MAIN" />

<category android:name="android.intent.category.LAUNCHER" />
 </intent-filter>
 </activity>
 </application>

</manifest>
– Khi thực thi ứng dụng, bạn sẽ có giao diện như trình bày ở trên, với kết quả như mong muốn.
– Bạn có thể tải coding mẫu ở đây:
http://www.mediafire.com/download/1ydvjc8wvizzjcm/LearnFileExternalStorage.rar
3) Saving cache files:
– Lợi ích của cache files là gì? Để tăng tốc độ xử lý của ứng dụng khi bạn thường xuyên truy cập internet thì bạn nên lưu cache.
– Khi lưu cache thì nó sẽ để ở đâu trong điện thoại? bạn xem hình:
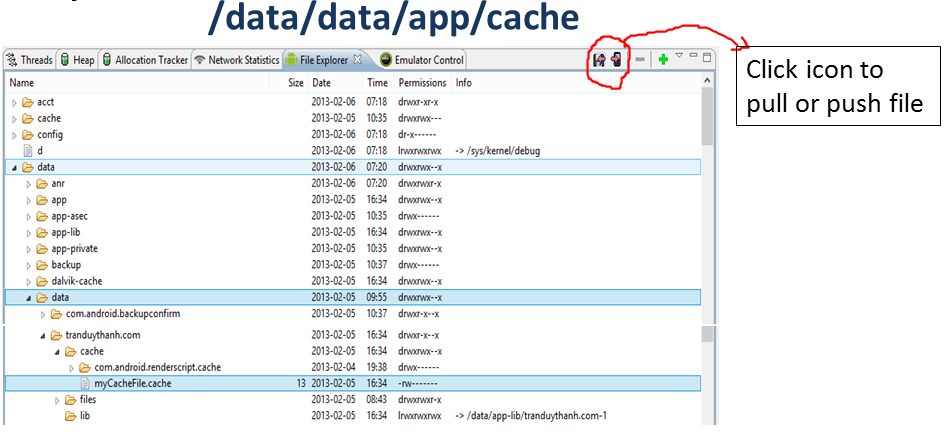
– Khi lưu cache thì mặc định nó sẽ lưu vào thư mục cache như hình bên trên. Hình trên Tôi có tập tin tên là myCachefile.Cache.
– Lưu như thế nào? và xóa như thế nào?
Khi bạn lưu cache, Android thường chỉ cho tối đa file cache là 1MB, khi bạn gỡ bỏ phần mềm thì nó cũng tự động xóa cache của phần mềm này đi.
– Để lấy được đường dẫn của thư mục Cache trong ứng dụng, ta dùng lệnh : getCacheDir() . Sau đó cách lưu cache tương tự như Java thuần túy.
– Dưới đây là phần mềm minh họa Cache, giao diện tương tự như trên:
– XML resource:
<LinearLayout xmlns:android="http://schemas.android.com/apk/res/android"
 xmlns:tools="http://schemas.android.com/tools"
 android:id="@+id/LinearLayout1"
 android:layout_width="match_parent"
 android:layout_height="match_parent"
 android:orientation="vertical"
 tools:context=".MainActivity" >

<Button
 android:id="@+id/btncreatecache"
 android:layout_width="match_parent"
 android:layout_height="wrap_content"
 android:text="Create Cache" />

<EditText
 android:id="@+id/editdata"
 android:layout_width="match_parent"
 android:layout_height="0dip"
 android:layout_weight="2"
 android:ems="10"
 android:gravity="top|left"
 android:inputType="textMultiLine" >

<requestFocus />
 </EditText>

<Button
 android:id="@+id/btnreadcache"
 android:layout_width="match_parent"
 android:layout_height="wrap_content"
 android:text="Read Cache" />

</LinearLayout>
– Xử lý code Activity:
package tranduythanh.com;

import java.io.File;
import java.io.FileNotFoundException;
import java.io.FileOutputStream;
import java.io.IOException;
import java.util.Scanner;

import android.os.Bundle;
import android.app.Activity;
import android.view.Menu;
import android.view.View;
import android.view.View.OnClickListener;
import android.widget.Button;
import android.widget.EditText;

public class MainActivity extends Activity implements OnClickListener{

Button btncreatecache,btnreadcache;
 EditText editdata;
 @Override
 protected void onCreate(Bundle savedInstanceState) {
 super.onCreate(savedInstanceState);
 setContentView(R.layout.activity_main);
 btncreatecache=(Button) findViewById(R.id.btncreatecache);
 btnreadcache=(Button) findViewById(R.id.btnreadcache);
 editdata =(EditText) findViewById(R.id.editdata);
 btncreatecache.setOnClickListener(this);
 btnreadcache.setOnClickListener(this);
 }

@Override
 public boolean onCreateOptionsMenu(Menu menu) {
 // Inflate the menu; this adds items to the action bar if it is present.
 getMenuInflater().inflate(R.menu.activity_main, menu);
 return true;
 }

@Override
 public void onClick(View v) {
 // TODO Auto-generated method stub
 if(v.getId()==R.id.btncreatecache)
 {
 createCache();
 }
 else if(v.getId()==R.id.btnreadcache)
 {
 readCache();
 }
 }
 /**
 * Lấy toàn bộ file cache
 */
 public void loadAllCache()
 {
 File pathCacheDir = getCacheDir();
 File []listCache= pathCacheDir.listFiles();
 for(File f :listCache)
 {
 //process f here
 f.delete();
 }
 }
 /**
 * đọc cache file
 * getCacheDir() trả về đúng thư mục cache
 */
 public void readCache() {
 try {
 File pathCacheDir = getCacheDir();
 String strCacheFileName = "myCacheFile.cache";
 File newCacheFile = new
 File(pathCacheDir, strCacheFileName);
 Scanner sc=new Scanner(newCacheFile);
 String data="";
 while(sc.hasNext())
 {
 data+=sc.nextLine()+"\n";
 }
 editdata.setText(data);
 sc.close();
 } catch (FileNotFoundException e) {
 e.printStackTrace();
 }
 }
 /**
 * Lưu cache file
 */
 public void createCache()
 {
 try {
 File pathCacheDir = getCacheDir();
 String strCacheFileName = "myCacheFile.cache";
 String strFileContents = editdata.getText()+"";
 File newCacheFile = new
 File(pathCacheDir, strCacheFileName);
 newCacheFile.createNewFile();
 FileOutputStream foCache =
 new FileOutputStream(
 newCacheFile.getAbsolutePath());
 foCache.write(strFileContents.getBytes());
 foCache.close();
 } catch (IOException e) {
 e.printStackTrace();
 }
 }

}
– Vì giao diện và cách chạy tương tự như ví dụ trước nên Tôi không chụp hình minh họa,
– Bạn có thể tải coding mẫu ở đây: http://www.mediafire.com/download/u0smn6v68xf6uc5/LearnCacheFile.rar
– Như vậy tôi đã giới thiệu xong tương tác tập tin trong Android: internal Storage, external storage, caching file
– Trong bài tập kế tiếp Tôi sẽ hướng dẫn các bạn cách tương tác với XML file trong Android, trong bài tập này Tôi muốn trình bày về 2 kỹ thuật duyệt tập tin XML đó là : DOM và SAX. Tôi thấy nó rất hay, các bạn nên chú ý theo dõi.


Thầy ơi,
Hàm bên dưới đây là em đọc dữ liệu từ 1 file xml trong sdcard của máy ảo, nhưng mà k hiểu sao nó k load dữ liệu lên được. Thầy xem giúp em với!
————————
public void saxparser() {
try {
XmlPullParserFactory fc =XmlPullParserFactory.newInstance();
XmlPullParser parser=fc.newPullParser();
String sdcard=Environment.getExternalStorageDirectory().getAbsolutePath();
String xmlfile=sdcard+”/employee.xml”;
FileInputStream fIn= new FileInputStream(xmlfile);
parser.setInput(fIn,”UFT-8″);
int enventType=-1;
String nodeName;
String datashow=””;
while (enventType!=XmlPullParser.END_DOCUMENT) {
enventType=parser.next();
switch (enventType) {
case XmlPullParser.START_DOCUMENT:
break;
case XmlPullParser.END_DOCUMENT:
break;
case XmlPullParser.START_TAG:
nodeName=parser.getName();
if (nodeName.equals(“employee”)) {
datashow+=parser.getAttributeValue(0)+”-“;
datashow+=parser.getAttributeValue(1)+”-“;
}
else if (nodeName.equals(“name”)) {
datashow+=parser.nextText()+”-“;
}
else if (nodeName.equals(“phone”)) {
datashow+=parser.nextText()+”-“;
}
break;
case XmlPullParser.END_TAG:
nodeName=parser.getName();
if (nodeName.equals(“employee”)) {
datashow+=”\n—————–\n”;
}
break;
}
}
TextView tv=(TextView)findViewById(R.id.textView1);
tv.setText(datashow);
} catch (XmlPullParserException e) {
e.printStackTrace();
}catch (FileNotFoundException e) {
e.printStackTrace();
} catch (IOException e) {
e.printStackTrace();
}
}
Thầy giảng hay quá!
Thầy ơi em đang học đến chỗ intent-filter nhưng em không hiểu về cái này nắm .Thầy có hể giải thích cho em về thằng này được không,có ví dụ đi kèm thì càng tốt.Em cảm ơn thầy.
Bài viết rất hay rất hữu ích.cám ơn thầy nhiều nhiều!
Rồi phương thức loadAllCache() được gọi ở đâu thế?
Làm thế nào để lưu tiên tục các dữ liệu mà không bị mất đi vậy bạn?
Em muốn đọc dữ liệu từ file Excel thì làm thế nào ạ? Em thực hiện đọc file Excel trong Java thì được nhưng trong này không thể được. Mong thầy và mọi người giúp đỡ.
Tôi xin hỏi muốn tạo một thư mục trong thẻ nhớ ( nếu có rồi thì thôi ) thì làm thế nào ah?
Cám ơn thầy vì dày công biên soạn những bài học vô cùng có ý nghĩa.
Thầy làm ơn cho em thắc mắc với ạ! File cache và file userData trong firmware của android đóng vai trò là gì ạ? và kích thước của chúng nói lên điều gì ạ?
Em backup một bản ROM của chip mediatek. Sau backup thiếu hai file là cache.img và user data.img . Em muốn chọn kích thước cho hai fie này trước khi chạy lại ROM thì nên chọn oại kích thước file lớn hay nhỏ ạ? Em cám ơn thầy!
làm sao để đọc file từ file sql trong web vậy?
Thầy ơi tại sao project này không thể chạy trên Android Studio được. Android Studio không chấp nhận file txt trong thư mục drawable. Thậm chí em chuyển thành đuôi .xml thì trình biên dịch cũng không chấp nhận vì không đúng form xml?
Em cũng bị giống bạn Hanah Nguyen. Android Studio ko chấp nhận file text nằm trong drawable, mà e cũng đã thử tất cả các thư mục khác, đều ko đc, Mong thầy giúp đỡ chúng e vượt qua bế tắc 😥
Em có thể tạo thư mục assets
thầy cho em hỏi chút nếu mình đọc file apk thì sao thầy. em lấy vị trí file apk String fpath = Environment.getExternalStorageDirectory() + ;nhưng không dc
thầy cho em hỏi tại sao em bi lỗi chỗ R.drawable.myfile trong dòng
InputStream in= getResources().openRawResource(R.drawable.myfile);
nó nói: The filename must end with .xml or .png
thầy cho em hỏi là em có thể sử dụng code như trên thầy đã hướng dẫn để chèn sách vào rồi cho người dùng tải sách về đọc trên di động được không thầy?
Hi em, em có link file, rồi dùng Download Manager là nhanh nhất nhé
dạ thưa thầy ,sao em thử đọc và ghi file nhưng khi em mở Android Device Monitor lên thì không thấy gì cả , ngay ô Device cũng không thấy ADK nào??? em hoang mang từ chiều đến giờ lên mạng tìm làm theo mà cũng không được mong thầy giúp em , em cảm ơn