Bạn muốn xây dựng ứng dụng để gửi thông báo tới khoảng 1000 máy client có kết nối internet cùng một lúc mà không tốn phí thì có thể nghiên cứu cách sử dụng Google Cloud Message (GCM), trong bài tập này Tui sẽ hướng dẫn các bạn từng bước xây dựng ứng dụng sử dụng GCM. Trước tiên Tui vẽ lại quy trình sơ lược cách thức vận hành của GCM như hình dưới đây:
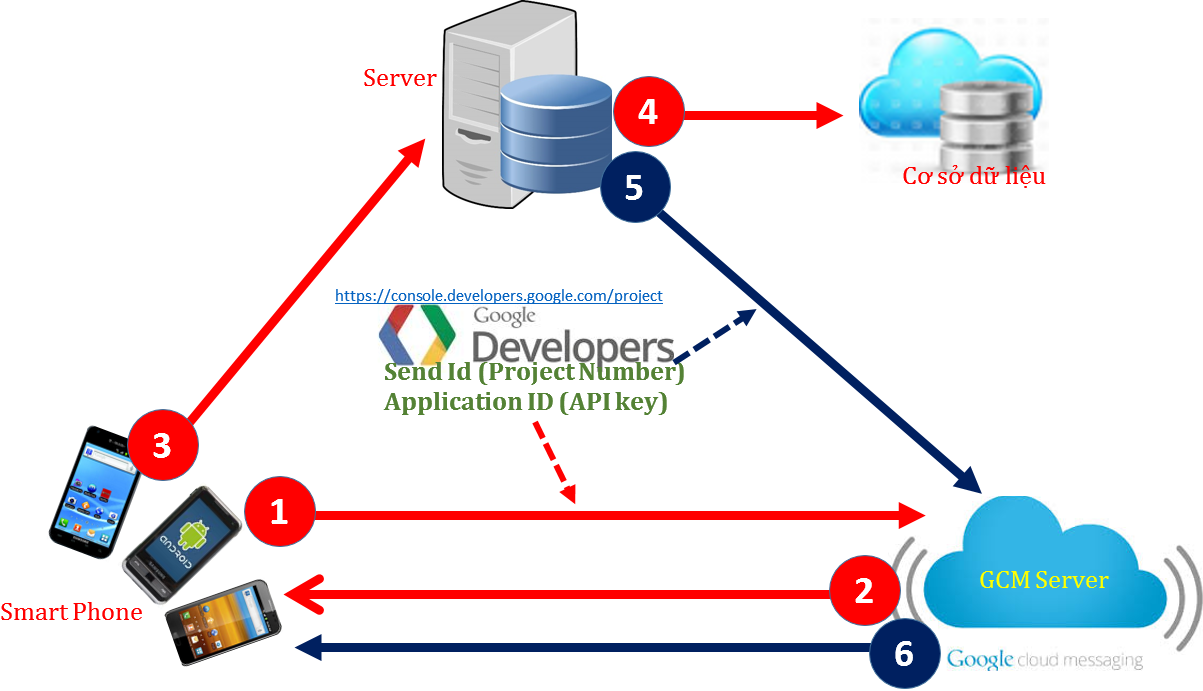
– Bạn chú ý là số 1,2,3,4 Tui để cùng màu đỏ
– Số 5,6 Tui để cùng màu xanh.
– Trung tâm Tui để Google Developer vì nó là điều phối cho các bước.
Quy trình hoạt động như sau (số thứ tự là bước):
Bước 0:
– Phải tạo một Project trên https://console.developers.google.com trước để có được Sender Id và Application Id
– Xây dựng Server và WebService của ta với CSDL phù hợp để lưu trữ Registration Id.
Bước 1:
– Các thiết bị Mobile Android sẽ gửi Sender Id và Application Id lên GCM server để đăng ký (chú ý là Sender Id được cung cấp từ Google Developers).
Bước 2:
– Nếu đăng ký thành công thì GCM Server sẽ tạo ra một mã đăng ký gọi là Registration Id và gửi ngược về cho thiết bị Android.
Bước 3:
– Sau khi nhận được Registration Id mà GCM Server gửi về, mỗi thiết bị Android này sẽ gửi Registration Id lên Server thông qua Web Service (chú ý là Server này do ta xây dựng, tức nó là độc lập với GCM Server của Google).
Bước 4:
– Sau khi Server của ta nhận được Registration Id (mỗi Android device sẽ được cung cấp Id riêng, theo từng session do GCM Server tạo ra) sẽ tiến hành lưu vào CSDL (do ta xây dựng) để sử dụng cho các lần sau này (gửi tin nhắn hàng loạt).
Bước 5:
– Xây dựng ứng dụng trên Server để cho phép gửi Tin nhắn hàng loạt (có thể gửi tới 1000 Android device mà không tốn phí), ở bước này cũng phải lấy Sender Id và Application Id do bước 0 tạo ra. Định dạng gửi tin sẽ theo JSON format, có thể gửi cả dấu Tiếng Việt.
– Tin nhắn ở bước này sẽ được gửi lên GCM Server.
Bước 6:
– Sau khi GCM Server nhận được tin nhắn theo định dạng JSON ở bước 5, nó sẽ tiến hành gửi tơi tất cả các máy trạm được đăng ký trong gói JSON này và gần như ngay lập tức các Client đều nhận được.
Bài này rất hay và có thể áp dụng được thực tế để giúp giảm thiểu chi phí nhắn tin SMS, vì về sau nhân viên sử dụng Smart Phone rất nhiều và dường như WIFI có trong mọi ngóc nghách hẻm hóc….. nên có thể triển khai để nhắn tin cho nhân viên thông báo họp hay đi ăn nhậu…. Đối với Trường học cũng vậy có thể áp dụng để nhắn tin cho học sinh , sinh viên lên tới 1000 người mà không tốn phí (Vì theo Tui càng về sau giới trẻ sẽ ưa chuộng Smart Phone hơn là cục gạch Nồi Đồng Cối Đá được sản xuất từ kiếp trước).
Bước 0, 5, 6 là xây dựng cho Server Side (CSDL, Webserver, WebService, Webform…)
Bước 1,2,3,4 là xây dựng cho Client Side (Android Application).
Chi tiết từng bước Tui sẽ hướng dẫn cụ thể để bạn có thể triển khai thực tế:
——————————————————————————
Bây giờ bạn cần làm theo từng bước dưới đây nhé:
Bước 0, 5,6: – Xây dựng Server Side
– Phải tạo một Project trên https://console.developers.google.com trước để có được Sender Id và Application Id
– Xây dựng Server và WebService của ta với CSDL phù hợp để lưu trữ Registration Id.
Như vậy ở bước 0 bạn phải xử lý 2 công việc chính đó là tạo project trên developer của google + xây dựng Server, bước này khá vất vả. Ngoài ra Tui sẽ dựng Webservice và CSDL ở trên Server miễn phí http://www.somee.com mà trong bài 44 Tui đã đề cấp tới, nếu bạn chưa rõ có thể vào bài này để xem lại (vì Tui sẽ không hướng dẫn lại nữa, chỉ hiển thị kết quả do đó bạn nào chưa học thì phải xem lại bài 44 thì mới hiểu được).
– Trước tiên cần phải tạo Project trên https://console.developers.google.com trước để có được Sender Id và Application Id. Sau khi bạn vào trang developer này và đăng nhập thì có giao diện như sau(dĩ nhiên google sẽ thay đổi nếu như có version mới):
Ở đây Tui dùng email tdthanh@t3h.hcmus.edu.vn để hướng dẫn.
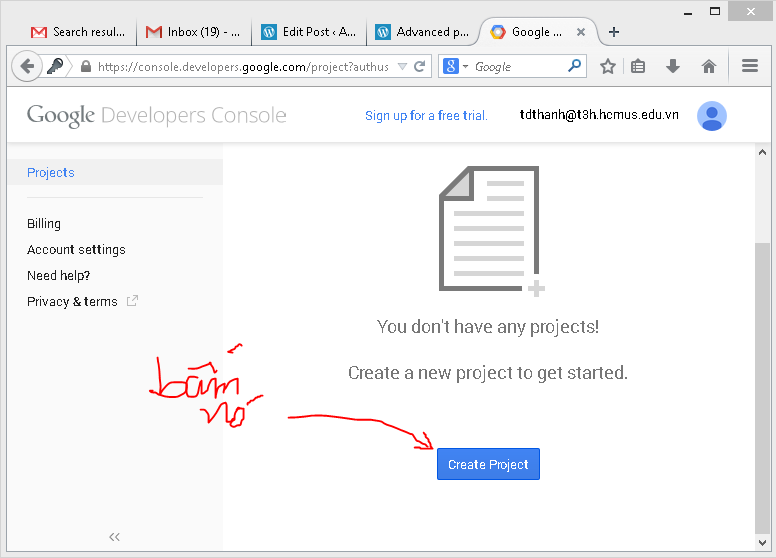 Ở màn hình trên bạn nhấn vào nút “Create Project” để tạo google project, màn hình sau xuất hiện:
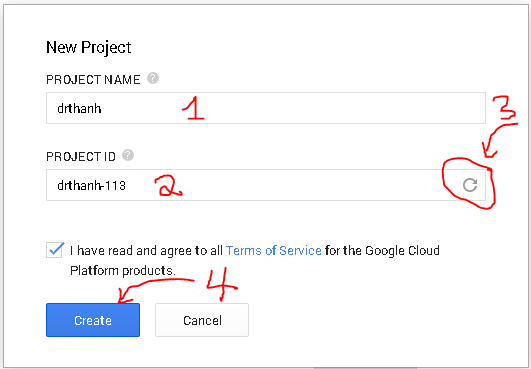 Mục 1: Nhập vào tên Project, ở trên Tui đặt là drthanh
Mục 2: Nhập vào Project ID, nếu muốn nó tự tạo thì bạn nhấn mục số 3
Mục 3: Nhờ Google tạo ID
Mục 4: Bấm vào Create để chấp nhận tạo Project, chú ý bạn phải checked vào “I have read and agree to all”.
Sau khi bấm “Create“, bạn chờ giây lát google sẽ tạo project cho bạn như màn hình dưới đây:
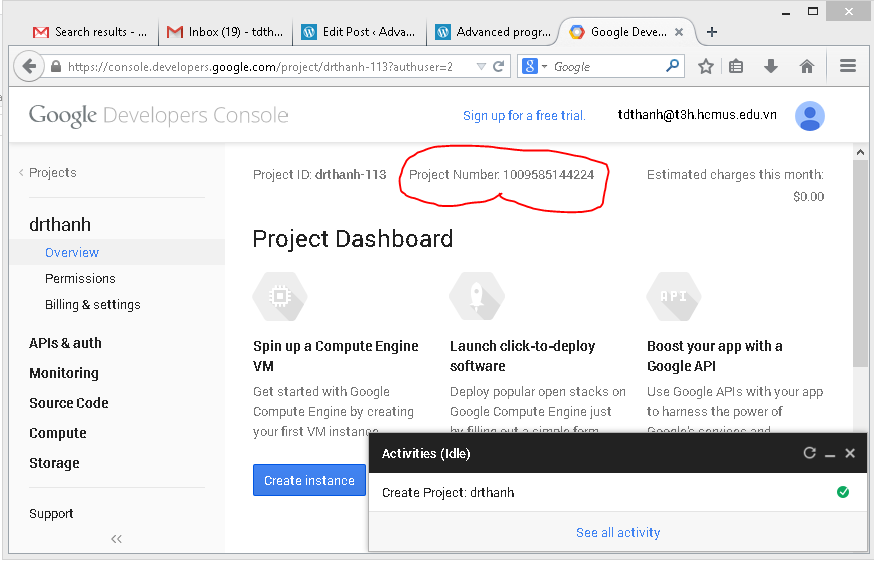 Ở màn hình trên bạn nhìn vào chỗ Tui khoanh vòng tròn màu đỏ:
Project Number: 1009585144224
Đây chính là Sender ID, bạn cần nhớ chỗ này để copy + paste vào Client side (android) và Server side của bạn.
Bạn nhớ đừng có dùng Sender ID này của Tui nhé, nếu có quá nhiều người sài, mỗi người gửi 1000 client…. Google nói Tui Spam họ…. họ ngắt tài khoản của Tui…. Tui sẽ buồn man mác đó….Không hướng dẫn thêm được.
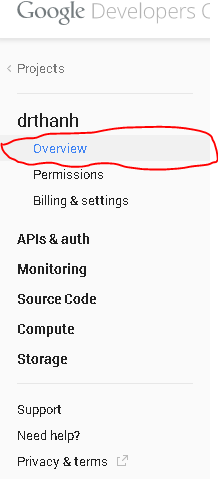
Nếu bạn bấm lung tung 1 hồi không tìm thấy Sender Id này thì nhớ bấm vào Overview để thấy lại nó nhé:
 Như vậy ta đã có Sender Id, giờ Tui hướng dẫn các bạn tìm Application ID:
Bạn vào APIs & auth/ chọn Credentials:
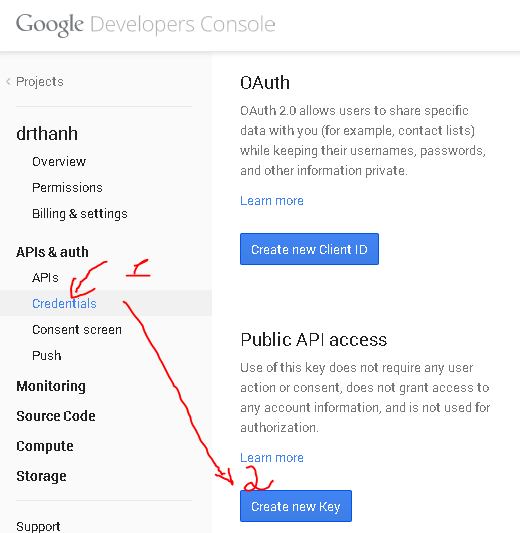 Sau khi bạn nhấn vào “Credentials”, màn hình Credentials sẽ hiển thị ra như trên. Bạn nhấm vào mục số 2 “Create new Key” màn hình sau xuất hiện:
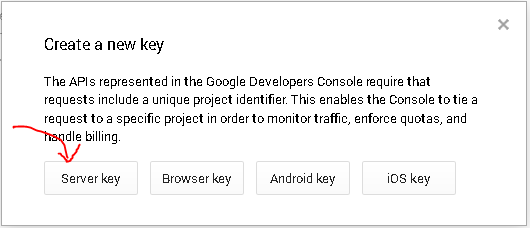 Ở màn hình trên bạn chọn “Server Key” thì màn hình tạo Key sau xuất hiện:
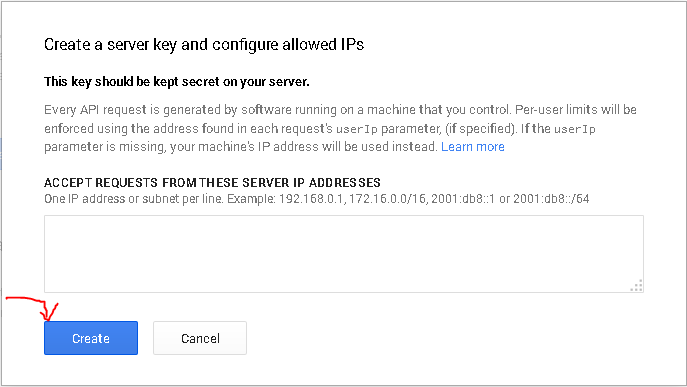 Tại màn hình này bạn để trống mặc định, chỉ việc bấm nút “Create“, ta có kết quả sau:
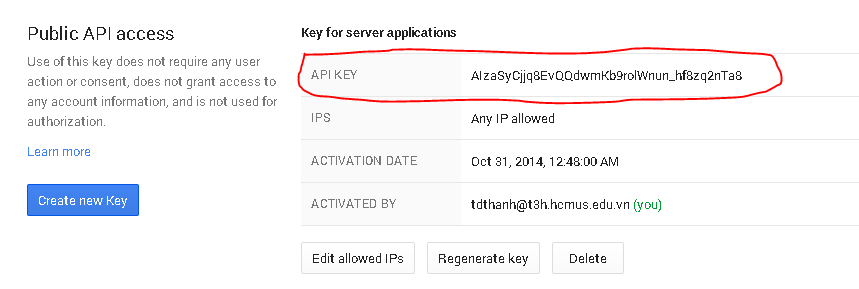 Ta thấy API key: AIzaSyCjjq8EvQQdwmKb9rolWnun_hf8zq2nTa8
API key chính là Application ID.
Như vậy bạn đã có được Sender ID và Application ID. Bạn cũng chú ý đừng sử dụng của Tui nhé, cố gắng tự tạo theo các bước Tui hướng dẫn mà sử dụng.
– Tiếp theo của bước 0, Ta cần xây dựng Webservice, CSDL trên Server. Ở đây Tui dùng http://somee.com để tải dịch vụ lên sử dụng. Bước này Tui sẽ hướng dẫn bạn 2 cách tạo Server để truyền tin tới client: Dùng Webservice và dùng Desktop Application để bạn có nhiều lựa chọn cũng như tăng thêm vốn kiến thức về vận hành GCM.
– Mọi thứ bạn nên tạo tại máy của bạn trước, sau khi test OK mới đưa lên Server.
Bây giờ bạn tạo cơ sở dữ liệu trong SQL Server với tên “dbDrThanhGCM“, với 2 bảng:
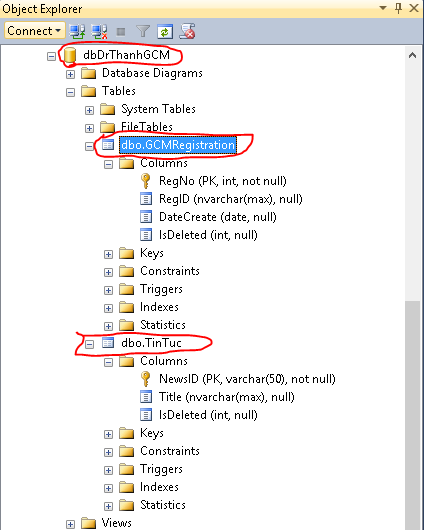 Bảng TinTuc:
| Tên cột | Kiểu loại | Ghi chú |
| NewsID | varchar(50) | Mã tin tức, khóa chính |
| Title | nvarchar(MAX) | Tiêu đề tin tức |
| IsDeleted | int | 1 là xác nhận sọt rác, 0 là còn sử dụng |
Bảng TinTuc mục đích để thêm danh sách tin tức tại máy Server, mỗi lần thêm Tin nó sẽ tự động thông báo cho toàn bộ máy Client:
Bảng GCMRegistration:
| Tên cột | Kiểu loại | Ghi chú |
| RegNo | int | No (tự động tăng), khóa chính |
| RegID | nvarchar(MAX) | Mã Registration ID của thiết bị do GCM server gửi về |
| DateCreate | date | Ngày tạo |
| IsDeleted | int | 1 là xác nhận sọt rác, 0 là còn sử dụng |
Bảng GCMRegistration dùng để lưu trữ các Registration Id của các Thiết bị đăng ký thành công trên GCM Server. Ta cần tạo bảng này để lưu trữ lại toàn bộ Registration Id của các thiết bị để sử dụng cho việc thông báo hàng loạt ở các lần khác nhau. Thường các ID này mặc định được lưu trữ khoảng 4 tuần trên GCM Server.
Chú ý bảng GCMRegistration bạn có thể bỏ cột RegNo, dùng RegID làm khóa chính luôn. Nhưng tại vì Tui sợ Google thay đổi cơ chế làm tăng chiều dài của RegID sẽ vượt qua ràng buộc khóa chính nên Tui dùng RegNo tự động tăng, và bạn cũng chỉ quan tâm tới RegID vì nó là duy nhất (không quan tâm RegNo).
– Bạn tiến hành Tạo WebService để tương tác với 2 bảng dữ liệu như dưới đây (Tui tạo Solution để nó chứa luôn 2 Project: Webservice và Desktop Application): Tạo solution tên GCMSolution
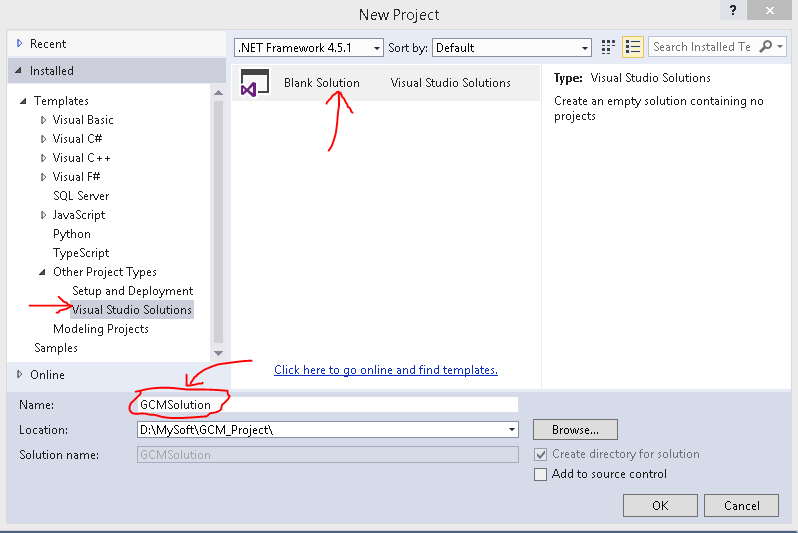 Bấm OK để tạo Solution:
 Tiến hành tạo ASP.NET project: Bấm chuột phải vào GCMSolution/chọn Add/New Project, màn hình sau xuất hiện:
 Ta chọn cấu hình giống như mô tả ở trên, nhập tên “GCMWebService” rồi nhấn nút ok:
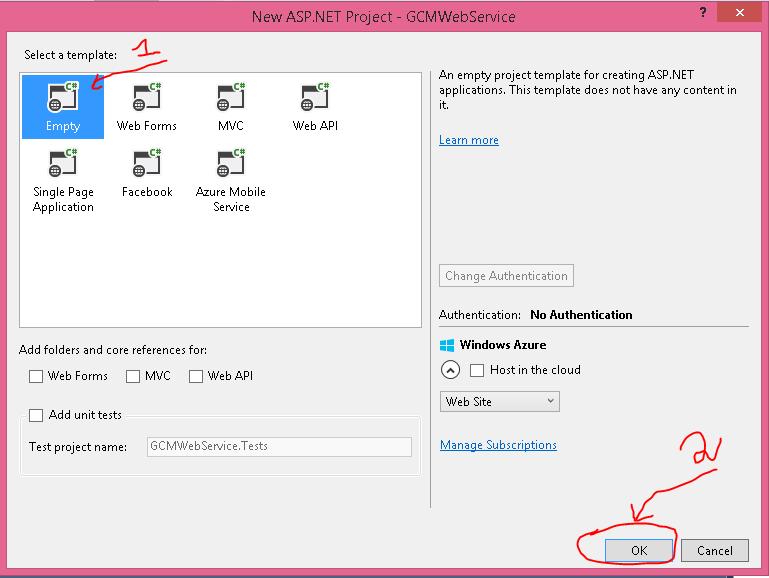 Trong màn hình New ASP.NET Project/chọn Empty rồi nhấn nút OK như hình.
 – Bây giờ ta tiến hành tạo WebService tên drthanhgcmservice.asmx:
Bấm chuột phải vào GCMWebService/chọn Add/ Chọn Web Service (ASMX), xuất hiện màn hình sau cho phép nhập tên:
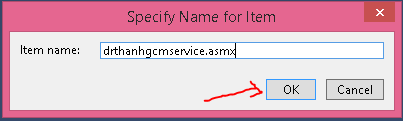 Nhập tên rồi bấm OK ta có kết quả mặc định như sau:
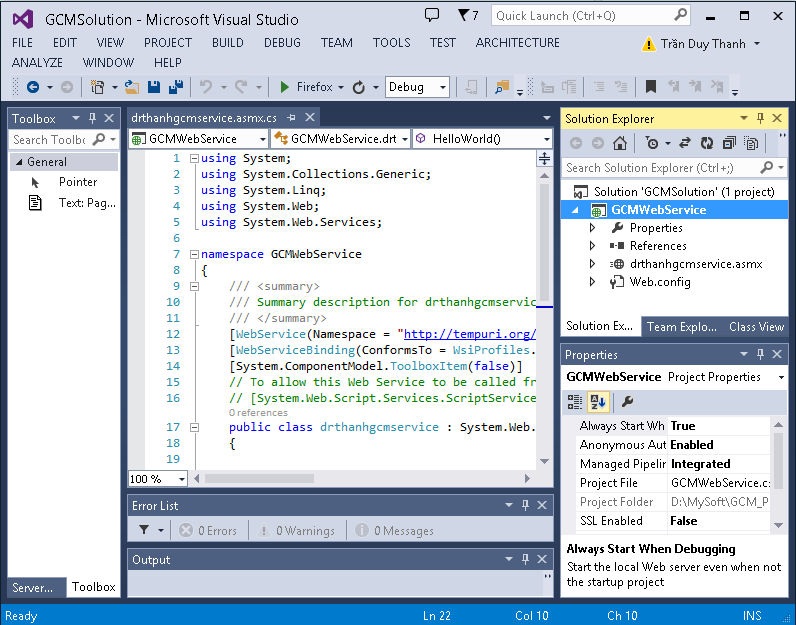 Giờ ta tiến hành tương tác CSDL để viết các dịch vụ.
Ta dùng LINQ để tương tác CSDL, bấm chuột phải vào GCMWebService/chọn Add/ chọn LINQ to SQL classes: 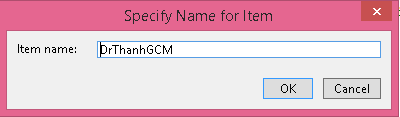 Sau đó tiến hành kết nối tới CSDL tạo ở trên (bạn nào không rõ thì xem lại các bài trước (bài 43, 44, 45, 46), Tui không muốn nói lại vì mất thời gian), sau khi cấu hình và kéo thả xong ta được như sau:
 Bạn chú ý là chuỗi kết nối sẽ tự động được tạo trong file “Web.config“, và khi đưa lên server Somee thì ta chỉ việc đổi chuỗi kết nối trong file này là xong (bạn cũng xem lại các bài trước tui đã đề cập).
Ta tiến hành viết lệnh cho lớp drthanhgcmservice:
using System;
using System.Collections.Generic;
using System.Linq;
using System.Web;
using System.Web.Services;

namespace GCMWebService
{
/// <summary>
/// Summary description for drthanhgcmservice
/// </summary>
[WebService(Namespace = "http://tranduythanh.com/")]
[WebServiceBinding(ConformsTo = WsiProfiles.BasicProfile1_1)]
[System.ComponentModel.ToolboxItem(false)]
// To allow this Web Service to be called from script, using ASP.NET AJAX, uncomment the following line.
// [System.Web.Script.Services.ScriptService]
public class drthanhgcmservice : System.Web.Services.WebService
{

[WebMethod]
public string HelloWorld()
{
return "Hello World";
}
/// <summary>
/// Hàm này dùng để lưu RegistrationId từ GCM gửi về cho mỗi thiết bị
/// </summary>
/// <param name="regId"></param>
/// <returns></returns>
[WebMethod]
public bool insertRegID(string regId)
{
try
{
DrThanhGCMDataContext db = new DrThanhGCMDataContext();
GCMRegistration reg = db.GCMRegistrations.FirstOrDefault(c => c.RegID == regId);
if (reg == null)
{
reg = new GCMRegistration();
reg.RegID = regId;
reg.IsDeleted = 0;
db.GCMRegistrations.InsertOnSubmit(reg);
}
reg.DateCreate = DateTime.Now;
db.SubmitChanges();
return true;
}
catch (Exception ex)
{

}
return false;
}
/// <summary>
/// Hàm dùng để trả về danh sách Registration đã được lưu vào Server của ta
/// để cung cấp cho việc gửi tin nhắn hàng loạt, chú ý là danh sách không nằm trong sọt rác
/// </summary>
/// <param name="isDeleted">isDeleted=0 là sẵn sàng, isDeleted=1 là bị nằm trong sọt rác</param>
/// <returns></returns>
[WebMethod]
public GCMRegistration[] getListRegIDs(int isDeleted)
{
DrThanhGCMDataContext db = new DrThanhGCMDataContext();
var  listc = db.GCMRegistrations.Where(x => x.IsDeleted == isDeleted);
return listc.ToArray();
}
/// <summary>
/// Hàm này dùng để lưu Registration vào sọt rác, thiết lập IsDeleted=1
/// </summary>
/// <param name="regId"></param>
/// <returns></returns>
[WebMethod]
public bool moveRegToRecycleBin(string regId)
{
DrThanhGCMDataContext db = new DrThanhGCMDataContext();
GCMRegistration x = db.GCMRegistrations.FirstOrDefault(c => c.RegID == regId);
if (x != null)
{
x.IsDeleted = 1;
db.SubmitChanges();
return true;
}
return false;
}
/// <summary>
/// hàm dùng để xóa vĩnh viễn Registration ra khỏi CSDL
/// </summary>
/// <param name="regId"></param>
/// <returns></returns>
[WebMethod]
public bool permanentlyRemoveReg(string regId)
{
DrThanhGCMDataContext db = new DrThanhGCMDataContext();
GCMRegistration x = db.GCMRegistrations.FirstOrDefault(c => c.RegID == regId);
if (x != null)
{
db.GCMRegistrations.DeleteOnSubmit(x);
db.SubmitChanges();
return true;
}
return false;
}
/// <summary>
/// Hàm trả về danh sách tin tức, mục đích là mỗi lần thêm 1 tin tức thì thông báo cho
/// máy client biết và cho phép mở xem danh sách tin mới.
/// </summary>
/// <param name="isDeleted"></param>
/// <returns></returns>
[WebMethod]
public TinTuc[] getListTinTuc(int isDeleted)
{
DrThanhGCMDataContext db = new DrThanhGCMDataContext();
var ds=  db.TinTucs.Where(x =>  x.IsDeleted == 0);

return ds.ToArray() ;
}
/// <summary>
/// Hàm dùng để thêm mới 1 tin tức
/// </summary>
/// <param name="ma"></param>
/// <param name="title"></param>
/// <returns></returns>
[WebMethod]
public bool insertTinTuc(string ma,string title)
{
try
{
DrThanhGCMDataContext db = new DrThanhGCMDataContext();
TinTuc t = db.TinTucs.FirstOrDefault(c => c.NewsID == ma);
if (t == null)
{
t = new TinTuc();
t.NewsID = ma;

t.IsDeleted = 0;
db.TinTucs.InsertOnSubmit(t);
}
t.Title = title;
db.SubmitChanges();
return true;
}
catch (Exception ex)
{

}
return false;
}
}
}
-Tiếp theo ta tạo 1 Webform để gửi thông báo tới các máy trạm bằng cách bấm chuột phải vào GCMWebService/chọn Add/ chọn Web Form: 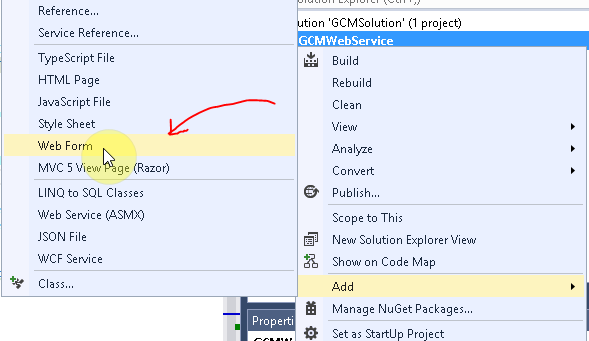 Cửa sổ tạo Webform hiển thị lên, bạn tạo tên như sau:
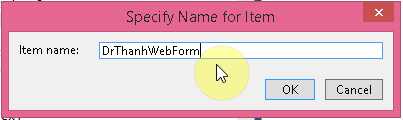 Tui đặt là “DrThanhWebForm” rồi nhấn nút OK, bạn nhấn nút Cancel cũng được nhưng mà phải làm lại.
Bạn thiết kế giao diện cho DrThanhWebForm như hình dưới đây:
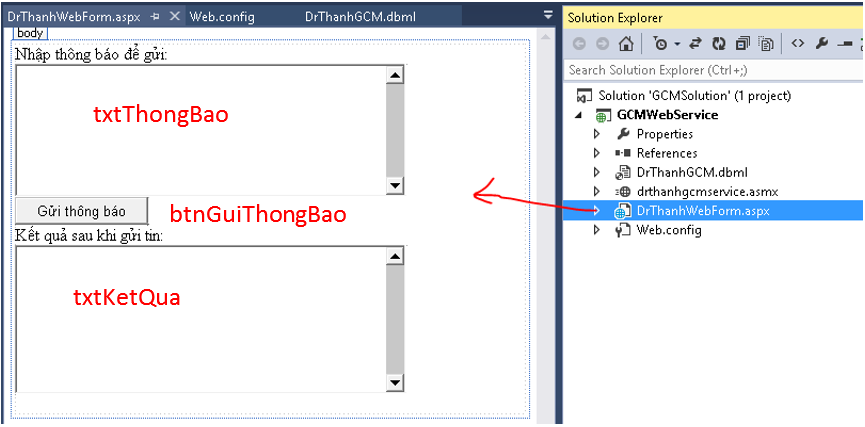 txtThongBao: Nhập tin muốn thông báo xuống các máy trạm
btnGuiThongBao: Nút lệnh để bắt đầu thực hiện lệnh gửi tin
txtKetQua: Ô hiển thị kết quả sau khi gửi thông báo.
Tiến hành viết coding cho nút “Gửi Thông báo”, bạn double click vào nó để viết lệnh như dưới đây:
using System;
using System.Collections.Generic;
using System.IO;
using System.Linq;
using System.Net;
using System.Text;
using System.Web;
using System.Web.UI;
using System.Web.UI.WebControls;

namespace GCMWebService
{
public partial class DrThanhWebForm : System.Web.UI.Page
{
protected void Page_Load(object sender, EventArgs e)
{

}

protected void btnGuiThongBao_Click(object sender, EventArgs e)
{
try
{
DrThanhGCMDataContext db = new DrThanhGCMDataContext();
//đây chính là API Key: (copy paste từ Google developer nhé)
string applicationID = "<Bạn copy API KEY vào đây nha>";
//lấy danh sách Registration Id
string[] arrRegid = db.GCMRegistrations.Where(c => c.IsDeleted == 0).Select(c => c.RegID).ToArray();

//đây chính là Sender ID: (copy paste từ Google developer nhé)
string SENDER_ID = "<Bạn copy Sender ID vào đây nha>";
//lấy nội dung thông báo
string value = txtThongBao.Text;
WebRequest tRequest;
//thiết lập GCM send
tRequest = WebRequest.Create("https://android.googleapis.com/gcm/send");
tRequest.Method = "POST";
tRequest.UseDefaultCredentials = true;

tRequest.PreAuthenticate = true;

tRequest.Credentials = CredentialCache.DefaultNetworkCredentials;

//định dạng JSON
tRequest.ContentType = "application/json";
//tRequest.ContentType = " application/x-www-form-urlencoded;charset=UTF-8";
tRequest.Headers.Add(string.Format("Authorization: key={0}", applicationID));

tRequest.Headers.Add(string.Format("Sender: id={0}", SENDER_ID));

string RegArr = string.Empty;

RegArr = string.Join("\",\"", arrRegid);
//Post Data có định dạng JSON như sau:
/*
*  { "collapse_key": "score_update",     "time_to_live": 108,       "delay_while_idle": true,
"data": {
"score": "223/3",
"time": "14:13.2252"
},
"registration_ids":["dh4dhdfh", "dfhjj8", "gjgj", "fdhfdjgfj", "đfjdfj25", "dhdfdj38"]
}
*/
string postData = "{ \"registration_ids\": [ \"" + RegArr + "\" ],\"data\": {\"message\": \"" + value + "\",\"collapse_key\":\"" + value + "\"}}";

Console.WriteLine(postData);
Byte[] byteArray = Encoding.UTF8.GetBytes(postData);
tRequest.ContentLength = byteArray.Length;

Stream dataStream = tRequest.GetRequestStream();
dataStream.Write(byteArray, 0, byteArray.Length);
dataStream.Close();

WebResponse tResponse = tRequest.GetResponse();

dataStream = tResponse.GetResponseStream();

StreamReader tReader = new StreamReader(dataStream);

String sResponseFromServer = tReader.ReadToEnd();

txtKetQua.Text = sResponseFromServer; //Lấy thông báo kết quả từ GCM server.
tReader.Close();
dataStream.Close();
tResponse.Close();

Response.Write(@"<script language='javascript'>alert('Tui đã nói bạn đừng test mà....\nduythanhcse@gmail.com')</script>");
}
catch(Exception ex)
{
//Response.Write(ex.ToString());
string msgError = ex.ToString();
Response.Write(@"<script language='javascript'>alert('" + msgError + "')</script>");
}
}
}
}
– Bây giờ ta cần đưa toàn bộ CSDL và Web application này lên server somee để sử dụng chung (khi ta cấu hình trên này thì bất kỳ nơi đâu ta cũng có thể tương tác miễn là có Internet, bạn chú ý là khi đưa lên server somee thì họ yêu cầu 1 tháng phải tối thiểu 5 lần tương tác nhé nếu không họ sẽ xóa tài khoản.
– Các bước đưa lên somee.com Tui đã trình bày rất kỹ lưỡng trong các bài tập trước đó (Tui có đề cập ở trên) bạn phải tự xem lại và cấu hình để biết cách đưa lên, Tui chỉ hiển thị kết quả sau khi cấu hình xong (Chú ý nếu bạn không tự xem lại các bài trước thì hãy ngừng luôn tại đây đừng có đọc tiếp nữa vì sẽ vô ích do không hiểu, bạn không thể lấy cái không biết này để thực hiện cái không biết khác). Bạn chú ý sau khi cấu hình để đưa CSDL lên somee bạn cần đổi lại chuỗi kết nối trong web.config để cho giống với somee cung cấp trước khi đưa lên máy chủ Somee (Nếu bạn có riêng HOsting thì tự cấu hình, không cần dùng somee):
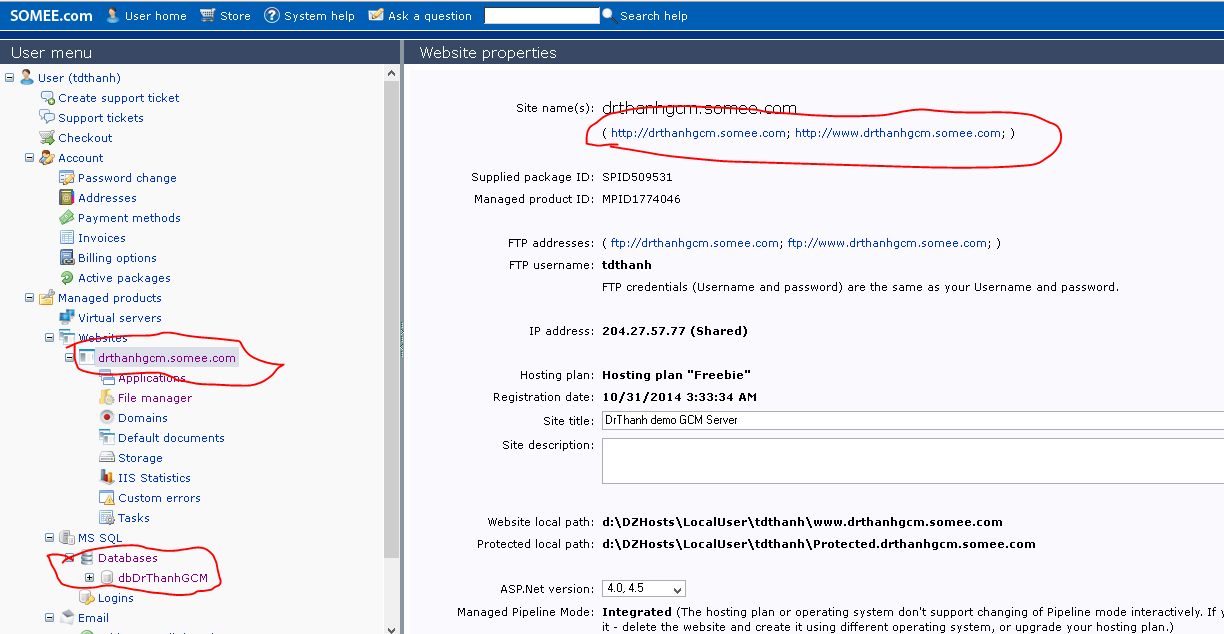
– Test Kết quả:
http://drthanhgcm.somee.com/DrThanhWebForm.aspx (link này để gửi thông báo đến hàng loạt client):
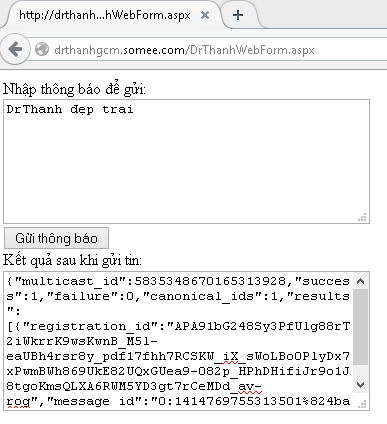 Bạn thấy đó, ở trên Tui nhập vào cụm từ “DrThanh đẹp trai”, khi bạn thấy phần kết quả thông báo danh chuỗi như trên và có success:(n) tức là đã gửi tới client thành công, lúc Tui bấm nút Gửi thông báo thì điện thoại của Tui cũng nhận được tin này. Nếu bây giờ bạn gõ chuỗi bất kỳ và bấm gửi Thông báo thì điện thoại của Tui cũng nhận được (do đó bạn đừng có SPAM nhé.. Tội nghiệp Tui…).
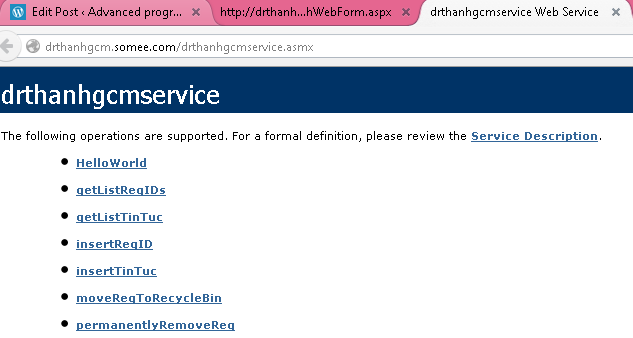
http://drthanhgcm.somee.com/drthanhgcmservice.asmx (dùng để tương tác thông tin giữa Client và Server của ta: Lưu Registration ID từ GCM server về, quản lý tin tức cũng như Registration (thêm mới, hiển thị danh sách):
 Như vậy ta đã tạo xong bước Server Side, bạn có thể tải source code mẫu Server side ở đây:
Cơ sở dữ liệu: http://download855.mediafire.com/cwhped1w6dhg/cjc26c2bmia2276/dbDrThanhGCM.sql
Source code : http://download1501.mediafire.com/5dm93jhg9h7g/56azkjufqybm6lz/GCMSolution.rar
Chú ý Source code bạn cần sửa 2 file:
– File DrThanhWebForm.aspx.cs: Copy + paste lại Application ID và Sender Id của bạn
– File Web.config: Copy + paste lại chuỗi kết nối.
Tui đã test chạy thành công hết rồi mới đưa lên đây nhé các bạn, chú ý sửa 2 file lại cho đúng.
Chú ý là ở bước số 0 Tui sẽ quay lại sau để hướng dẫn cách viết Desktop application để tương tác sử dụng GCM Server nhé, tạm thời dùng Webform (vì Tui sợ nhiều quá các bạn sẽ rối).
Bước 1, 2, 3, 4: – Xây dựng Client Side
Bước này chính là xây dựng Android Application để:
– Gửi thông tin đăng ký lên GCM Server để nhận Registration Id
– Lưu Registration Id vào CSDL trên server (của ta xây dựng)
– Nhận thông báo từ Server (GCM Server)
Bạn tạo 1 Project mới với tên “DrThanhAndroidTestGCM“, Project này có 2 chức năng chính đó là:
– Tự động lắng nghe thông báo từ Server gửi về (Push Notification – GCM )
– Đọc danh sách Tin tức từ Server thông qua WebService.
Bạn chú ý là chương trình sẽ tự động nhận thông tin từ Server trong cả trường hợp Ứng dụng đã bị tắt.
Giao diện vô cùng tầm thường như sau:

XML layout như sau:
<LinearLayout xmlns:android="http://schemas.android.com/apk/res/android"
xmlns:tools="http://schemas.android.com/tools"
android:id="@+id/LinearLayout1"
android:layout_width="match_parent"
android:layout_height="match_parent"
android:orientation="vertical"
android:paddingBottom="@dimen/activity_vertical_margin"
android:paddingLeft="@dimen/activity_horizontal_margin"
android:paddingRight="@dimen/activity_horizontal_margin"
android:paddingTop="@dimen/activity_vertical_margin"
tools:context="tranduythanh.com.MainActivity" >

<Button
android:id="@+id/btnDangKyGCM"
android:layout_width="match_parent"
android:layout_height="wrap_content"
android:text="Đăng ký GCM Server" />

<ListView
android:id="@+id/lvTinTuc"
android:layout_width="match_parent"
android:layout_height="wrap_content" >
</ListView>

</LinearLayout>
Bạn cần tham chiếu tới thư viện KSOAP API để tương tác tới .Net Webservice đã tạo ở trên.
Và tải thư viện GCM để tương tác GCM Server của Google rồi chép cả 2 thư viện KSOAP, GCM vào thư mục libs như hình Tui chụp dưới đây:
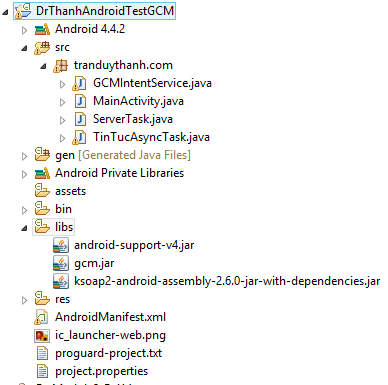 – Sau đó tiến hành tạo và sửa các lớp như sau:
1) Tạo GCMIntentService – Lắng nghe Push Notification để thông báo cho Client
2) Sửa MainActivity – Màn hình chính để cho phép đăng ký Registration GCM Id cũng như hiển thị danh sách tin tức
3) Thêm ServerTask – Để lưu Registration GCM ID gửi về lên Server riêng để sử dụng cho lần khác
4) Thêm TinTucAsyncTask – Để đọc danh sách tin tức từ Server – dùng đa tiến trình
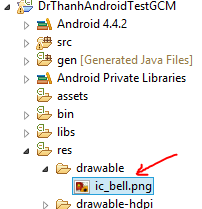
Bổ sung thêm ic_bell ( )vào thư mục drawable (bạn tự new 1 thư mục y xì tên này, khác là bị báo lỗi):
 Tiếp theo bổ sung danh sách các chuỗi sau vào strings.xml để sử dụng cho các thông báo:
<?xml version="1.0" encoding="utf-8"?>
<resources>

<string name="app_name">DrThanhAndroidTestGCM</string>
<string name="hello_world">Hello world!</string>
<string name="action_settings">Settings</string>
<string name="server_register_error">Could not register device on Demo Server after %1$d attempts.</string>
<string name="server_registering">Đang thử (lần %1$d/%2$d) để đăng ký thiết bị trên GCM Server.</string>
<string name="server_registered">From Demo Server: successfully added device!</string>
<string name="gcm_registered">From GCM: device successfully registered!</string>
<string name="gcm_unregistered">From GCM: device successfully unregistered!</string>
<string name="gcm_message">From GCM: you got message!</string>
<string name="gcm_error">From GCM: error (%1$s).</string>
<string name="gcm_recoverable_error">From GCM: recoverable error (%1$s).</string>
<string name="gcm_deleted">From GCM: server deleted %1$d pending messages!</string>

</resources>
Cuối cùng cấu hình AndroidManifest như sau:
<?xml version="1.0" encoding="utf-8"?>
<manifest xmlns:android="http://schemas.android.com/apk/res/android"
package="tranduythanh.com"
android:versionCode="1"
android:versionName="1.0" >

<uses-sdk
android:minSdkVersion="14"
android:targetSdkVersion="19" />

<uses-permission android:name="android.permission.INTERNET" />
<uses-permission android:name="android.permission.WRITE_EXTERNAL_STORAGE" />

<permission
android:name="tranduythanh.com.permission.C2D_MESSAGE"
android:protectionLevel="signature" />

<uses-permission android:name="tranduythanh.com.permission.C2D_MESSAGE" />
<!-- App receives GCM messages. -->
<uses-permission android:name="com.google.android.c2dm.permission.RECEIVE" />

<!-- GCM requires a Google account. -->
<uses-permission android:name="android.permission.GET_ACCOUNTS" />
<!-- Keeps the processor from sleeping when a message is received. -->
<uses-permission android:name="android.permission.WAKE_LOCK" />

<application
android:allowBackup="true"
android:icon="@drawable/ic_launcher"
android:label="@string/app_name"
android:theme="@style/AppTheme" >
<activity
android:name="tranduythanh.com.MainActivity"
android:label="@string/app_name" >
<intent-filter>
<action android:name="android.intent.action.MAIN" />

<category android:name="android.intent.category.LAUNCHER" />
</intent-filter>
</activity>
<receiver
android:name="com.google.android.gcm.GCMBroadcastReceiver"
android:permission="com.google.android.c2dm.permission.SEND" >
<intent-filter>
<action android:name="com.google.android.c2dm.intent.RECEIVE" />
<action android:name="com.google.android.c2dm.intent.REGISTRATION" />

<category android:name="tranduythanh.com" />
</intent-filter>
</receiver>

<service android:name="tranduythanh.com.GCMIntentService" />
</application>

</manifest>
———————————————————–
Giờ ta tiến hành coding cho từng class:
Lớp GCMIntentService:
package tranduythanh.com;

import tranduythanh.com.R;
import android.app.Notification;
import android.app.NotificationManager;
import android.app.PendingIntent;
import android.content.Context;
import android.content.Intent;
import android.media.RingtoneManager;
import android.net.Uri;
import android.util.Log;
import com.google.android.gcm.GCMBaseIntentService;
import com.google.android.gcm.GCMRegistrar;

import static tranduythanh.com.ServerTask.*;

public class GCMIntentService extends GCMBaseIntentService{
private static final String TAG = "GCMIntentService";

public GCMIntentService() {
super(SENDER_ID);
}

@Override
protected void onRegistered(Context context, String registrationId) {
Log.i(TAG, "Device registered: regId = " + registrationId);
displayMessage(context, getString(R.string.gcm_registered));
ServerTask.register(context, registrationId);
}

@Override
protected void onUnregistered(Context context, String registrationId) {
Log.i(TAG, "hủy đăng ký unregistered");
displayMessage(context, getString(R.string.gcm_unregistered));
if (GCMRegistrar.isRegisteredOnServer(context)) {
//Call bỏ đăng ký ở đây
GCMRegistrar.setRegisteredOnServer(context, false);
//ServerTask.post_unregister(context, registrationId);
} else {
Log.i(TAG, "Ignoring unregister callback");
}
}

@Override
protected void onMessage(Context context, Intent intent) {
Log.i(TAG, "Received message");
//String message = getString(R.string.gcm_message);
String message = intent.getStringExtra("message");
displayMessage(context, message);
// notifies user
generateNotification(context, message);
}

@Override
protected void onDeletedMessages(Context context, int total) {
Log.i(TAG, "Received deleted messages notification");
String message = getString(R.string.gcm_deleted, total);
displayMessage(context, message);
// notifies user
generateNotification(context, message);
}

@Override
public void onError(Context context, String errorId) {
Log.i(TAG, "Received error: " + errorId);
displayMessage(context, getString(R.string.gcm_error, errorId));
}

@Override
protected boolean onRecoverableError(Context context, String errorId) {
// log message
Log.i(TAG, "Received recoverable error: " + errorId);
displayMessage(context, getString(R.string.gcm_recoverable_error,
errorId));
return super.onRecoverableError(context, errorId);
}

/**
* Issues a notification to inform the user that server has sent a message.
*/
private static void generateNotification(Context context, String message) {
int icon = R.drawable.ic_bell;
long when = System.currentTimeMillis();
NotificationManager notificationManager = (NotificationManager)
context.getSystemService(Context.NOTIFICATION_SERVICE);
Notification notification = new Notification(icon, message, when);
String title = context.getString(R.string.app_name);
Intent notificationIntent = new Intent(context, MainActivity.class);
// set intent so it does not start a new activity
notificationIntent.setFlags(Intent.FLAG_ACTIVITY_CLEAR_TOP |
Intent.FLAG_ACTIVITY_SINGLE_TOP);
PendingIntent intent =
PendingIntent.getActivity(context, 0, notificationIntent, 0);
notification.setLatestEventInfo(context, title, message, intent);
Uri alarmSound = RingtoneManager.getDefaultUri(RingtoneManager.TYPE_NOTIFICATION);
notification.sound=alarmSound;
notification.flags |= Notification.FLAG_AUTO_CANCEL;
notificationManager.notify(0, notification);
}
}
Coding ServerTask:
package tranduythanh.com;
import java.util.Random;
import org.ksoap2.SoapEnvelope;
import org.ksoap2.serialization.MarshalFloat;
import org.ksoap2.serialization.SoapObject;
import org.ksoap2.serialization.SoapPrimitive;
import org.ksoap2.serialization.SoapSerializationEnvelope;
import org.ksoap2.transport.HttpTransportSE;

import tranduythanh.com.R;

import com.google.android.gcm.GCMRegistrar;
import android.content.Context;
import android.content.Intent;
import android.util.Log;
import android.widget.Toast;

public final class ServerTask {
//Biến lưu namespace do bạn cấu hình trong Webservice
public static final String NAMESPACE="http://tranduythanh.com/";
//Biến lưu WSDL của server URL
public static final String SERVER_URL ="http://drthanhgcm.somee.com/drthanhgcmservice.asmx?WSDL";
//biến lưu Sender ID
public static final String SENDER_ID = "1050525163328";
//biến lưu log lại khi có sự kiện sảy ra
public static final String TAG = "DrthanhGCM_LOG";
/**
* Intent sử dụng để hiển thị lên màn hình
*/
public static final String DISPLAY_MESSAGE_ACTION = "tranduythanh.com.DISPLAY_MESSAGE";

/**
* Thông tin (message) để intent hiển thị
*/
public static final String EXTRA_MESSAGE = "message";
/**
* Hàm dùng để hiển thị Message lên màn hình (chú ý là nó chạy background)
*
* @param context
*            application's context.
* @param message
*            thông báo hiển thị ở màn hình.
*/
public static void displayMessage(Context context, String message) {
Intent intent = new Intent(DISPLAY_MESSAGE_ACTION);
intent.putExtra(EXTRA_MESSAGE, message);
context.sendBroadcast(intent);
}

public  static final int MAX_ATTEMPTS = 5;
public  static final int BACKOFF_MILLI_SECONDS = 2000;
public  static final Random random = new Random();

public static boolean post(final Context context, final String regId)
{
try{
final String METHOD_NAME="insertRegID";
final String SOAP_ACTION=NAMESPACE+METHOD_NAME;
SoapObject request=new SoapObject(NAMESPACE, METHOD_NAME);

request.addProperty("regId", regId);
SoapSerializationEnvelope envelope=
new SoapSerializationEnvelope(SoapEnvelope.VER11);
envelope.dotNet=true;
envelope.setOutputSoapObject(request);
MarshalFloat marshal=new MarshalFloat();
marshal.register(envelope);
HttpTransportSE androidHttpTransport=
new HttpTransportSE(SERVER_URL);
androidHttpTransport.call(SOAP_ACTION, envelope);
SoapPrimitive response=(SoapPrimitive) envelope.getResponse();
String s=response.toString();
Toast.makeText(context, "kết quả ="+s, Toast.LENGTH_LONG).show();
Log.i(TAG, "Ghi Registration lên Server:\n"+s);
return true;
}
catch(Exception e)
{
Toast.makeText(context, "kết quả =\n"+e.toString(), Toast.LENGTH_LONG).show();
Log.i(TAG, "Lỗi post:\n"+e.toString());
}
return false;
}
public static boolean post_unregister(final Context context, final String regId)
{
try{
final String METHOD_NAME="deleteRegid";
final String SOAP_ACTION=NAMESPACE+METHOD_NAME;
SoapObject request=new SoapObject(NAMESPACE, METHOD_NAME);

request.addProperty("regId", regId);
SoapSerializationEnvelope envelope=
new SoapSerializationEnvelope(SoapEnvelope.VER11);
envelope.dotNet=true;
envelope.setOutputSoapObject(request);
MarshalFloat marshal=new MarshalFloat();
marshal.register(envelope);
HttpTransportSE androidHttpTransport=
new HttpTransportSE(SERVER_URL);
androidHttpTransport.call(SOAP_ACTION, envelope);
SoapPrimitive response=(SoapPrimitive) envelope.getResponse();
String s=response.toString();
//Toast.makeText(context, "kết quả ="+s, Toast.LENGTH_LONG).show();
Log.i(TAG, "Hủy Registration lên Server:\n"+s);
return true;
}
catch(Exception e)
{
//Toast.makeText(context, "kết quả =\n"+e.toString(), Toast.LENGTH_LONG).show();
Log.i(TAG, "Lỗi post2_unregister:\n"+e.toString());
}
return false;
}
public static boolean register(final Context context, final String regId) {
Log.i(TAG, "registering device (regId = " + regId + ")");

long backoff = BACKOFF_MILLI_SECONDS + random.nextInt(1000);
// Once GCM returns a registration id, we need to register it in the
// demo server. As the server might be down, we will retry it a couple
// times.
for (int i = 1; i <= MAX_ATTEMPTS; i++) {
Log.d(TAG, "Attempt #" + i + " to register");
try {
displayMessage(context, context.getString(
R.string.server_registering, i, MAX_ATTEMPTS));
boolean b=post(context,regId);

GCMRegistrar.setRegisteredOnServer(context, true);

String message = context.getString(R.string.server_registered);

displayMessage(context, message);
if(b)
return true;
} catch (Exception e) {
// Here we are simplifying and retrying on any error; in a real
// application, it should retry only on unrecoverable errors
// (like HTTP error code 503).
Log.e(TAG, "Failed to register on attempt " + i, e);
if (i == MAX_ATTEMPTS) {
break;
}
try {
Log.d(TAG, "Sleeping for " + backoff + " ms before retry");
Thread.sleep(backoff);
} catch (InterruptedException e1) {
// Activity finished before we complete - exit.
Log.d(TAG, "Thread interrupted: abort remaining retries!");
Thread.currentThread().interrupt();
return false;
}
// increase backoff exponentially
backoff *= 2;
}
}
String message = context.getString(R.string.server_register_error,
MAX_ATTEMPTS);
displayMessage(context, message);
return false;
}
}
Code lớp TinTucAsyncTask:
package tranduythanh.com;

import java.util.ArrayList;

import org.ksoap2.SoapEnvelope;
import org.ksoap2.serialization.SoapObject;
import org.ksoap2.serialization.SoapSerializationEnvelope;
import org.ksoap2.transport.HttpTransportSE;

import android.os.AsyncTask;
import android.util.Log;
import android.widget.Toast;

import static tranduythanh.com.ServerTask.*;

public class TinTucAsyncTask extends AsyncTask<Void, Void, ArrayList<String>>{

MainActivity context=null;
public TinTucAsyncTask(MainActivity context)
{
this.context=context;
}
@Override
protected void onPostExecute(ArrayList<String> result) {
super.onPostExecute(result);
try
{
Toast.makeText(
this.context,
"onPostExecute "+result.size(),
Toast.LENGTH_LONG)
.show();
context.dsTin.clear();
context.dsTin.addAll(result);
context.adapter.notifyDataSetChanged();
}
catch(Exception ex)
{
Toast.makeText(context, ex.toString(), Toast.LENGTH_LONG).show();
}
}

@Override
protected void onPreExecute() {
super.onPreExecute();
Toast.makeText(
this.context,
"onPreExecute",
Toast.LENGTH_LONG)
.show();
}

@Override
protected void onProgressUpdate(Void... values) {
// TODO Auto-generated method stub
super.onProgressUpdate(values);
//Toast.makeText(context, values[0].getId()+"-"+values[0].getTitle(), Toast.LENGTH_LONG).show();
}
@Override
protected ArrayList<String> doInBackground(Void... params) {
ArrayList<String>arr=new ArrayList<String>();
try{
//hàm cần truy suất
final String METHOD_NAME="getListTinTuc";
final String SOAP_ACTION=NAMESPACE+METHOD_NAME;
//service description
//khai báo đối tượng SoapOBject
SoapObject request=new SoapObject(NAMESPACE, METHOD_NAME);
//thiết lập version
SoapSerializationEnvelope envelope=
new SoapSerializationEnvelope(SoapEnvelope.VER11);
envelope.dotNet=true;
//thiết lập output
envelope.setOutputSoapObject(request);
//tạo đối tượng HttpTransportSE
HttpTransportSE androidHttpTransport=
new HttpTransportSE(SERVER_URL);
//tiến hành triệu gọi Service
androidHttpTransport.call(SOAP_ACTION, envelope);

SoapObject soapArray=(SoapObject) envelope.getResponse();
for(int i=0; i<soapArray.getPropertyCount(); i++)
{
//(SoapObject) soapArray.getProperty(i) get item at position i
SoapObject soapItem =(SoapObject) soapArray.getProperty(i);
//soapItem.getProperty("CateId") get value of CateId property
//phải mapp đúng tên cột:
String id=soapItem.getProperty("NewsID").toString();
String title=soapItem.getProperty("Title").toString();
String tin=id+" - "+title;
arr.add(tin);
}
}
catch(Exception e)    {
//Toast.makeText(context, e.toString(), Toast.LENGTH_LONG).show();
Log.i("LOI_DOC_TIN", e.toString());
}
return arr;
}

}
Coding lớp MainActivity:
package tranduythanh.com;

import java.util.ArrayList;

import tranduythanh.com.R;

import com.google.android.gcm.GCMRegistrar;

import android.app.Activity;
import android.content.BroadcastReceiver;
import android.content.Context;
import android.content.Intent;
import android.content.IntentFilter;
import android.os.AsyncTask;
import android.os.Bundle;
import android.util.Log;
import android.view.Menu;
import android.view.MenuItem;
import android.view.View;
import android.view.View.OnClickListener;
import android.widget.ArrayAdapter;
import android.widget.Button;
import android.widget.ListView;
import android.widget.Toast;
import static tranduythanh.com.ServerTask.*;
public class MainActivity extends Activity {

Button btnDangKyGCM;

ListView lvTinTuc;
public ArrayList<String> dsTin;
public ArrayAdapter<String>adapter;

AsyncTask<Void, Void, Void> gcmRegisterTask;

final BroadcastReceiver handleMessageReceiver =
new BroadcastReceiver() {
@Override
public void onReceive(Context context, Intent intent) {
String newMessage = intent.getExtras().getString(EXTRA_MESSAGE);
Toast.makeText(MainActivity. this, newMessage, Toast.LENGTH_LONG).show();
Log.i(TAG, newMessage);
}
};

@Override
protected void onCreate(Bundle savedInstanceState) {
super.onCreate(savedInstanceState);
setContentView(R.layout.activity_main);

addControlAndEvents();

try
{
xemTinTuc();
}
catch(Exception ex)
{

}
}
private void xemTinTuc() {
TinTucAsyncTask task=new TinTucAsyncTask(this);
task.execute();
}

private void addControlAndEvents() {
btnDangKyGCM=(Button) findViewById(R.id.btnDangKyGCM);
lvTinTuc=(ListView) findViewById(R.id.lvTinTuc);
dsTin=new ArrayList<String>();
adapter=new ArrayAdapter<String>
(this,
android.R.layout.simple_list_item_1,
dsTin);
lvTinTuc.setAdapter(adapter);

btnDangKyGCM.setOnClickListener(new OnClickListener() {

@Override
public void onClick(View arg0) {
xuLyDangKyGCMServer();
}
});
}

//Chỉ cần đăng ký 1 lần, các lần khác không cần--> tự động nhận biết rồi
protected void xuLyDangKyGCMServer() {
// Make sure the device has the proper dependencies.
GCMRegistrar.checkDevice(this);
// Make sure the manifest was properly set - comment out this line
// while developing the app, then uncomment it when it's ready.
GCMRegistrar.checkManifest(this);

//msg = (TextView) findViewById(R.id.display);

registerReceiver(handleMessageReceiver,
new IntentFilter(DISPLAY_MESSAGE_ACTION));
final String regId = GCMRegistrar.getRegistrationId(this);
Toast.makeText(this, "REGID của bạn = \n"+regId, Toast.LENGTH_LONG).show();
if (regId.equals("")) {
// Automatically registers application on startup.
GCMRegistrar.register(this, SENDER_ID);
} else {
// Device is already registered on GCM, check server.
if (GCMRegistrar.isRegisteredOnServer(this)) {
// Skips registration.
//msg.append(getString(R.string.already_registered) + "\n");
Toast.makeText(this, "REGID của bạn đã được đăng ký", Toast.LENGTH_LONG).show();
Log.i(TAG, "đã đăng ký :\n"+regId+"\n Thành công");
final Context context = this;
gcmRegisterTask = new AsyncTask<Void, Void, Void>() {

@Override
protected Void doInBackground(Void... params) {
boolean registered =
ServerTask.register(context, regId);
// At this point all attempts to register with the app
// server failed, so we need to unregister the device
// from GCM - the app will try to register again when
// it is restarted. Note that GCM will send an
// unregistered callback upon completion, but
// GCMIntentService.onUnregistered() will ignore it.
if (!registered) {
GCMRegistrar.unregister(context);
}
return null;
}

@Override
protected void onPostExecute(Void result) {
gcmRegisterTask = null;
}

};
gcmRegisterTask.execute(null, null, null);
} else {
// Try to register again, but not in the UI thread.
// It's also necessary to cancel the thread onDestroy(),
// hence the use of AsyncTask instead of a raw thread.
final Context context = this;
gcmRegisterTask = new AsyncTask<Void, Void, Void>() {

@Override
protected Void doInBackground(Void... params) {
boolean registered =
ServerTask.register(context, regId);
// At this point all attempts to register with the app
// server failed, so we need to unregister the device
// from GCM - the app will try to register again when
// it is restarted. Note that GCM will send an
// unregistered callback upon completion, but
// GCMIntentService.onUnregistered() will ignore it.
if (!registered) {
GCMRegistrar.unregister(context);
}
return null;
}

@Override
protected void onPostExecute(Void result) {
gcmRegisterTask = null;
}

};
gcmRegisterTask.execute(null, null, null);
}
}
}

@Override
public boolean onCreateOptionsMenu(Menu menu) {
// Inflate the menu; this adds items to the action bar if it is present.
getMenuInflater().inflate(R.menu.main, menu);
return true;
}

@Override
public boolean onOptionsItemSelected(MenuItem item) {
// Handle action bar item clicks here. The action bar will
// automatically handle clicks on the Home/Up button, so long
// as you specify a parent activity in AndroidManifest.xml.
int id = item.getItemId();
if (id == R.id.action_settings) {
return true;
}
return super.onOptionsItemSelected(item);
}
}
Bạn có thể tham khảo Source code đầy đủ ở đây: http://download1516.mediafire.com/38l17dust0og/b7u58q8rp5ukql9/DrThanhAndroidTestGCM.rar
Chú ý bạn phải cấu hình cho đúng CSDL cũng như Webservice, APPI Key, Sender ID thì mới có thể chạy ứng dụng
Chúc các bạn thành công!


Web tiếng Việt em thấy của thầy là chất lượng nhất luôn
dạy dễ hiểu quá trời,em đang đợi hướng dẫn từng bước của Thầy…
Thầy ơi cho em hỏi ý này.
+ Em muốn Push Notify cho từng User.
+ User này đăng nhập vào App Android thông qua một Web Login mà em đã viết sẵn.
+ Vậy khi có thông tin mới của từng User này em Push cho từng User được không thầy.
+ Đừng la em thầy nhé hiihi
Hoàn toàn được… vì mỗi 1 device có 1 mã nhận dạng gửi về Server riêng, em có thể gửi cho người nào tùy thích. Thay vì giờ gửi mỗi GCM Resgistration ID thì em có thể gửi thêm cả user đăng nhập, dựa vào 2 thông số này để xử lý.
Dạ em cám ơn thầy
Thầy ơi viết tiếp đi thầy, em thấy hay quá
thầy ơi em gửi SenderID lên GCM nó toàn báo lỗi Service_Not_Available
em kiểm tra kĩ trong manifest theo tài liệu android.developer thấy ko sai gì hết. Lỗi đó có thể do từ đâu vậy thầy
Bạn Luu Duc Hoa ơi, bạn đã làm được chưa? Mình bị lỗi này là bị sao hả bạn
{“multicast_id”:7623180254387112840,”success”:0,”failure”:1,”canonical_ids”:0,”results”:[{“error”:”InvalidRegistration”}]}
Tiếp đi bạn ơi . Hay Quá Cơ . Dễ hiểu
E cũng đang làm đề tài access Google CLoud nhưng lại làm trên Eclipse ,thầy có thể coding cho e thêm k thầy…
Em bị lỗi này là sao nhỉ anh ?
{“multicast_id”:6071529746838710271,”success”:0,”failure”:1,”canonical_ids”:0,”results”:[{“error”:”MissingRegistration”}]}
mình cũng bị lỗi này, bạn sửa được chưa?
Mình cũng bị lỗi như vậy. Có ai sửa được chưa???
bạn bỏ đoạn code setRegistration lên xem thử
[…] bài tập 50 Tui cũng đã hướng dẫn dùng Google Project với bài Google Cloud Message, bạn có thể […]
thầy ơi, có 1 bài viết https://www.scorchsoft.com/blog/free-angularjs-cordova-push-notification-plugin/ . em thường viết ứng dụng mobile bằng html5 angularjs và dùng phonegap dịch qua android. thầy có thể giúp em với cái code ví trụ trong link trên được không thầy.? Em xin cám ơn thầy!
Viết native đi. Xài cách đó xử lí notification rất hạn chế trên mobile
Cám ơn Google, cám ơn Samsung. Dùng ĐT andoird để ủng hộ Samsung
http://suckhoe.tv/tin-tuc/samsung-viet-nam-co-gan-600-nhan-vien-mang-bau-moi-thang.html
Thưa thầy khi Em Click vào btnGuiThongBao thì xảy ra ngoại lệ System.Net.WebException: The remote server returned an error: (401) Unauthorized. at System.Net.HttpWebRequest.GetResponse() tại dòng lệnh WebResponse tResponse = tRequest.GetResponse(); Em có tra google rồi mà không biết lỗi gì ạ? Mong thầy xem hộ em với!
mình cũng bị như vậy. Bạn fix được chưa vậy ??
mình cũng đang bị lỗi này, bạn làm được chưa vậy?
bạn vào tab permission và edit project thành canview nhé
^Thu Bùi:
Bạn có thể chỉ rõ hơn cho mình được không?
Cảm ơn bạn nhiều
[…] : https://duythanhcse.wordpress.com/2014/10/30/bai-50-cach-su-dung-google-cloud-message-trong-android/ […]
thầy ơi e hỏi chút, chẳng hạn khi mình gửi lên gcm một đoạn text font utf-8 thì gcm server trả về đoạn text đó nhưng bị lỗi font, thầy có thể giúp e dk k a,
Không download code được. Thầy up lại giúp e. thanks thầy
Thầy ơi! nếu sử dụng php và mysql thì khác thế nào so với dùng asp.net và sqlserver ạ?
em đã làm được, cam ơn thầy rất rất rất nhiều ạ…………
Bài này quá hay, sử dụng được cho rất nhiều trường hợp + rất nhiều ứng dụng… Thầy thật quá có ích cho những sinh viên như chúng em… Cám ơn thầy….
Em theo dõi từng bài trong website của thầy, rất chi tiết và thiết thực.
Rất cảm ơn thầy vì những bài viết này và mong thầy sẽ tiếp tục viết thêm nhiều bài viết nữa ạ !
Thây hướng dẫn sử dụng php giúp em với nhé ! Thank thầy !
Nếu em muốn gửi nhiều hơn 1000 device trong 1 lần thì như thế nào Anh? Anh có thể cho em biết giá của google được không? Em cám ơn Anh
Cảm ơn bài hướng dẫn rất chi tiết, tỉ mỉ của thầy rất nhiều.
Bạn cho mình hỏi bạn đã làm thành công chưa với ?
Mình làm theo hướng dẫn của thầy nhưng sau khi mình nhập 1 đoạn văn bản tượng trưng vào txtThongBao rồi ấn btnGuiThongBao nhưng ở dưới ô txtKetQua lại không có bất cứ cái gì trả về hoặc hiện ra …
thầy cho e hỏi sao e vào trang somee.com lại ko order hosting free !
[…] Ở bài tập 50 Tui cũng đã hướng dẫn dùng Google Project với bài Google Cloud Message, bạn có thể tự xem lại cách tạo Project (Nhớ xem lại nếu chưa biết tạo sử dụng, ở đây Tui mặc định bạn đã biết vì Tui đã hướng dẫn chi tiết trong bài 50 – Do đó nếu không thấy màn hình dưới đây tức là bạn chưa học bài tập 50). […]
Kính gửi Thầy.
Em có làm thử ứng dụng theo hướng dẫn của thầy. Tuy nhiên, khi thực hiện thì không lấy được regId (regId=null). Em có build và chạy thử trên điện thoại nhưng cũng không được.
Kính mong thầy cho em xin project của Thầy để em test thử (project android client). Em có tải theo link của thầy nhưng file đã xóa.
Email: mtr.quang@gmail.com
Trân trọng cảm ơn!
Hi Em, Tui đã kiểm tra và thấy vẫn còn tải được project (em đợi khoảng 30s nó refresh lại)
bạn có thể viết thêm server Desktop application thêm được không
[…] https://duythanhcse.wordpress.com/2014/10/30/bai-50-cach-su-dung-google-cloud-message-trong-android/ […]
Thầy cho e hỏi cái lỗi System.Net.WebException: The remote server returned an error: (401) Unauthorized.\r\n at System.Net.HttpWebRequest.GetResponse() thì fix
như thế nào ạ? Em đã search Google và thử đủ mọi cách để fix như:
1. Vô IIS manager -> Application Pools -> Identity -> Local System cho DefaultAppPool
2. Vô IIS manager -> Allow “Anonymous User” cho .NET Authorization Rules và Authentication
3. Cấp quyền permission:
a. Click chuột phải vô folder chứa webservices và form -> Properties
b. Security tab
c. Thêm account “Network Service” với check “Modify”, “Read”, và “Write”.
=> em đã làm đủ mọi cách như vẫn báo lỗi ở trên. Nhờ thầy hướng dẫn giúp e ạ! Em cám ơn!
Hi em. Lỗi đó là do trên Google đổi cơ chế. em có thể search FCM
Dạ em hiểu rồi thầy! Cám ơn thầy vì đã chia sẻ kiến thức cho tụi em. Chúc thầy luôn hạnh phúc và thành công 😀
[…] bài Bài 50: Cách sử dụng Google Cloud Message trong Android Tui đã hướng dẫn rất chi tiết về Google Cloud Message(GCM). Hiện nay Google đã ra […]
[…] bài Bài 50: Cách sử dụng Google Cloud Message trong Android Tui đã hướng dẫn rất chi tiết về Google Cloud Message(GCM). Hiện nay Google đã ra […]
Thầy ơi cho em hỏi ý này.
+ Em muốn Push Notify cho từng User.
+ User này đăng nhập vào App Android thông qua một Web Login mà em đã viết sẵn.
+ Vậy khi có thông tin mới của từng User này em Push cho từng User được không thầy.
+ Đừng la em thầy nhé hiihi
Hi em
Được em nhé, lúc user đăng nhập vào App client, em lấy token theo user , lưu token theo user lên server ==> tự AdMIN em lọc ra chọn theo User thôi em nhé
Chúng tôi xin gới thiệu chúng tôi chuyên xây nhà Việc tiếp theo chính là lập dự toán chi phí xây
dựng nhà ở để xác định nguồn vốn tài chính
mà gia chủ mang đi đầu tư..… có sự lựa chọn tối ưu nhất theo
tiêu chuẩn xây dựng nhà ở của bộ xây dựng
Công ty xây dựng Thương tín Bước thứ 3 cũng
là bước cuối cùng trong trình tự xây nhà là
thi công và hoàn công. Hầu hết việc này được giao cho đơn vị
nhà thầu hoàn tất…… Thành phố nha trang
những lời nói xuôi tai và chắc như đinh đóng cột
nhưng sau đó là khiến bạn mất thời gian và tiền bạc do thiếu tính minh bạch và rõ ràng ngay từ lúc ký kết.,.… công
ty tư vấn thiết kế xây dựng